This Sushi Tray costume was worn by my eldest son. My son loves to draw and one of his favorite subjects to draw is food. Not just ordinary food but food beings. He gives these culinary creatures a face, arms and legs and has them doing various activities, like dancing, running, and playing.
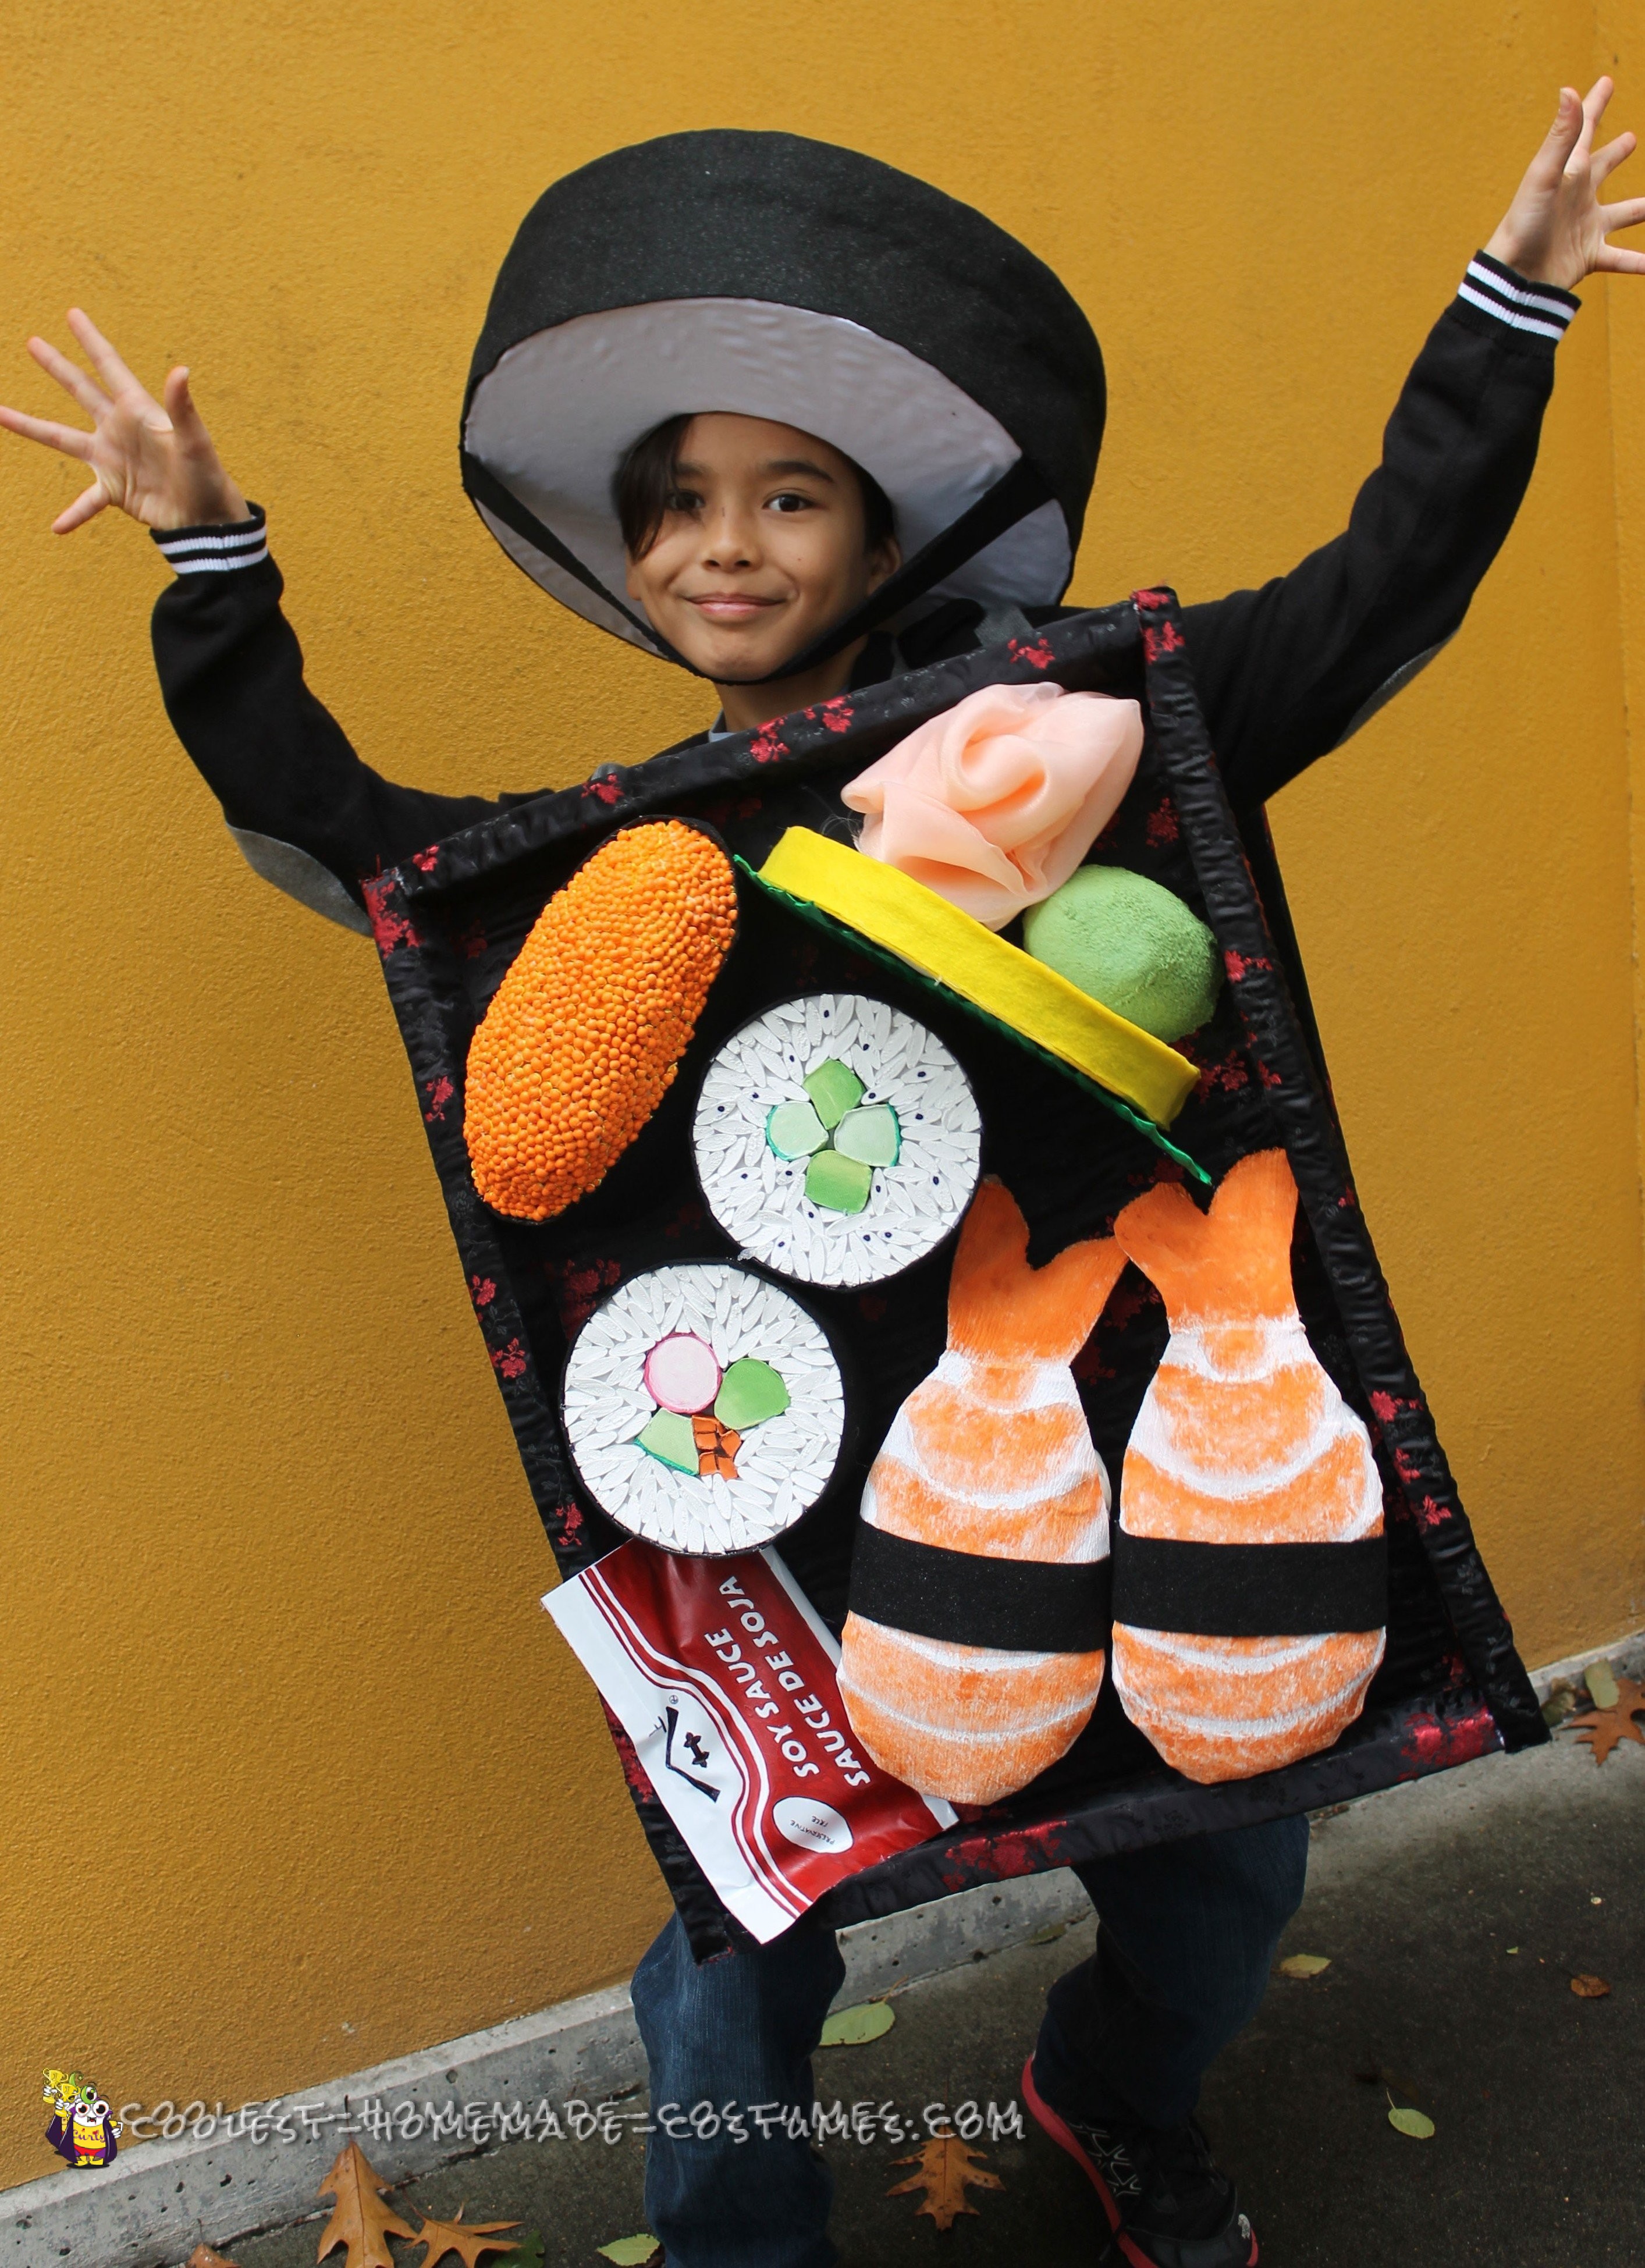
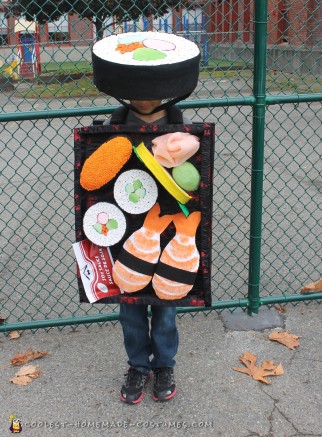
While we were brainstorming costumes for Halloween, the idea of him being a piece of food quickly surfaced. After tossing around the idea for a while we finally settled on sushi (a hamburger was a close second but I was worried about lack of mobility in such a bulky costume). I wanted to try something I had never seen before so I decided a tray of sushi would be fun to make (rather than a single sushi roll) and has a lot of interesting details.
So, the materials I used were primarily foam, fabric, Model Magic and paint (with some elastic and D rings thrown in for good measure).
I started with a rectangular piece of foam that was long enough to cover his torso (but not so long as to make stairs difficult) and not so wide as to make grabbing candy from a bowl an impossibility. I also cut out a piece of cardboard of equal size and hot glued it to the foam to give a bit more support for the base of the costume.
Next, I hot glued a piece of fabric with a black and red Asian design (to match the trays at the grocery stores) to the foam on all sides. Using foam I cut small strips covered in the same way to act as the edge of the tray (also attached with hot glue).
Then, I created the soy sauce packet using a white vinyl fabric that I painted with a design. I then placed a single piece of bubble wrap inside —gluing flat the outside edges so it would look realistic.
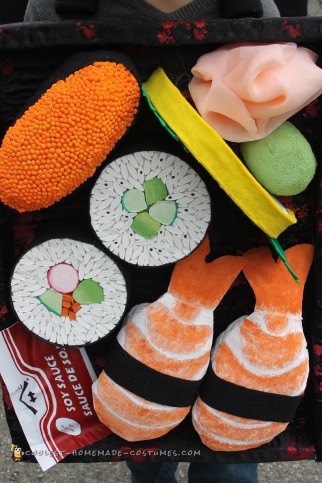
I was concerned that the weight of the tray could easily get too heavy to be comfortable so I looked for light weight options wherever I could find them. For the rice and tobiko (fish eggs) on the sushi I used Model Magic and rolled them by hand. I realize this sounds crazy— and it was—however, there were no lightweight options so a mom had to do what a mom had to do.
For consistency for the rice I measured ¼ tsp of Model Magic for each “grain” before rolling. Once the rice dried for 48 hours I cut them in half lengthwise as a sushi roll might be cut when prepared.
When constructing the sushi I started with a piece of thin white foam paper which I cut into a circle (one for the bottom and the top of each piece). I then glued a piece of black felt—with sparkles—to give the shine of a seaweed wrapper—around the edge of the bottom foam circle. To give the piece structure I added bubble wrap to the center.
To make the sushi filling I used thin pieces of foam covered with the rough side of the white vinyl fabric which were then painted to look like avocado, crab, etc.—these were attached to the center of the circular white foam pieces. I glued each piece of rice on to fit around the “fillings” then attached this finished piece to the top edge of the seaweed wrapper.
The tobiko sushi was made in the same way just using an oval bottom rather than a circle. Also—to get the top to dome I cut an oval larger than the bottom one (by about an inch on all sides) then notched it with about 12 one inch triangles around the outside then glued those edges together to create an arching shape. I painted the tobiko with orange acrylic paint to get a color that looked right.
The shrimp was made in a similar way to the top piece of foam for the the tobiko sushi. I drew out a simple shrimp shape then notched the top part and glued it so it would dome up a bit. I covered it with peach fabric which I then painted it with acrylic paint to get a more realistic look.
On the bottom of the shrimp I created small rounded rectangles from foam then covered them with the left over rough side of the vinyl fabric. I hand rolled the rice again but this time I laid the grains on wax paper and gently smooshed them a bit (with another piece of wax paper) to create the look that hand patted rice would have. These were then glued on to the fabric rectangles which held the shrimp up.
To finish the look I added a seaweed band to the outside of the shrimp sushi.
The dollop of wasabi was made from a piece of foam that I shaped with scissors then covered with fleece which was painted to give a better color and to hide the seams of the fabric. The ginger was made from a piece of fabric that was folded then twisted on itself to imitate the look of sliced ginger. Where the fabric met itself I glued those pieces together with hot glue so it wouldn’t unwind.
To create the fake grass I used a very large thin piece of foam paper which I sketched the grass design onto. I covered this with fabric which was glued on in a pattern of lines (which mimicked the look of the fake grass). Once it was cool I went over the glue lines with a permanent green marker to accent the design.
The lemon was created from foam covered with a light yellow fabric for the flesh of the fruit and a thick yellow felt for the rind. I also painted the white lines of the lemon to give a more realistic look.
The sushi hat was made in a similar way as the sushi except the rice pieces were made using measurement of one tsp of Model Magic vs 1/4tsp. The structure for the sushi hat was all made of foam—hallowed out in the middle to fit the head comfortably. I also covered the bottom and inside in a soft white fabric to make it comfortable to wear and attached a strap of elastic covered in fabric so the sushi hat wouldn’t easily fall off.
To finish the look I made a simple back side of the tray using foam, cardboard and fabric and connected the front and back pieces together using a wide piece of elastic–sewn on and then reinforced with glue (to the front piece) and attached to the back using D rings. I also made padded pieces (that rested on the shoulders) so the sushi costume would be comfort to wear.
Lastly, because we were expecting heavy rain in our part of the country I painted all of the Model Magic pieces with a matte acrylic medium for protection. We did get rain and the costume held up great.
The Sushi Tray costume took about 40 hours to create and cost about 75 dollars to make but the joy it brought my child was truly priceless. We went trick or treating in a merchant sponsored area where he received so much attention and appreciation.
One woman, who owned a restaurant, was so enthusiastic that she ushered us to her business— excitedly staying with us as we trick or treated so that we wouldn’t, by accident, miss her place.
My son had so much fun and I was over the moon seeing the constant smile on his face.
Thanks for letting us share our Halloween happiness with you.

Related costumes:
 Cutest Toddler Sushi Costume
 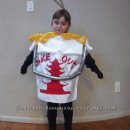 Amazing Children’s Sushi Roll and Chinese Take Out Box Halloween Costumes
  Coolest Homemade Play on Sushi Costume – Dragon Roll and Rainbow Roll
  Cool Sushi Costume – 100% Homemade!
  Coolest Sushi Family Costume
 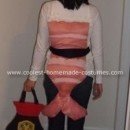 Coolest Homemade Sushi Couple Costume
  Coolest Homemade Shrimp Nigiri Sushi Roll Creative Halloween Costume
 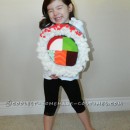 Coolest Sushi Roll Costume for Kids!