
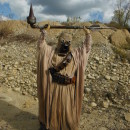
A few months ago, my seven year old son decided that he wanted a Tusken Raider costume for Halloween this year. As a huge Star Wars fan, I naturally obliged. My love for the movies have inspired him over the years and his desire to dress in character inspire my work. In the end, its all about love.
This was a fun costume to build, offering a variety of materials, textures and techniques – and who doesn’t love the smell of leather.
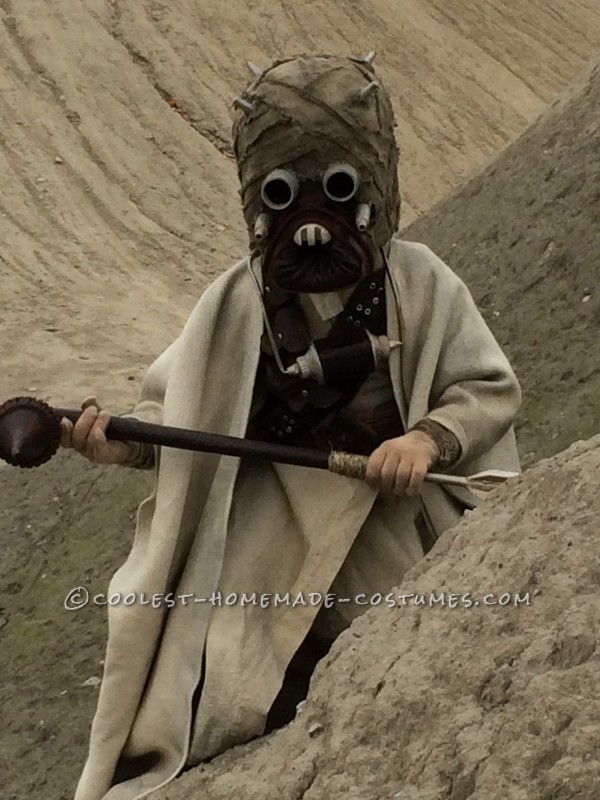
I wanted to enhance the costume by photographing it within a desert-like setting. Well, there aren’t too many deserts in Toronto, actually none, but we do have an awesome bike park along the lakeshore. The night before Halloween, we took a trip down to the Sunnyside Bike Park to take some photos. The weather was overcast (followed by rain all day on Halloween) but it worked out for the best. The dirt ramps and hills along with grey skies captured a vintage 1970’s Star Wars quality. I was really happy with the result.
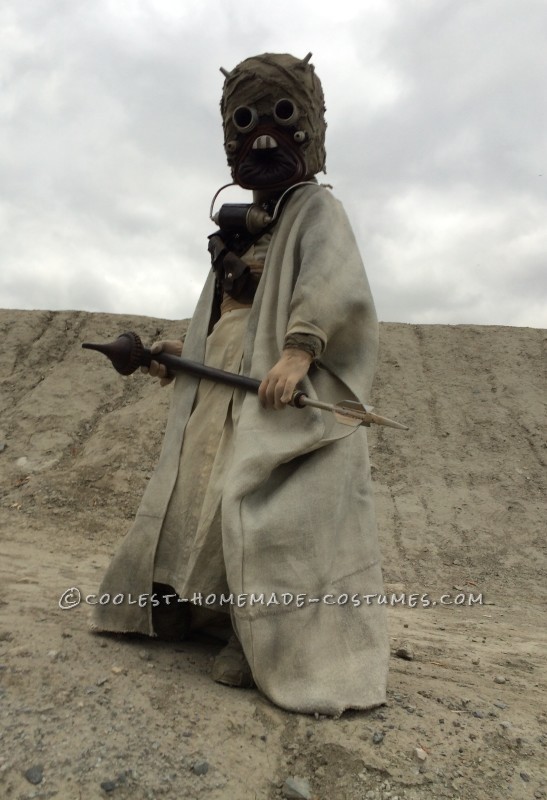
Standing lookout on the ridge

HEAD
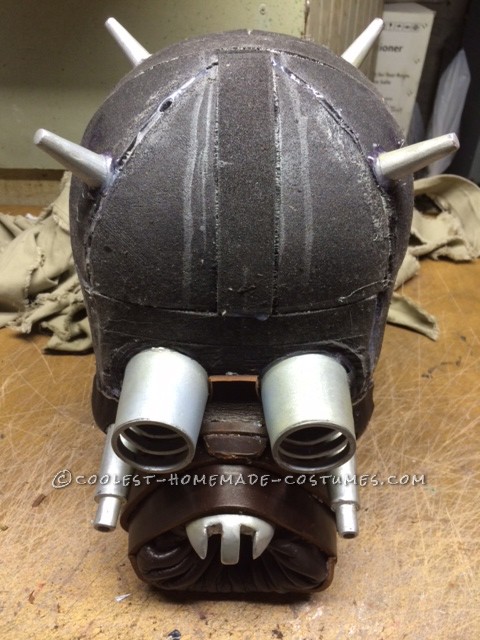
The head shell was constructed using 0.5″ plastazote foam. The initial form underwent several tweaks before I arrived at a size and shape I was satisfied with.
I started by creating half a sphere comprised of eight wedges. To calculate a sphere, multiply the diameter by pi (3.14) and divide by eight. This will give you the width of each of the eight wedges.
Once sized and cut, I shaped the wedges using a heat gun. The wedges were glued with spray adhesive. A strip was added down the middle to change the shape from sphere to a more oval skull shape.
I then added an extension to create the depth of the head.
The front panel was added and tweaks were made to finalize the shape. Openings for eyes were cut along with the mouth and blood spitter. The muzzle was added and later shortened, lengthened and then shortened again.
Once the rough head was constructed, I did a fitting on my son and realized the head was too tall. I removed 0.5″ from the overall height in order to shrink the head. The eye sockets, spikes and blood spitters were formed using 1/8″ sintra (PVC foamboard). Initially, I temporarily placed the pieces as a mock up and later made changes to position.
Considering a seven year old would be wearing this costume during the night walking up and down stairs of city homes, I modified the eye sockets to try and maximize his vision while still maintaining the look. I shortened the length of the eye stocks and widened the tapering on the end.
The pieces were cleaned, sanded and primed before painting. I sprayed each piece silver, then scuffed with sandpaper once dry. Next, I spritzed each piece with yellow and blue spray paint to create a tarnished look. The final colour application was diluted acrylic paint (burnt sienna) to finalize the look. The pieces were attached using both E-600 adhesive and hot glue.
The teeth were carved from Plastazote foam and covered with three coats of Flexbond before painting. The same painting process was used as other silver components. I then added the soft leather around the inside of the mouth. This was a little tricky until I understood exactly how it was achieved. I started with a length of leather (remember, its a kids costume, so the dimensions are smaller) that was longer than it was wide. Starting at the top of the snout, I glued the edge down and started creating pleats by folding the leather onto itself. Using hot glue, I glued down the pleats, or folds, and continued on around the opening.
The teeth were glued on top of the muzzle/snout, extending slightly over the edge.
Next, I added the leather strips around the snout. I bought a single
piece of cowhide that was a uniform length which didn’t allow any flexibility with sizing of each strip. Once again, since it’s a child’s costume, I was able to vary the size by starting with the fixed size and cutting some off. The leather was wrapped around the mouth using hot glue and layed according to reference photos.
Next, the piece of leather was added between the eyes, followed by the same leather used inside the mouth to fill the small gaps between the blood spitters and eye sockets.
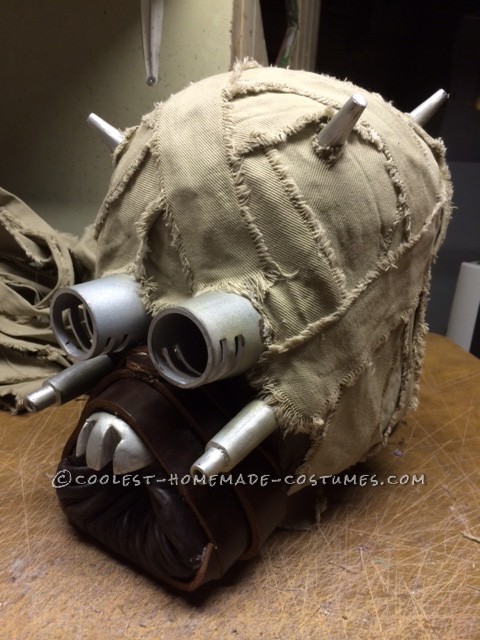
I used a khaki coloured fabric for the head bandages. I tore and washed the strips, leaving them to hang dry over night. This gave the strips a natural weathered look.
The strips of fabric were applied using hot glue and were systematically applied in a random type fashion – makes sense?
Next, the head needed to be weathered and the color needed to shift towards a darker, more olive tone seen in Star Wars Episode 4. I lightly sprayed the finished head with black spray paint before applying chalk pastel. I layered a mix of earth green, charcoal and Terra Cotta. I then smudged the chalk into the fabric grain. I may seal the head with a matte fixative spray but will have to test it first. I don’t want any type of sheen on the surface.
Raw build with details in place
Bandaged head before weathering
BOOTS
I purchased a cheap pair of girl’s boots for the costume as I wanted something long and that fit snug around the leg. The boots were then treated and weathered in the same fashion as the head. I hot glued the strips around the boot – leaving the sole bare, and weathered with the same color combination of chalk pastel.
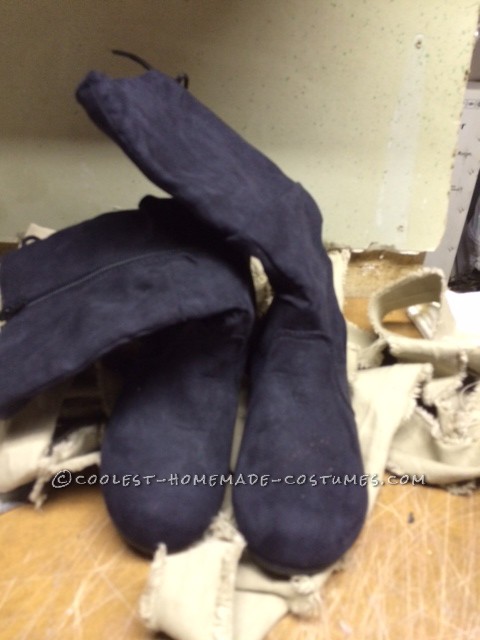
Original boots
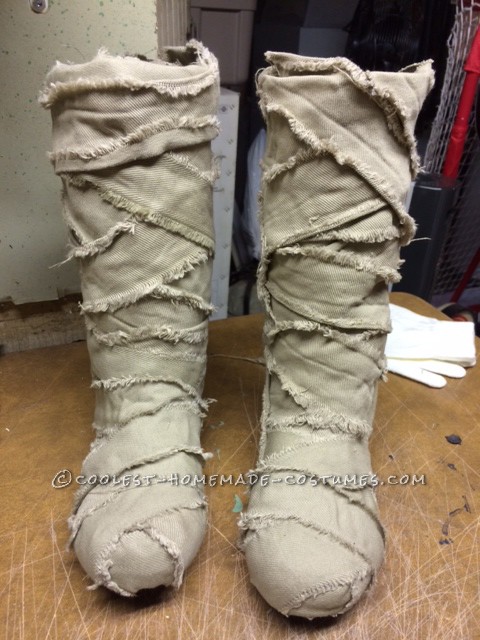
FInished wrapped boots
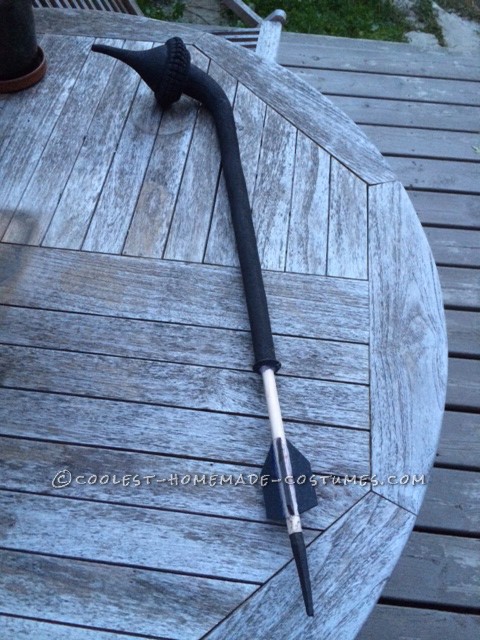
Gaffi Stick
Using a photo reference I found which I believe to be a Gaffi used in the movie, I created a paper template of the design. I read that the Gaffi is 34″ in length, so I scaled the size down a bit to be more suitable for my son.
The head and shaft were carved out of Plastazote foam, sanded with a Dremel and by hand.
A steel bar was added between the shaft to keep the foam from bending. I then attached the head to the shaft using hot glue and a piece of dowel for strength.
I added another piece of dowel to the end of the carved shaft to act as the steel extension on the Gaffi. The fins were created with sintra and the sharpened tip was carved out of Plastazote foam for safety reasons. Seven year old boys and sharp weapons are potentially hazardous.
Once finished, I coated the Gaffi with Flexbond before painting.
I painted the Gaffi with acrylic paint and silver spray paint. I weathered the “metal” shaft and tip much like the Tusken head components.
BANDOLIERS
I created two bandoliers for the costume and were a mix of what we see in the movie. I chose to create the WW1 Ottoman Empire Turkish bandolier and the P-1903 bandolier.
Bandolier 1
I based the Ottoman off of an auction image I found which claimed to be the one worn by Peter Diamon in Episode IV. It had 16 pouches but I decided to go with eight as my son would be wearing an outer robe.
I created a template design loosely based on the photo. I changed the metal details from bronze to zinc.
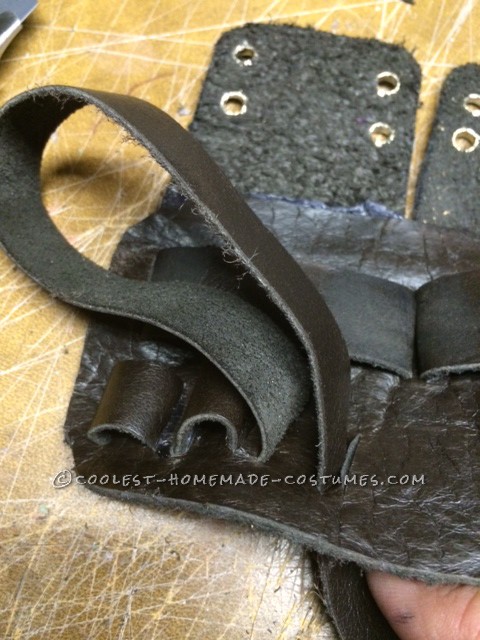
I found nice sized leather scraps from a local fabric store that were $1 a piece. I bought five pieces and had some leftover.
Started by cutting out the basic bandolier main strap. I then cut the pouch flaps and lops that would be glued to the front and back of the main strap. I added the small eyelets to each flap before gluing to the back of the bandolier. (Note: I found that hot glue worked well provided you glue each piece on the raw unfinished side of the leather) The loops were added by cutting a slit in the leather and gluing from the inside backing.
Once that was complete, I added the bullet loops. I cut a long strip of leather and wove it through the bandolier, cutting slits and pulling the leather through. The loops were glued on the inside.
I planned to use working snaps but decided to go with rapid rivets due to cost. Same aesthetic without functioning. I also riveted a buckle to each bandolier.
I weathered the bandolier using sandpaper, chalk pastel and acetone. I also bent and glued a couple of flaps over, and knocked out an eyelet to give it more authenticity.
Bandolier 2
Next I created the P-1903 bandolier. I found a template for the pouches online and then made a couple of modifications. I widened the bottom of the pouch slightly, and redrew it to be symmetrical, it appeared to be off a bit. I also had to shrink it in order to be proportionate to my son.
Again, I made the main front plate before cutting the pouch templates. In both bandoliers, I doubled up my leather to give it more substance.
In this case, I used rivets to attach the folded pouches to the bandolier. Four rivets were used and penetrated the pouch and strap at once. Rapid rivets were used instead of the Sam Brown buttons (budget).
One strap was riveted to the front main strap while the other was a continuous piece extending from the main strap.
A buckle was added for fastening.
I weathered this bandolier in the same manner as the Ottoman.
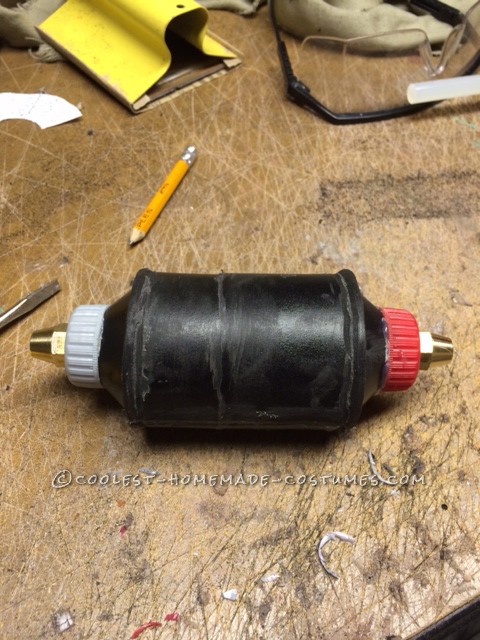
RESPIRATOR / MOISTURE TRAP
I created his respirator based on some of the tips found on some of the websites. However, I built the cylinder from scratch using sintra. I also build the tapered end caps. Water valve fittings were used and a couple of 2L pop bottle caps to finish off the design.
Once built, I used Bondo glazing putty to fill areas before priming.
A piece of leather was wrapped around the cylinder after all of the painting and weathering was complete.
The neck loop was created using a hollow aluminum tube purchased at a hobby store. It does crimp if you bend it drastically, but if you take your time, you can get the desired curves. It’s lightweight and cheap. I hot glued the loop into each end of the water valve fittings.
ROBES, GLOVES & BELT
Robes
I’m not much of a sewer and was fortunate to have a co-worker sew the Tusken robes for me based on measurements and specifications supplied. A big thanks goes out to Kris for his help on this project. The inner robe was made from muslin, and the outer robe from a much thicker, heavier fabric. I can’t remember the exact name but it was listed as drapery. It has a nice weave and base color. It was also the end of a roll and I got a good price on it.
Once I received the finished robes, I had to trim the outer robe along the bottom and then weather. I kept it simple and only used black and gray spray paint and a spray bottle filled with tea. I dusted the robes with spray paint, focusing on high traffic areas. I then spritzed the robes with tea concentrating on the bottom, neckline, cuffs etc.
Belt
The belt was made from muslin. I started with a sewn rectangle panel made to the right circumference, then punched six large eyelets into the belt, three per side. My son actually attached the eyelets. : ) Once finished, I tea-dyed the belt and rinsed any excess tea from the fabric. I then pinched and creased the fabric until the pleaded look was created. I then added some diluted acrylic (which helps stiffen the fabric) and left it to dry. Once dry, the belt resembled what we see in episode IV. Some light black paint and a little chalk pastel were added for effect. I used a piece of rope to tie the belt from the back.
Gloves
I used a pair of kids gloves from the dollar store which I then dyed with tea. The color came out a little strong for my liking, so I sprayed them heavily with black after final photos were taken. I hot glued strips of fabric – again using the same technique as the head and boots, to the gloves in order to hide any skin showing.

Related costumes:
 Tusken Raider (aka Sand Person) from Star Wars Costume
  The Force Awakens Family Star Wars Homemade Costumes
  Despicable Star Wars: Return of the Minions Group Costume
 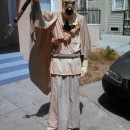 Cool Hand-Sewn Star Wars Tusken Raider Costume
  Luke Skywalker Costume: Jedi Training with Master Yoda
  Coolest Lego Boba Fett Costume
  Coolest Homemade Jawa Costume Ideas
  Coolest Ever Driving R2D2 Halloween Costume
Your comment has been sent successfully.