My son is now 3 and has been a Thomas fan since he stole our neighbour’s Thomas Train at 10 months old! So I had to make a Thomas the Tank Engine costume for him.
Making Thomas the Tank Engine Costume
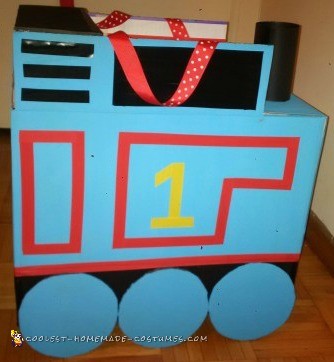
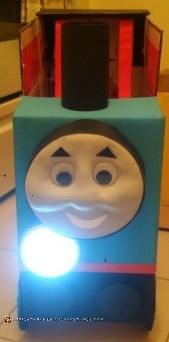
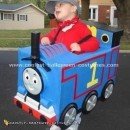
We used a diaper box. He helped paint it blue on the middle and top flaps and black on the bottom flap. I turned the box inside out and hot glue gunned it closed so the print on the box wouldn’t show through. I cut down the long flaps the same length as the side flaps for the front and just hot glued and taped a rectangle piece of cardboard painted black for the coal area at the back. Just make sure there’s still plenty of room for your child in the middle!
I used black electrical wire tape between the colours to clean up the line, then red electrical tape for the lines. I ran out of tape to do the half circle, but my suggestion is to neatly cover a piece of paper in the red electrical tape and then trace the right size of bowls to make the half cirle and then cut it out and glue it to the box. For the wheels, I used this stuff that was like two pieces of Bristol board with black thin foam in between, but you could just used cardboard from another box.
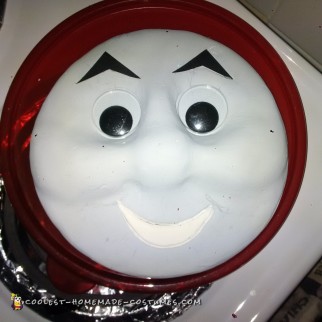
Paint them blue as well Yellow electrical tape was perfect for the number 1. The face was my biggest challenge and I spent many sleepless nights over it. I ended up cutting 2 circles out of bristol board and a 2″ strip of bristol board, the same diameter. I used masking tape to attach the strip around one circle’s diameter.
On the other circle, I used Model Magic by Crayola in white. One package is enough for the face but I bought 2 and experimented. The 1st time I used scrunched paper to make the fave 3D but it was bumpy and ended up looking like the mask from the movie ‘Saw’, not like our loving Thomas.
Nose
I rolled a ball for the nose tip, a snake/cylinder or the bridge and a 2 tear drops curved for the cheeks.
Eyes
Then I rolled out a ball, 1/4 ” thick and bigger than the circle and draped it over the pieces I had molded for the face to be 3D. I gently pressed in the biggest googly eyes I could find at the dollar store into the eye sockets and very gently pressed out the face. I used another bigger bowl centered over the face to cut away any extra Model Magic by Crayola.
Eyebrows
Then, I cut out eyebrows from the black bristol board. My son is more of a perfectionist then I am and didn’t like them because he said they made Thomas look angry! So I just cut out triangles that were smaller than the googly eyes and they worked perfectly :) I didn’t wait long enough for it to dry, so when I painted it, it cracked.
And I would wait 48 hours before you paint because the shapes used to make it 3D are thick! I hot glued the eye brows after I painted the face grey.
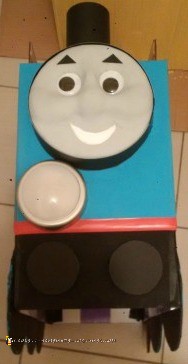
Attaching the Face to the Thomas the Tank Engine Costume
Now came the hard part, attaching the face. I needed something light enough to put in the other circle. So the face rested on top on the 2 ” strip. I ended up cutting another bristol board strip 1 7/8″ inches, rolling into a loose spiral and taping it onto the bottom and using 2 sticks of hot glue on the back of the circle the face was on and gently pushing down. And then gluing the bottom circle to the box.
After I was done and my son wore it for 5 minutes, Thomas’ face fell off!!! “Mama! Thomas has a BIG boo boo!” I ended up putting the face back on and hot gluing the diameter to the inside of the bristol board. It didn’t look as neat but did the trick….What I should have done was a bit of searching on-line because someone had the great idea of using a round dollar store box, painting it black, gluing the bottom to the cardboard box and making the face on the lid and taping it closed to the box! Genius!
I used more bristol board cut in circles for the two buffers in the front. Another rolled up piece of black bristol board for the funnel. I made the straps out of thick red ribbon. Then crossed them to help distribute the weight better since t front is heavier with the face.
Thomas the Tank Engine Costume Finishing Touches
Finally, I got a battery operated push light, put batteries in it and covered the back in hot glue. Ta da! Best costume I’ve ever made! And I bought a clear plastic huge garbage bag to put over it in case it rains, I wouldn’t want the rain to destroy my hard work!!!
I spent about $20 on 1 piece of black foam board, 2 black bristol boards, 1 each of blue and black paint, a 3 pack or different coloured electrical tape, black electrical tape, 1 package of giant googly eyes, paint tray, rollers, sponge brushes and glue gun and 2 packs of glue sticks for it- all from Dollerama.
And then 2 packages (but you only need one in total for the face) cost me $5.99 each at Toys r Us. It took me probably 5 hours total spread over 2 weeks to make this Thomas the Tank Engine costume. While trying to fight my son for the box so I could work on it. And dealing with my 15 month old daughter who my son calls “Trouble”, which fits her perfectly :)

Related costumes:
 65+ Coolest Homemade Thomas the Train Halloween Costume Ideas
 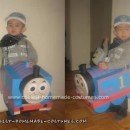 Coolest Homemade Thomas The Tank Engine Costume
  Original Kids Thomas the Tank Engine Homemade Halloween Costume
 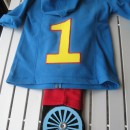 Easy Thomas the Tank Engine Toddler Costume
 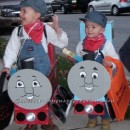 My Boys in Thomas and James Trains Homemade Halloween Costumes
 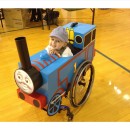 Rolling Thomas the Tank Engine Wheelchair Costume
 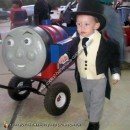 Coolest Thomas the Tank Engine and Sir Topham Hatt Costume
 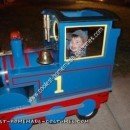 Cool Homemade Thomas the Tank Engine Halloween Costume
Your comment has been sent successfully.