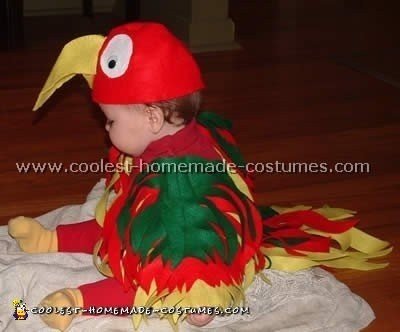
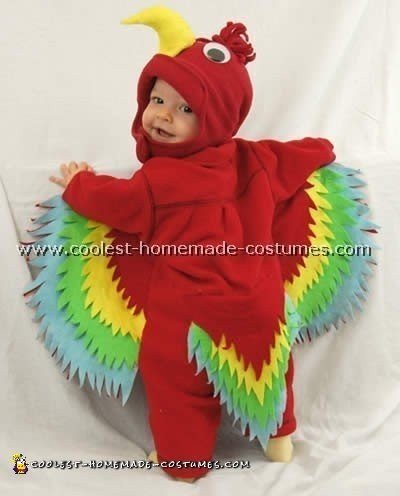
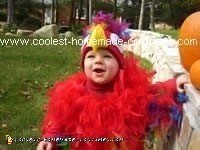
I got the idea for a parrot costume from other parrot costumes on this page. My baby eats everything within reach, so (although it was adorable!) using real feathers from a feather boa was not an option. I started by buying three colors of felt for the feathers, red, green and yellow along with a small amount of white felt for eyes and a pair of small craft googly eyes.
After eyeing up the baby and getting an idea of size I cut the general shape of both the tail section (a teardrop with a point at the bottom) and the wing sections from the felt. In both the tail and the wings the bottom layer (yellow) was bigger than the middle layer (red) which was bigger than the top layer (green).
Making the Feathers
After the general shape was cut, I cut feathers into the shape leaving a solid/uncut section in the center. After the feathers were cut into the wings and tail I sewed them on to a plain red onesie. The wings were sewed to the top side of the shoulder and upper arm of the onesie and the tail obviously on the back/butt.
Then on to the head I sewed a simple red cap from the felt then constructed a beak from yellow felt and sewed that on to the cap. This was trial and error- sorry- no brilliant instructions. Finally I hot glued two white felt circles to either side of the cap for eyes and glued the googlies to the white felt. This was Maddie’s first Halloween and I think she looked brilliant!
Total Spent: $10
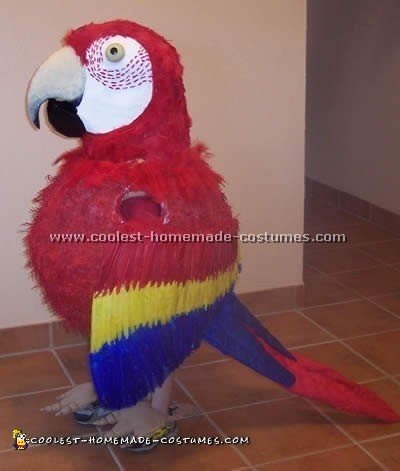
Awesome Scarlet Macaw
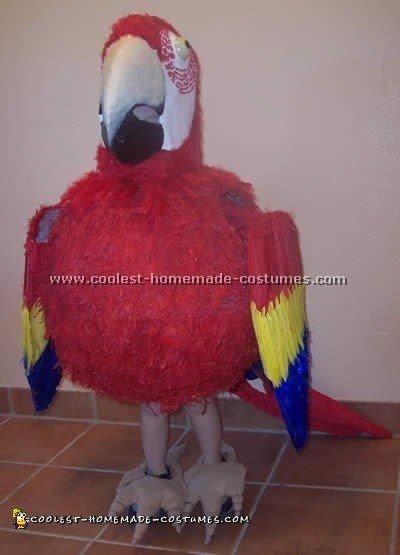
Parrot costume by Candice P., Brackettville, TX
For this Scarlet Macaw parrot costume, I used:
- chicken wire
- masking tape
- hot glue gun and sticks
- heavy duty cardboard
- newspapers
- flour and water for paper mache
- red and black spray paint
- craft paint in colors appropriate for eyes
- face paint for touch up
- “cutting in” large drafting paper or butcher paper or equivalent for drawing patterns
- light brown or gray felt light-weight batting
- two yards cotton material in blue
- one yard cotton material in yellow
- three yards red cotton material
- red thread
- heavy gauge craft wire
- two large “bubble gum machine” container bottoms ( both must be same size)
- red pipe cleaners and about six other ones of any color
- several packages of rainbow craft feathers (mostly red or blue)
- heavy duty hand stapler
- wire snips or cutters scissors
- needle-nosed pliers
- box cutter knife
- sewing machine
- sewing pins
- two screws about an inch long
- small plastic butter bowl or yogurt cup (or something else equivalent in flexibility)
- one large Halloween pumpkin pinata (or other large spherical pinata)
- and lots of patience!
Before starting this parrot costume you must consider that this particular costume is quite complex and should only be attempted by those with patience and who work well with their hands and have some experience with a sewing machine. Though this only took one week to complete it was challenging and very complex!
Macaw Costume Inspiration
I got the idea for this costume from my four year old son. He asked me to make him a macaw with a red belly and rainbow feathers. He got the idea from watching ‘Go Diego Go’! So he put me up to the challenge so I did my best to make him the neatest Macaw costume I could!
Making the Macaw
This is how the parrot costume was done: I started by determining how big I needed the head to be. Then I got a piece of cardboard and drew the shape of a parrot head on it ( If you look at one of the pictures of the making of the costume you will see a piece of cardboard on the floor with the shape that I cut out and used). I then had two pieces cut for the head. Then I drew two curved pieces for the bottom of the beak, two for the top then cut out taped the top together to make the top of the beak.
For the Beak
I worked the cardboard so that I got the top of the beak nice and rounded like a real beak. I followed the same routine with the bottoms pieces of the beak. Then I put them aside to work on the head pieces.
I took the two pieces and then tried to form them into the neck. I ended up with a flap from each side and then bent them in and glued together with the hot glue and then secured the glued flaps with staples. Then I taped with masking tape when it was mostly dry. It closes up the neck in the front and it should look like a “U” when viewed from the top.
Now I tried fitting my two beak pieces in while cutting small slivers of cardboard off of the top of the head to make fit and reach my desired shape. When the beak pieces are in place, glue and tape with in place with masking tape (be prepared to use a lot of masking tape throughout this costume construction).
Shaping the Head
After that I took the chicken wire and cut small strips that were about six inches long and about four or so inches wide and fit them into the empty top of the parrot head. I took the ends of the cut wire and bent it in only about a half inch to one inch to keep them from poking. After that completely tape all along the cut and bent wire edges to prevent injuries. Also the tape aids in the installation of the chicken wire.
I worked with the wire; bending and shaping until I got it just right. I then placed the wire in the gap at the top of the head and then glued into place gluing onto the masking tape that I used to safety line the raw jagged edges of the cut wire.
After you have shaped and attached all of your chicken wire and you are done shaping the top of the head and back of neck then use masking tape to tape down any bumpy or harsh edges left behind from cardboard.
For instance where the cardboard meets the chicken wire there is a large bump between the cardboard where it drops down to chicken wire. Smooth this out with the tape. Repeat anywhere else needed.
Paper Mache the Head
After you are satisfied with the current appearance of the parrot costume then apply one layer of paper mache over the entire exterior of the head, beak and all. Paper mache requires half water and half flour mixture with a little bit of salt to prevent mold. The consistency should be soupy but not watery. Not quite like gravy but a little thicker than a consistency like tomato soup.
While letting that dry take your two “gumball machine container bottoms and paint them with the paint colors that you have chosen for the eyes. You may need to gently buff the containers with sandpaper or prime them with a primer so that paint will adhere to the surface.
Putting on the Eyes
After the eyes are painted dried and satisfactory glue those into place after you have marked where the eyes will be making sure that they are symmetrical with each other. Using hot glue in a ring to fit the bottom edges of the containers attach the eyes and hold in place to prevent sliding.
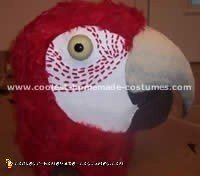
After they are both securely dried then apply another layer of paper mache all over the head. Around the eyes cover them just a little around the first few millimeters of the edge where they are attached to the head. This should make it look like the eyes are in the head rather than just glued on.
After the second layer is dry test it to see if you think it will be durable enough. I only needed two layers to achieve a strong structure for the parrot costume.
Now use the person who will be wearing this parrot costume to see if they can see out of the beak. Make the appropriate adjustments for vision and comfort. I cut small semi-circles for the shoulders on the bottom of mine.
Spray Painting
Then I taped off the areas that were not going to be red. I spray painted let dry then removed the masking. Then I repeated for painting the beak of the parrot costume. After that was dry I hand painted the white face and let dry.
I used red and black craft paint to touch up red feather and beak areas that needed fixing. I painted by hand the beige color on beak. Then I took the red pipe cleaner, trimmed it and then cut several small sections smaller than a half inch.
While using my hot glue gun some tweezers and a photo of a macaw I placed the segments of pipe cleaner in the feather pattern on the white part of the face. This will take several pieces of pipe cleaners.
Putting on the Feathers
Then you can begin gluing the red feathers on the head of the parrot costume starting at the top of the head and then working backward from side to side until you reach the bottom. Glue the feather from the end (the quill end) and leave the end of the feather free so that you can glue the next row underneath the free part of the feather from the previous row.
Continue this pattern of gluing throughout. You are now done with the head. Finish up by detecting any rough pokey spots inside the head that might cause discomfort for the parrot costume wearer.
The Macaw’s Body
The body of the parrot costume is quite simple. I found a nice pumpkin pinata that was perfect for me to use. I left the pinata fringe on, cut holes in the appropriate spots; arms, one head and one hole at bottom wide enough for both legs to walk comfortable with normal steps.
I taped the edges that were cut with masking tape. This prevents the pinata from falling apart. There were several wires inside of the pinata that I had to cut and bend to make wearable. Make sure you do the same in preventing pokes and scratches for the wearer as you had done for the head.
Then spray paint the entire thing with red spray paint. After allowing plenty of time to dry you will need to prepare the body of the parrot costume to attach the tail.
Constructing the Tail
I found a nice strong piece of cardboard for my tail. I cut the cardboard in a large trapezoidal shape. Then I bent the cardboard down the middle so that both sides are equal then worked the card board with my hands to get a slightly curved “V “shape. This will be the base of the tail.
It must be strong and sturdy enough to support the tail feathers that you will soon make and attach to the ends. To get the appropriate size look at the body and hold your cardboard in place to see if there needs to be any changes like trimming to make smaller.
Inside the “pinata” is a wire frame that was used to make its round shape. I used the wire frame inside the body to wire the tail base to by taking three small 4” segments of the craft wire puncturing a hole in the card board tail in the middle at the bend and one on each side about 1” from the edges and wiring each to the body.
By carefully puncturing a small hole in the body that directly corresponds to the spacing of the wires that will penetrate it you will be able to insert the wires. After the wires have successfully been poked through then attach to the nearest wire in the frame by twisting tightly.
Remember that for every wire that you attach and twist there needs to be measures taken to make sure that the wearer does not get injured. Tape those ends with masking tape. After the tail base is attached to the appropriate area of the parrot costume and does not wiggle easily when nudged then you can spray it red.
Making the Wings
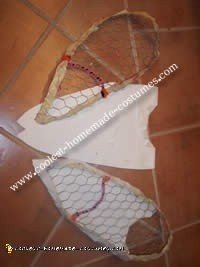
Now take some red feathers and line the top of the body around where the head will meet. Now we are ready for the parrot costume wings. According to the pictures that I have included there are two long triangular shapes that look like arrow heads made out of chicken wire. Those will be part of the wings that the wearer’s arms go into.
I took some poster board type cardboard and cut a triangular shape. I made another one exactly like it. Then I cut two pieces of chicken wire in the same shape. Notice how there is pipe cleaners wired to the chicken wire in the picture? Those will be the “handles” that the wearer will grab to hold onto the wings.
Before attaching the chicken wire to the cardboard tape the ends of the wire like previously on the head. Then shape the chicken wire to be “curvy” over the front. The card board back side will be flat and will be the side that stays against the body while worn.
Attaching the Wings
To attach the wire and the cardboard together I cut small slits all along the sides of the cardboard triangle to make small one inch or smaller tabs that I glued and folded over the wire. Press and hold for a few moments.
Repeat with all the cardboard tabs that you have cut until you return to the opposite side from where you started. Then the top of the card board triangle draw a half circle to mark where you have to cut out a hole for more comfort for the underarm of the user.
I cut tabs like the ones I made for attaching the cardboard to the wire and folded them all in and glued. It made a nice curve to allow the arm to rest comfortably. Now you should be able to stick your arm in grab a hold of the “handles” that you’ve made from your pipe cleaners. Test them out, flap them!
Paper Mache the Arms
Now you are ready to paper mache the entire exterior of the parrot costume arm structures. Make sure you paper a flap over all the edges of the top going into the arm holes to maintain smooth consistency in appearance and comfort.
You will probably need at least two layers of paper Mache to make the arms strong. Allow to dry completely in between layers. When they are dry you will have two pieces that look kind of like two chicken strips. It’s okay if they are not perfect because no one will see them. You will eventually cover them entirely with cloth and feathers.
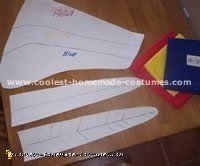
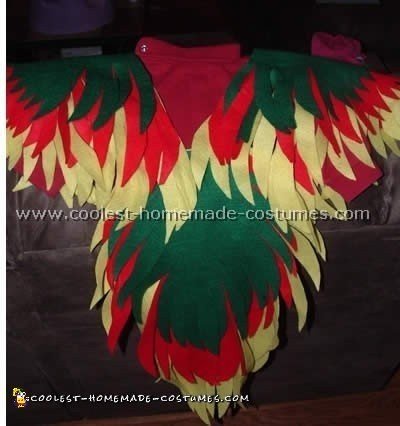
Wing Pattern
Now make a pattern similar to the wing pattern that I have included in my photos. It has the words: red, blue and yellow written on it. When you draw your wings out on your pattern paper make sure you draw the line where the colors are going to change from red to yellow to blue.
Cut red material out of the entire shape of the pattern. You will need four of these, two for each arm mirrored. Then you can cut the pattern so that you have a pattern for the yellow stripe and a pattern for the blue stripe. You will need to cut four of each, the blue and the yellow from the new patterns. Put all of your cut pieces together like a puzzle and pin into place. Make sure you have them pinned so that you don’t accidentally end up with two of the same part of the wing. You will need a left front left back right front right back.
With your sewing machine and red thread stitch all of the colored sections to the larger red wing shape. Repeat for all. Now take the triangle arm pieces that you just made. Position the two stitched front and back of one wing on the front and the back.
Position the material so that they are corresponding with the other side match the edges then position the arm piece toward the wider part of the wing material. Carefully start gluing the material to the arm piece and continue gluing the wing until you have finished gluing all the matched edges together. Now you should be a lot closer to having something that resembles a real wing. Make the other one now.
More Feathers
Once they are both done, start gluing feathers that match the colors of each wing stripe. Completely cover the wing with feathers using hot glue to vertically attach each feather into its appropriate place.
It’s better to start from the bottom blue and then work your way from side to side until you reach the top with red. I used the fuzzy type feathers underneath of the straight long feathers to give it more realistic body and appearance. Repeat with the other wing. Due to lack of feathers I chose not to attempt to apply feathers to the underside of the wing. You may if you choose.
Attaching With Washers
Now attach to the parrot costume body. I used two screws about an inch long to drive through twisting by hand the top corner of each wing on the thin side then drove through the body in the appropriate spot.
Then I took a thin plastic butter dish and cut with the scissors two small round circles about a half-inch wide. I used these as washers to hold the screws in place. On the inside of the body place one plastic “washer” where the center of the screw is poking through the center of the circle.
Press and turn until the screw winds the plastic all the way up and it’s tightly secure. Do the same for the other. Now In the back where the wings come together there is a gap where there is red where there should be blue and yellow feathers. Fill in the triangular gap with feathers continuing the pattern until both wings look like one from the back.
Tail Feather Pattern
Now refer to the tail feather pattern from the picture to draw your own. If you are familiar with making pillows on a sewing machine then this next step will be quite understandable. Take your red material and mark your pattern out. You will need four pieces from that pattern.
Make sure you cut about an inch or more around the marked edges of the feather outline because you will be stitching on the drawn lines. After you have them cut use the pattern to cut two feathers out of batting. Pin the batting to one piece of red feather. Stitch the feather detail lines on the top of the material side of the pinned batting feather.
Pinning and Stitching
Then after that pin what will be that back side of the feather to the opposite side of where the batting is showing. Then stitch the outline of the entire batting of the feather leaving the flat end open. Trim the free edges around the feather that aren’t stitched.
Cutting triangles would be best. When you pull it inside out like a sock you reveal a beautiful feather! Now get some craft wire measure from the tip of the completed feather to the end. Cut a wire that size. Glue the wire with hot glue to the inside of the bottom side of the feather right down the middle.
Repeat for red feather number two. Now take the same pattern for the red feather and make three short blue feathers the same way as the red ones but without the wire unless wire is desired. I made my blue feathers a little less than half as long as the red feathers.
Arrange them in place on the tail base to see how they will need to be glued. I secured mine with staples and hot glue. The wire in the red tail feathers can be bent so bend the feathers and straighten them out as desired.
Parrot Feet
Now we are ready for the feet of the parrot costume. I took the brown felt and drew three toed feet. I cut out four of these. Then I cut out the toe for back of the foot. I needed four pieces. Then I stitched a pillow out of two of each piece and stuffed. I left the ends open.
Then I took wire and measured the ankles of the wearer. I looped the wire not so snugly around the ankle leaving about three to four inches of slack on both ends of the piece of wire sticking straight back.
After measuring I removed from the potential wearer and proceeded to attach the pillow feet that I made to the front of backs of two round “ankle holes” with hot glue making the single toe attach to the four inches of protruding slack on the back of the looped ankle wires.
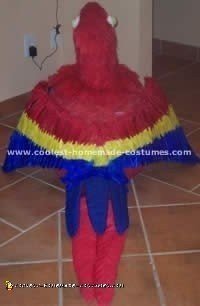
The person’s foot should slip right through the hole and rest on the ankle while regular casual footwear can be worn underneath. I stitched a small piece of elastic to the bottom side of each foot front so that it can be tied to shoe laces keeping the feet from rotating around the ankle as the costume is being worn.
Trying it On
Now dress rehearsal! Try the parrot costume on the subject and try to make more adjustments individual comfort needs. I had to use small strips of foam padding and batting to pad insides for shoulder comfort. Now you should be all done!
This is a very challenging project; but remember, you are not only creating a wonderful costume you are creating beautiful memories that you and your children will remember and cherish for a lifetime! I hope who ever attempts this parrot costume project has as much fun as I did while making it! Good Luck!
Total Spent: $25
Cute and Colorful Parrot Costume
Parrot costume by April H., Tuscaloosa, AL
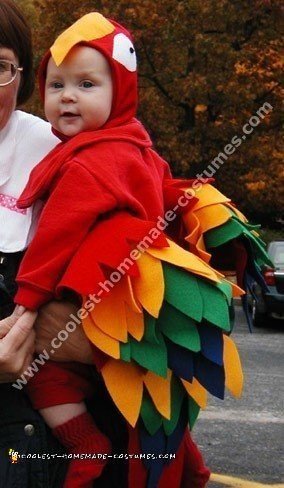
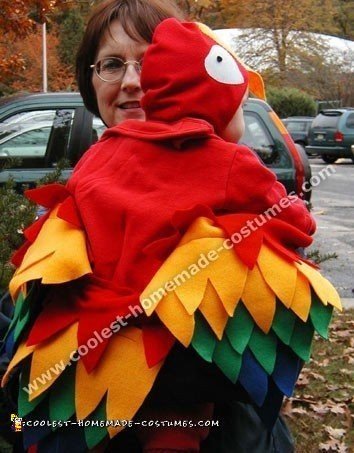
I’ve wanted to dress up like a pirate for years. Now that I have a child I had the perfect excuse! I decided that she would be my parrot so for her parrot costume I first bought a red one piece outfit on EBay. Then I bought coordinating felt in four colors.
Making the Wings
I created a base pattern for the wings. First, I made a blue piece then reversed the pattern for the blue piece of the other wing. I did the same in red for the inside of the wings (I wanted the inside of the wings to match the underbelly).
I then cut off a portion of the top and sides of the pattern to make the next layer – as with the wing bases I reversed the pattern for the other wing. Then for each layer I simply cut off another section of the pattern and continued the process.
For the Tail
I did the same for the tail only it didn’t need reversing since there is only one. Next I created a top layer for the tail in red so it would blend in with the one piece outfit.
Each layer was attached by felt glue. The final tail was top stitched to the outfit. Sewing the wings on was tricky. I opened the bottom of the sleeves along with the sides down to where the wings would stop. The sleeve had to be pinned and sewn first because turning it inside out required stuffing the wing inside the sleeve. I then pinned the sides and sewed them.
The Hat
Next I found a winter hat at a consignment sale. As an added bonus it had stringy pieces on top that worked for the tuft of feathers on the head. I used the leftover yellow felt for the beak. I glued it along the top and bottom leaving about a quarter of an inch for folding.
Next I stuffed it with tissue paper. Then I folded the sides in so there would be felt material to glue to the hat. After it dried I glued the beak to the hat then added goggle eyes.
To complete the parrot costume I put yellow socks on my daughter. I can’t wait until Halloween!
Total Spent: $16

Easy and Adorable DIY Costume
Parrot costume by Nicole Y., Melbourne, Australia
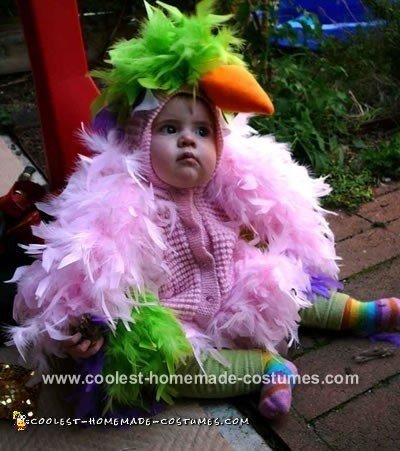
This baby parrot costume was a last minute idea to match the pirate costumes my partner and I wore. It came together quite well and was a hit at the party. The feather boa was purchased at a local craft warehouse along with some cheap felt for the eyes and nose. I selected a knitted jacket matching the color of the boa and a pair of bright colored pants.
As the jacket was still used we only lightly hand stitched the feathers, nose and eyes to protect it yet keep it strong enough should our little one decide to start pulling the feathers off. Fortunately she didn’t even try once; I think she enjoyed the experience as everybody fussed over her at the party.
This design is a just a quick and easy costume to put together that may suit some extremely busy mothers or those with a budget in mind maybe you already have all these materials at home.
Total Spent: $40
Birds of a Feather
Parrot costume by Smitha C.M., Kuwait
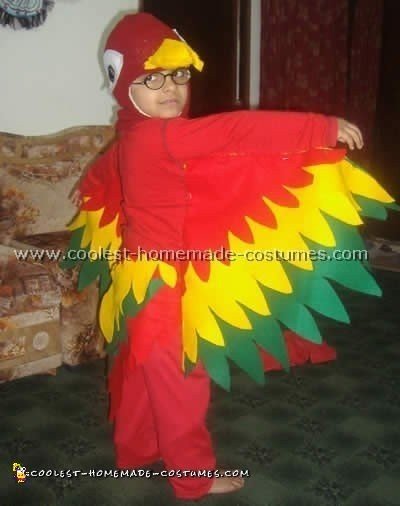
I used felt material of yellow, red and green colors for this parrot costume. Cut them out like feathers and then did similar work for the tail. Sewed the wings on to a sweat shirt and made the tail with a string to tie at the waist.
I used a monkey cap for the head part sewed the eyes onto it and then cut the felt material in the shape of a parrot beak. stuffed it with cotton and then sewed it to the forehead part of the cap. I do not have a photo with the final beak which was appropriate.
Total Spent: $10
Plucky Parrot
Parrot costume by Jill T., Bourne, MA

I dressed my son up in a parrot costume and I went as a pirate! Thanks to this website for the idea. I loved the little chicken costume but I didn’t want him to be a chicken. I wanted to dress up as something that went along with him.
This is how I made the parrot costume that landed us in the newspaper! I bought a onsie from Wal-Mart and a red feather boa. I stitched the boa around the onsie.
Making the Costume
For the body I bought red long sleeve arms. For the tail, I bought a multi-colored boa.
I stitched 3 strips of the colored boa (so if my son was standing the middle piece would hit the floor and the two side pieces were a little shorter so they would just miss the floor) to the butt of the onsie so it hung like a tail. I took two more strips of the colored boa and stitched them to the underside of the arm for the wings.
Then, I covered the entire arm with the colored boa but was way too much. I also stitched a little clump of the colored boa to the chest to add some flare.
I bought a plain red ski hat from Wal-Mart for the head of the parrot costume. Also, I bought red ribbon and sewed it on near the ears so I could tie it around the chin so my son could not get the hat off.
For the Eyes
I bought big googly eyes from a craft store and two pieces of felt one white and one yellow. To figure out how to do the eyes, I looked at a picture of a parrot. I cut 2 almost rain drop shapes out of the white felt for the background of the eyes. I hot glued the felt pieces onto either side of the hat.
Then, I hot glued the googly eyes onto those felt pieces and the eyes were complete!
The Crest
To make a crest, I sewed a little strip of the colored boa to the top of the hat.
The Beak
To make the beak for this parrot costume was the toughest part. It took some trial and error to get the shape just right.
First, I folded the yellow felt in half and then along the fold I drew a beak shape as if I were looking at a parrot from the side. I cut the shape out and hot glued the seam together so it would hold the shape leaving the bottom open. Next, I stuffed cotton balls (that’s all I had at the time) into the bottom of the beak to puff it up and keep its shape. After the cotton balls were in place I hot glued the rest of the beak shut. I then hot glued the beak onto the front of the hat where it would hit my son’s forehead.
Making the Legs
For the legs of the parrot costume I bought white tights and died them yellow using yellow RIT dye. My son also had a pair of red sweatpants so I put them on under the feathery onsie and then put the elastic at the ankle so it sort of hung like a parrot’s thigh. From the knee down you could see the yellow tights.
Even though I dressed up as a pirate I was worried people wouldn’t realize that my son had a parrot costume on because if he sat in his stroller you couldn’t see his tail.
So, I put two slits in the side of the red onsie along the seams. I put him in the baby Bjorn and then put the costume OVER the Bjorn. I was able to snap it shut by pulling the Bjorn out of the slits in the side. Then, I pushed the tail down and then it hung in between my baby’s legs!
His parrot costume was such a hit! He looked great and had lots of fun plucking the feathers so he didn’t try to take his hat off even once!
Total Spent: $26
Beautiful Bird Baby
Parrot costume by Jennifer B., Cherry Hill, NJ
After my 6yr. old son decided he was going to be a Pirate for Halloween; he then wanted his 5-month-old sister to be his Parrot. I looked at pictures of Parrots on the Internet and in books and then went on my own from there.
To start, I cut out a triangle shaped piece of red material long enough at the base to go from the cuff to about her hip and then sewed layers of feathers made from felt on top of that piece for wings.
Then, I sewed that piece under the full arm and part of the body on a red one-piece overall (would also work with just a red sweatshirt and pants for an older kid). I did the same shape with the tail just a little longer.
For the parrot head I made a hat out of the same red material I had used for the wings and added a beak and two eyes out of felt. I also made sure the hat stayed on by adding a velcro strap under her chin.
My son was very proud to have his own Parrot at the school Parade and all day trick-or-treating (in between naps of course!)
Total Spent: $10

Related costumes:
 Coolest Parrot and Porcupine Costumes
 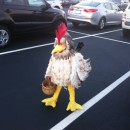 A Chicken So Realistic, She Almost Laid an Egg!
 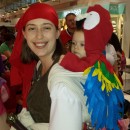 Babywearing Pirate and Parrot Costume
 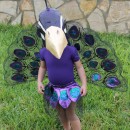 A Very Original Homemade Peacock Costume
 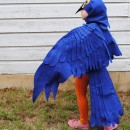 Coolest Blue Macaw Parrot Costume
 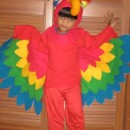 Coolest Child Parrot Costume
  Beautiful Peacock Costume for a 3 Year-Old Girl
  Perky Parrot Nation, Unique Parrots in Extravagant Costumes
Your comment has been sent successfully.