First, acquire a baby. Yours or someone else’s will do. (We used our own, it’s much cheaper that way.) Preferably pick one that is (or if using your own, hopefully yours is) good-natured, and has a tendency to laugh and smile for photos.
Second, brainstorm food costume ideas because babies are adorable, and dressing them up as food will further enhance their adorableness. If you have brainstormed correctly, you will indubitably come up with the cannoli. Babies are chubby and cannolis are full of fluff – it’s a marriage made in heaven.
Third, acquire the cheapest light-colored hoodie you can find. It should be size appropriate for the baby, but don’t get all sentimental about it because you will be wrecking it by cutting the arms off and going crazy with a glue gun. It will be destroyed, so don’t get attached and think you can reuse it after Halloween. Just don’t.
Fourth, go to a craft store to buy some felt that resembles a cannoli shell and the whitest, fluffiest poly-fil you can find. Bonus points if you have poor estimation skills and buy one or even two yards of felt even though your baby will only use 1/3 of a yard at most, and be sure and buy the biggest package of poly-fil even if you may only end up using four of the 24 oz. It’s okay. You’ve got your costumes for the next several Halloweens lined up, all consisting of white poly-fil – cloud, marshmallow, and any other desserts you can think of that contain some form of whipped cream. That fluffy goodness is money. Or rather, you spent lots of money on it, so you better use it. The best part of the trip will be when the baby wakes up screaming and you have to balance your purchases and the baby who keeps trying to jump out of your arms.
Fifth, procrastinate. Why work on your costume when you have several weeks before Halloween comes? It’s better to delude yourself into thinking it will be an easy project and silence your fears about your lack of crafting experience by binge watching Netflix at night after your baby has gone to sleep.
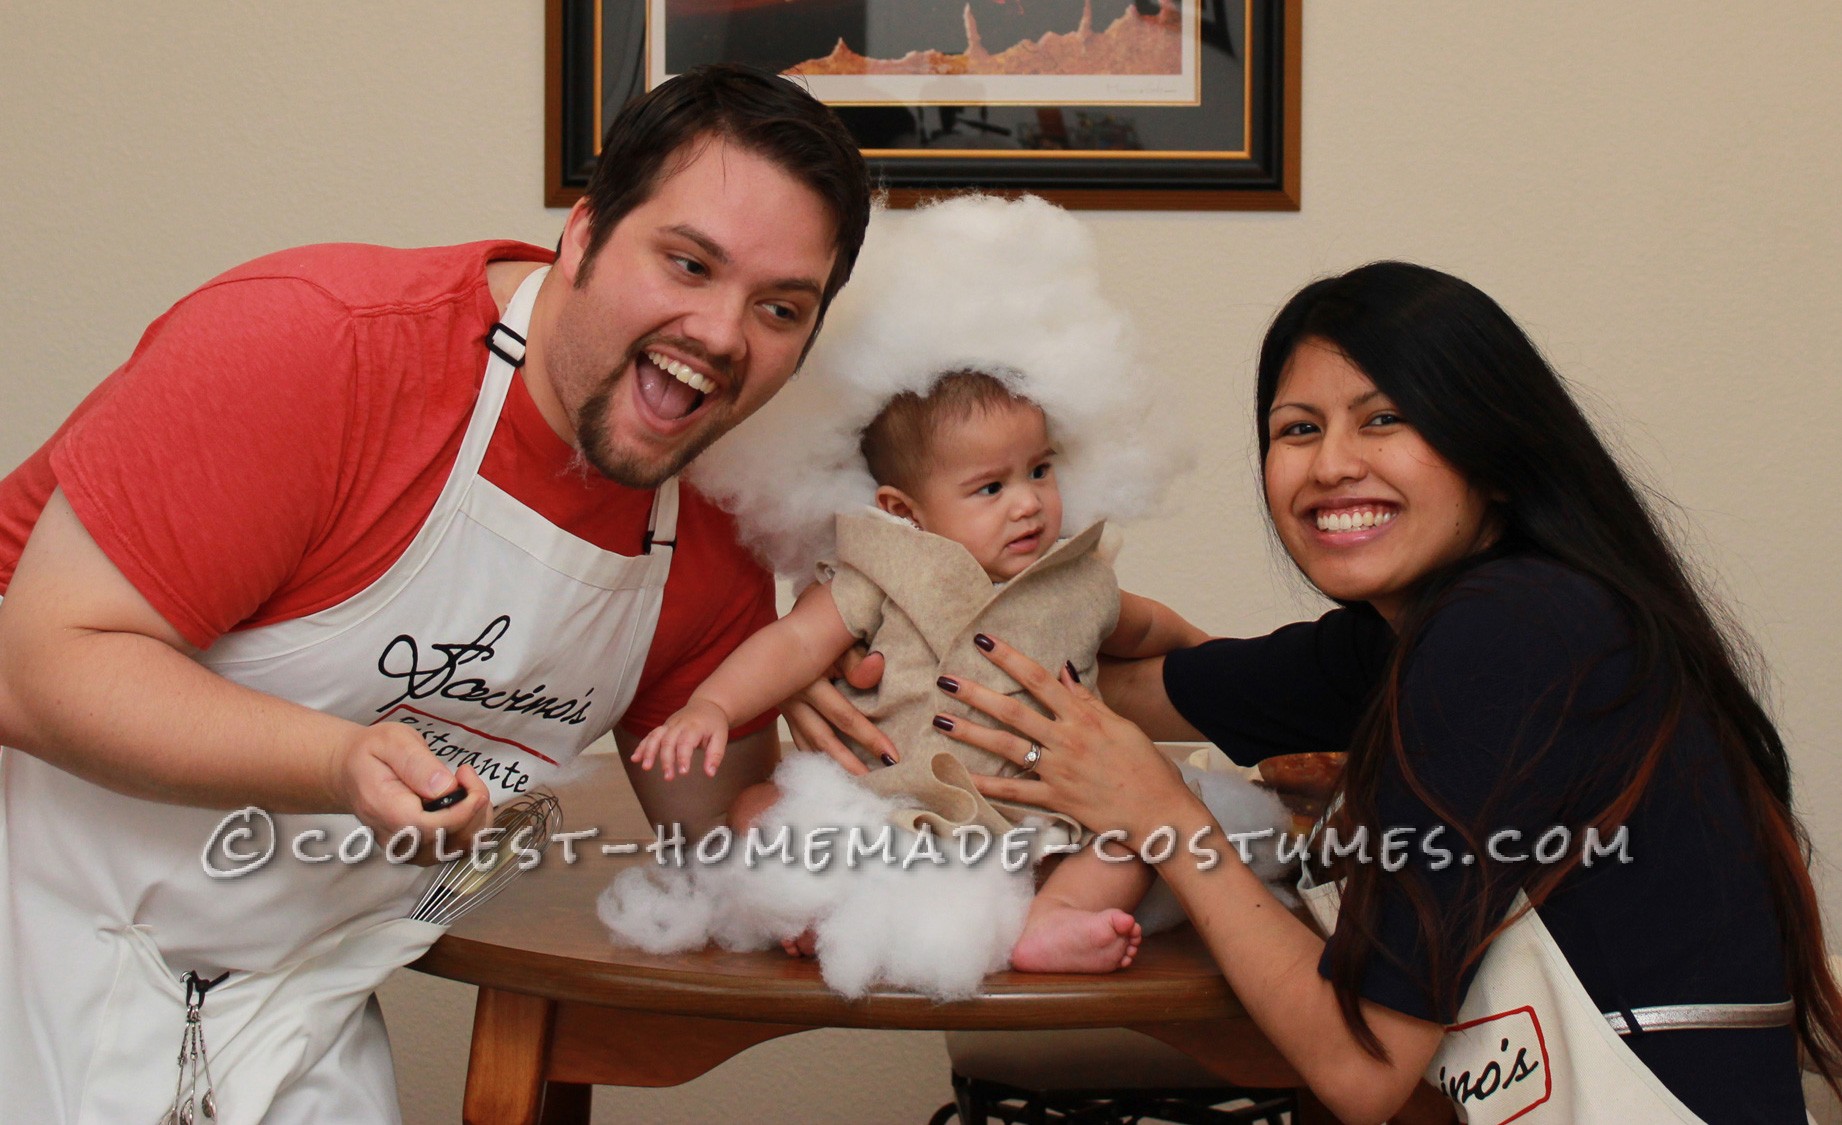
Sixth, go crazy making the costume! This is best done the night before Halloween. The closer you are to midnight when you start, the better. Begin by cutting your cannoli shell that will go around your baby’s body. It will be somewhere between a circle/oval shape that you have to mess with. Lack of precision is key here. Again, the best part is having poor estimation skills that require you to go into the nursery and slide the material around the sleeping baby and risk waking him/ her. But hey, it’s for a greater purpose, right? Next, wrap the felt around the hoodie, secure with adhesive velcro, and cut arm slits through the felt. Bring the hoodie sleeves through and then cut them off. Just do it! Don’t hem and haw and try to figure out a way to save the arms so you can reuse the hoodie afterwards. There will be way too much glue on it anyway. Which brings us to the next part – the glue gun! Glue gun the hoodie arm stumps within the felt so it doesn’t move around. Then, glue gun sections of poly-fil onto the hood, all over the hood. This will take forever. You will lose track of time and of the number of glue sticks you’ve used. Be sure to cover the edges around the face as well for a more realistic look. Also, your baby will love to try and eat those pieces. For every time you burn yourself with the glue gun, you get two points. Good job! You’re racking those up! In the end, just forget about gluing poly-fil to the bottom end of the costume because you are too exhausted and go to bed. You’ve earned it. The baby can just stand in the fluff, he won’t mind.
Seventh, finally on Halloween, dress your baby! Your significant other (husband, in my case) will double over laughing and insist that rather than a cannoli, the baby actually looks like George Washington with a powdered wig, or less dignified – a q-tip. Don’t be bothered by this. Furthermore, don’t be alarmed if your normally good-natured, happy, smiling, laughing baby is annoyed and snappy at being surrounded in a cloud of fluff. Just remember how cute it will look in pictures! Which leads us to our eighth and final step.
All of that effort is not worth it if it isn’t memorialized, so take lots of photos. Just go to town! Remember you’re in a race against the clock since dressing the baby and your significant other laughing at said baby have taken some time and the baby is getting more and more annoyed with being in a cloud of fluff. Hopefully, your camera is already set up on the tripod, so you only have to deal with the remote being fickle and not working every other shot. Also, if you’ve planned ahead, you’ve thoughtfully arranged props to go with the cannoli theme, including aprons for you and your partner, measuring spoons, whisk, spatula, icing bag, and rolling pin. The rolling pin is likely to roll off the table and stub your partner’s toe so he yells and jumps around, further delaying the photo session. You will need all four of the hands between the two of you and still feel like you’re lacking hands as you try to keep the baby standing, then transition to sitting because standing simply won’t work, and most importantly, to keep the baby from eating the poly-fill. Or at least from eating all of it. The key here is continuous photography. Just keep snapping away. You will soon realize that any ideas of a cute and composed family shot are ludicrous and unrealistic. Rather, hope instead for at least some good outtakes to come out of it. Your friends and family members will likely come up with clever captions to go along with the baby’s expressions like “these people are crazy” and “someday somebody’s going to pay for this.” So there you have it – 8 easy steps! Now enjoy your little cannoli and have a Happy Halloween!

Related costumes:
 Awesome Cotton Candy Homemade Halloween Dog Costume
  Circus Animal Cookie Baby Costume, Easy and Delicious!
  Coolest Homemade Cup Cake Halloween Costume
  100+ Cool DIY Cake and Cupcake Homemade Halloween Costume Ideas
  Sweetest Chocolate Cupcake Halloween Costume for a Girl
  Coolest Adult Cotton Candy Costume
  Coolest Cannoli Halloween Costume
  Coolest Bag of Cotton Candy Costume
Your comment has been sent successfully.