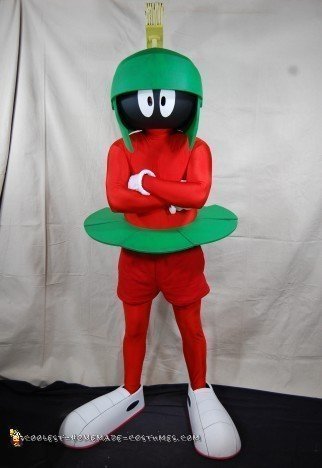
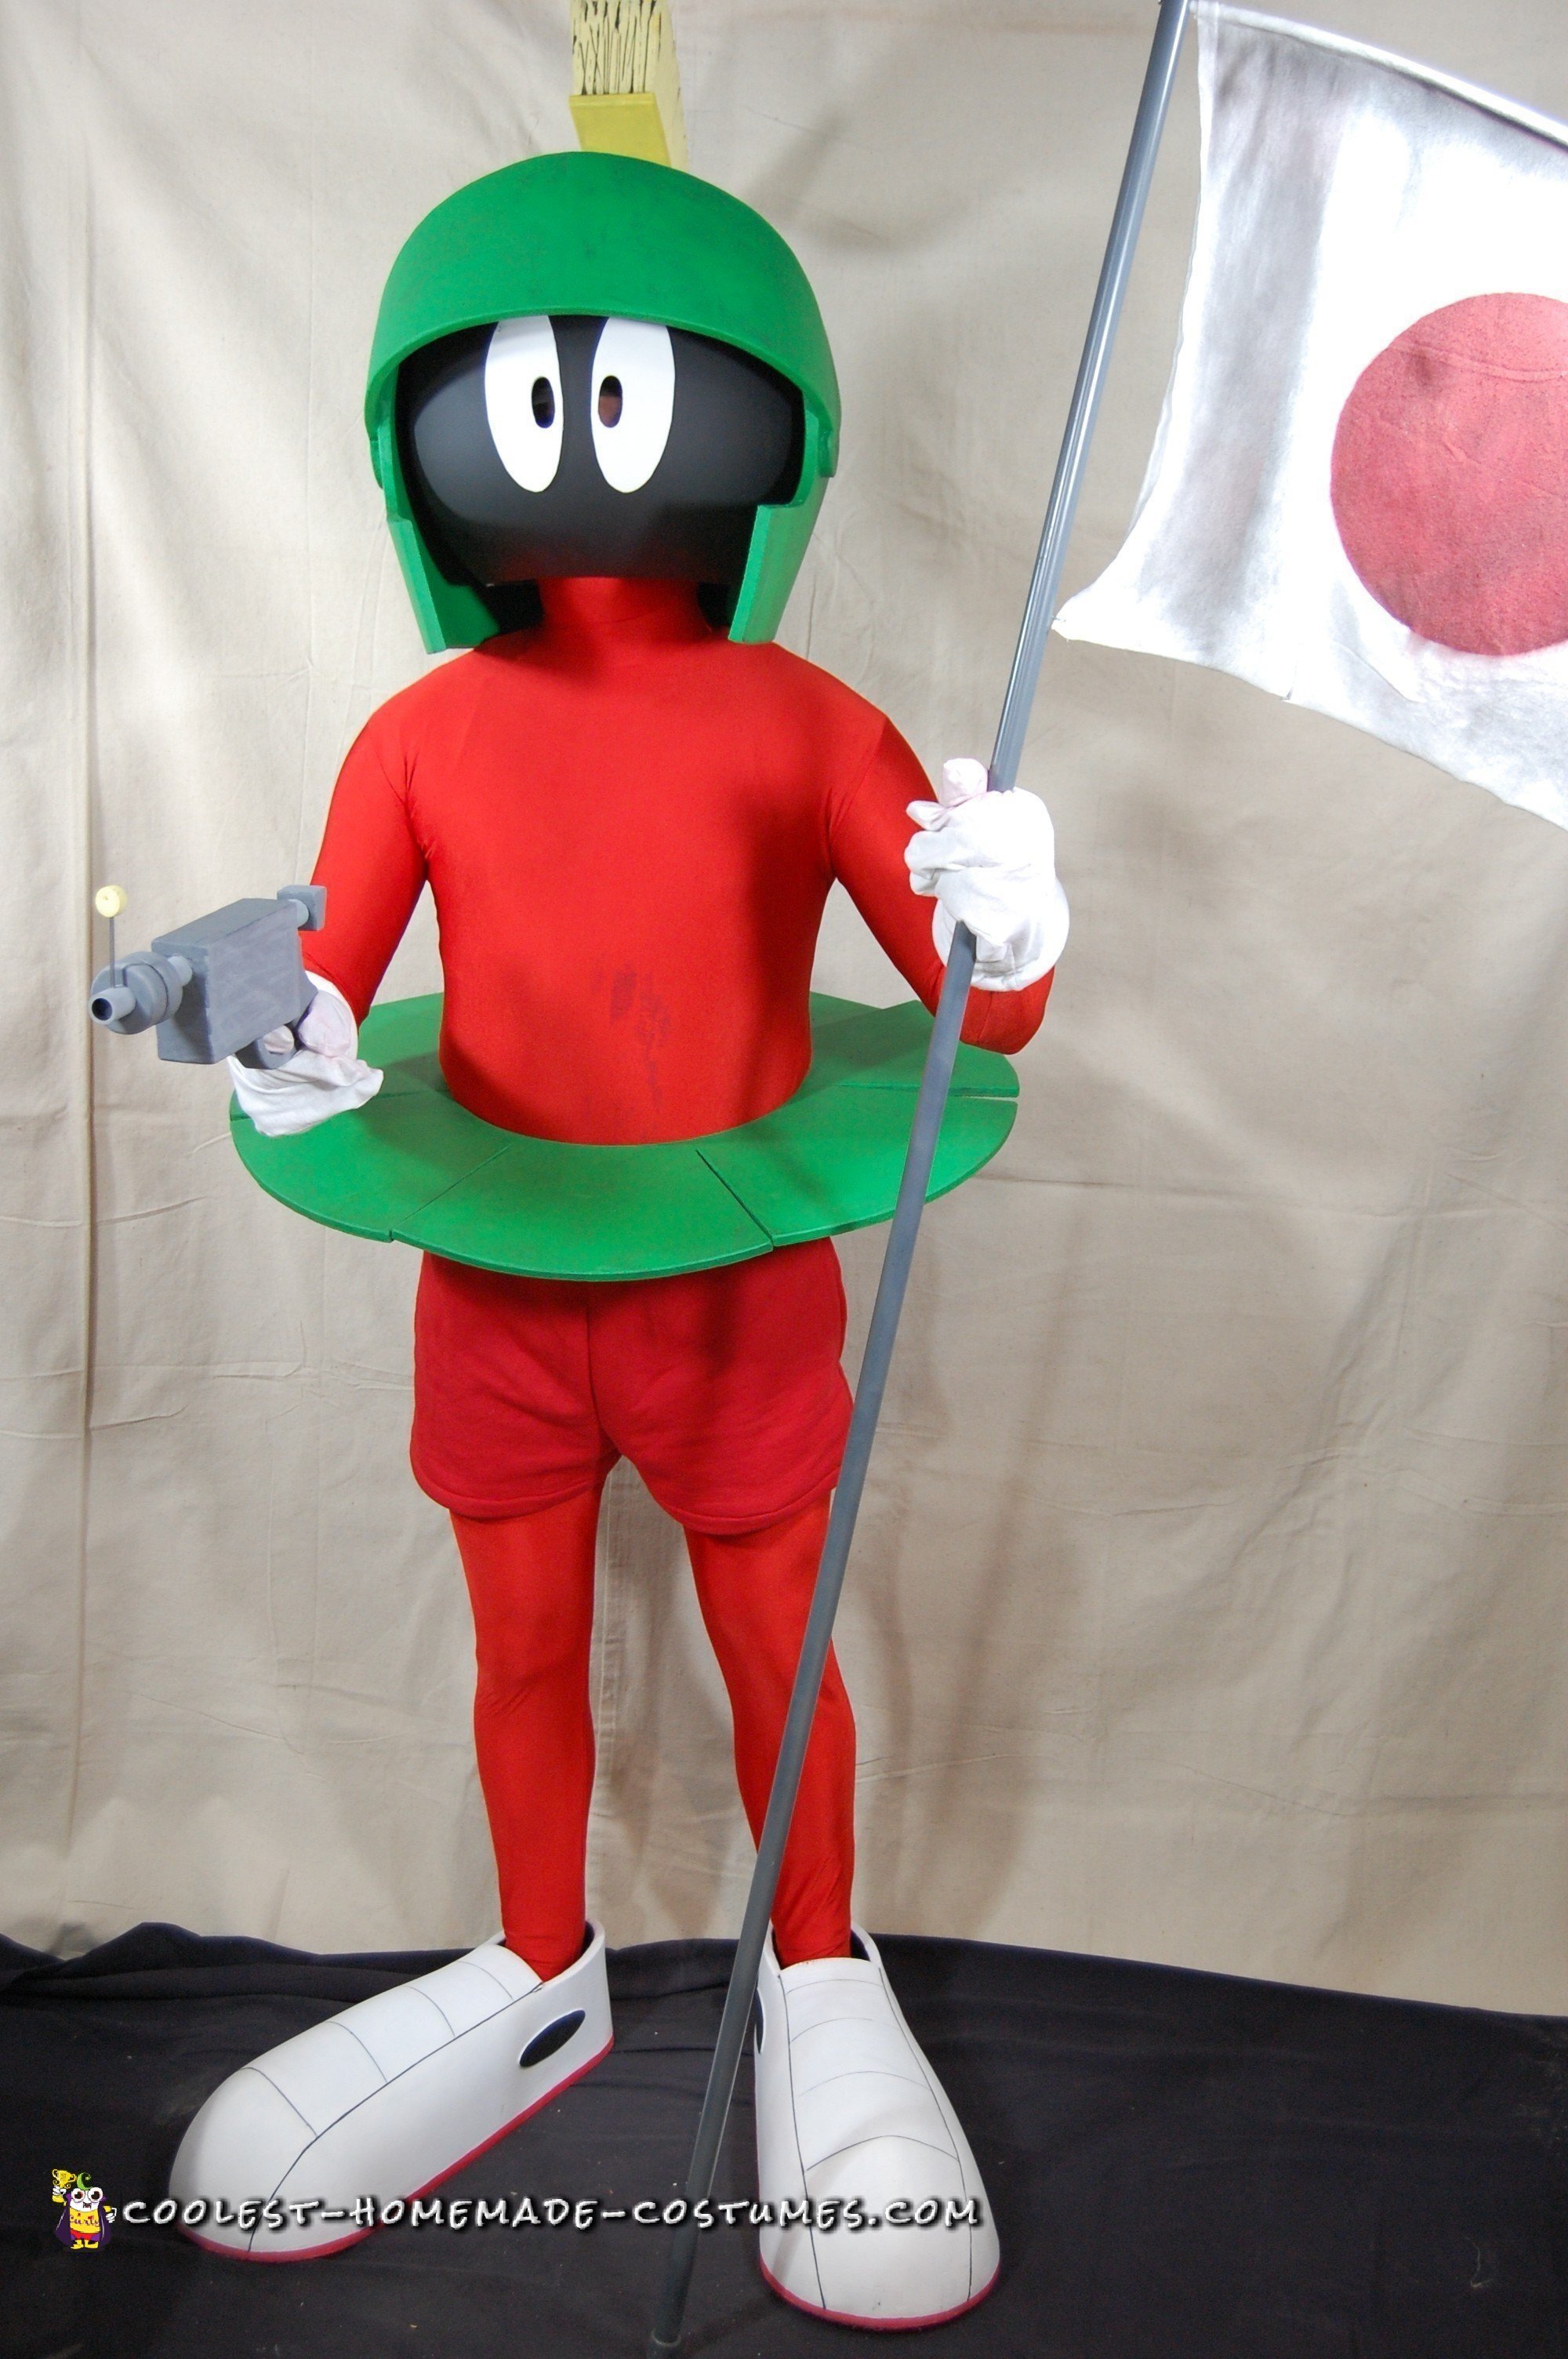
I gravitate towards full body costumes. I have fun being immersed in the identity and personality of a character. For a short time every year, I get to use my imagination and play dress up without it being totally weird. I decided on a Marvin the Martian Halloween costume.
In regard to fabrication, I like to take on costumes which force me to learn a new technique and/or skill set. This year, that took the form of Foamsmithing – using EVA foam floor mats. From making custom templates, cutting foam and shaping. Then gluing foam together with contact cement, sanding foam, and painting foam. All of this was new territory.
Making the Marvin the Martian Halloween Costume
Marvin’s Body
A face open lycra bodysuit (purchased) with the addition of cut off/resewn sweatpants to maintain my decency.
Marvin’s Head
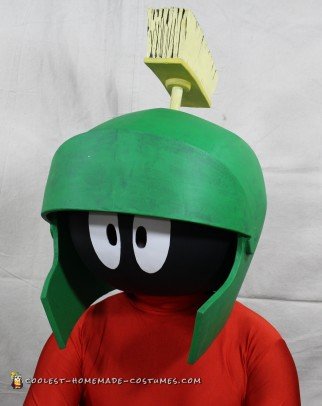
A 14” acrylic globe usually found atop decorative lamp posts. After enlarging the bottom hole to fit over my head, I prepped it with plastic primer and then spray painted flat black. I padded the the inside with foam until I achieved a snug fit around my head. For the eyes, I cut out from 1/8” craft foam. For the pupils, I drilled out holes so I could actually use them to see.
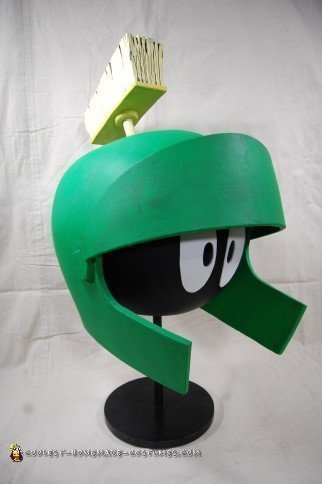
The Helmet
The templates are an existing Evil Ted pattern, which I enlarged to 200%. Then, I modified to include additional material for the cheek flairs. I pinned the templates to the foam, traced, and cut them out with a sharp razor. Any initial shaping/curving can be achieved by warming up the foam with a heat gun and bending the form by hand. I coated all mating edges with contact cement, allowed to dry for 5-10 mins and then pressed them together for a clean and insanely strong bond. Once glued together, I laid out and cut the cheek flairs, as well as adding a flair to the back of the helmet by notching/re-gluing the foam. For the visor, I laid it out as a separate piece and then was cut and shaped it to fit. I did this part of the Marvin the Martian Halloween costume without a template.
The Plume
Starting as ten layers of foam laminated into a block, the rough form of a deck brush was cut out using a bandsaw and then shaped using an oscillating belt sander. To create the appearance of bristles, I cut a few wedges out of the foam at the top edge and then used a sharp razor to score shallow lines on the top and all sides. Applying air from a heat gun will make all these cuts open just a bit.
A rectangular piece of foam is glued to the bottom of the brush section to act as the wooden block and then a hole is drilled in the center to accept a section of ½” PVC. I epoxied a T-nut into the other end of the PVC pipe so that this entire plume assembly can be attached to the acrylic glove with a hex bolt. Not only does this make for a secure connection, but it’s removable, which means easier storage and shipping if necessary.
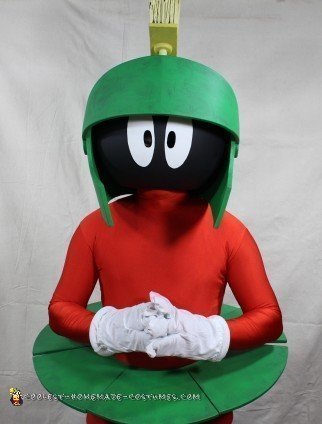
The Green Skirt
By drawing a 17” and 28” diameter circle around the same center point onto contractor paper, I laid out the skirt. Then I divided them into seven segments of varied widths. I cut the 28” circle out and removed the 17” center. Then I cut the remaining ring into the seven separate parts and used as templates to cut the parts from foam. The segments got glued to the top of a foam belt, which is a 2-ply lamination of 1 ½” wide strips of foam. A plastic, side-release clasp on nylon strapping is concealed within the inside layer of foam at the back of the skirt. This solution makes the skirt quick and easy to put on and remove. I left a few inches of excess strapping so that I could tighten and loosen the fit.
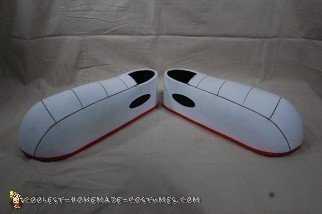
The Shoes
I created the shoe template by building a temporary form using cardboard, scrap foam, hot glue, and packing tape. Next, I covered that form with aluminum foil and a layer of duct tape. Then I drew separation/cut lines onto the tape.
After removing the foil/tape, I cut it into the three designated sections, flattened, and used as templates to cut two sets of parts from foam. I glued the three foam sections together to form the shoe tops and then glued them to the soles. The foam shoes ended up being 20” long so to make them wearable, I used contact cement and glue inexpensive shoes inside the enormous shoes. This worked perfectly, but it’s still difficult to walk in 20” shoes.
The Disintegration Pistol
EVA floor mat foam with ½” PVC for the barrel. I sketched and made a template for the grip and core of the pistol using a Nerf pistol for scale reference. I designed and fabricated the remaining parts on the fly using reference pictures. The foam rings were made my tracing a 2” fender washer and using a ¾” copper pipe, with the outside edge sharpened, to punch out the centers. The outside diameter was cut close to the line and then sanded to the line using an oscillating belt sander. The sight is just one of the punched centers glued to a short section of 1/8” steel rod.
Marvin’s Flag
A white T-shirt with a spray painted red disc (Mars = The Red Planet). The pole is ½” PVC with a 3” Styrofoam ball and two foam rings glued to the top. In order to keep the flag open/visible, I hot glued a length of PEX to the top of the flag and inserted into a hole drilled in the ½” PVC
The Gloves
Using a homemade 4 finger/Muppet template, I traced and cute the gloves from a white T-shirt. I used a sewing machine and poorly stitched the gloves together!
I wrapped the material at the base of the glove around a foam ring (5/8” caulk saver foam) and secured using hot glue. Mainly because I wasn’t sure how do get that done with the sewing machine.
Prepping And Painting Foam
I sanded all of the foam components as necessary. All the gaps, I filled with Kwikseal caulking, heat sealed with a heat gun and base coated with Plasti Dip. Then I applied the acrylic latex finish colors with a brush.
Tools
I used quite a lot of tools! They include a razor knife, Kershaw blade sharpener, straight edge and dremel. As well as, a miter saw, drill press, hand drill, bandsaw, oscillating belt sander and hot glue gun.
Time Spent Making the Marvin the Martian Halloween Costume
This costume took 50-60 hours to make.
I had some materials, on the rest I spent $137. The supplies were $39.50.
You can check out my Instructable, with more granular detail, here.
Reactions to the Marvin the Martian Halloween Costume
I won “Best Overall” at a Friend’s annual Halloween party ($15 Dunkin’s card – worth it).
On Oct. 31st I put up a light stand and stood outside in full costume to hand out candy. Most of the very young kids were too hesitant to approach, but a few offered “low fives.” Older kids, but more so adults, asked if they could take pictures with Marvin. The general consensus was that the Marvin The Martian Halloween costume was AWESOME!


Related costumes:
 Glowing Marvin the Martian EL Wire Costume
  Coolest Homemade Marvin the Martian Costume
  Coolest Marvin (and Marsha) The Martian Couple Costume
  Cute Homemade Marvin the Martian Costume for a Woman
  Coolest Marvin the Martian Halloween Costume for Under $20
  Coolest Homemade Mrs. Nesbitt/Buzz Lightyear Costume
  Homemade Wall-E Halloween Costume
  Coolest Ever Nickelodeon TMNT Group Costume