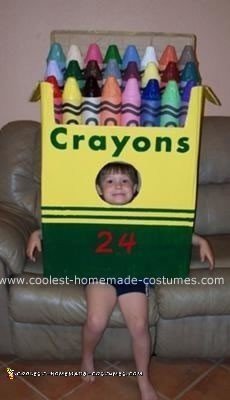
This crayon Halloween costume was really simple. The materials used to make this box of crayons costume were: hot glue gun and glue sticks, several large cardboard cores or tubes (like the middle of a paper towel roll or other larger roll of some sort), cardboard pieces, cardboard box that is the desired size and shape that resembles a box of crayons, a cone shape for crayon tops, aluminum foil, newspapers and flour mixed with salt and water for paper mache, several colors of paint, school glue, peel and stick glue stick, a variety of colored construction paper, a can of Great Stuff spray foam, duct tape or wide masking tape, plain painters caulk, box cutter, pencil, measuring tape or ruler, and an old backpack with good straps or old pair of overalls or suspenders (optional, but makes the costume more comfortable).
I found a box that had the perfect shape and size. Then my husband had some large cardboard cores that came from the rolls of felt that he uses at his roofing company. We divided the cores in three equal sections and then cut them. We ended up making 24. I took some duct tape and covered one end of each tube. Then we used a traffic cone to shape the tops out of paper mache. We took some aluminum foil, covered the top of the cone, covered with a thin layer of paper mache, then we gently lifted the foil off of the cone and layed all 24 paper mache cones out to thoroughly dry for 8 hours. We measured each cone and cut them all to the desired size (to fit perfectly to the size of the top of the cardboard cores).
Then I used a can of Great Stuff to fill the hollow of each cut cone top. This prevents them from getting smashed or to lose their shape, and it gives you a surface to glue to. Make sure you follow the instructions on the can and read them carefully. That stuff can be very messy, and also comes out of the can pretty fast, and you only need to fill them half full, so pay attention! Once the foam has cured, then it may be necessary to trim off some excess foam, if any. Then, you have something to glue to! Get a hot glue gun, put an ample dot of glue on the end of the tube that you taped off. Then grab a cone top and stick it on and hold for a few moments to insure that the glue has dried.
Take plain painters caulk and caulk around the bottom to fill the crack of each glued on crayon top. Fill the cracks between the cardboard tube and paper mache cone to give a nice uniform appearance. By now, you should have a shape that resembles a crayon. Pick out the number of crayon colors that you intend to use. It may be wise to make sure that you have construction paper colors that will match to the colors that you will be painting each crayon. I took all of the construction paper that I will use for the crayon wrappers and ran them through the printer to print the crayon label and letters. I used a paintbrush program on my computer to draw the wavy lines, type the text, and changed the text size to over 150.
Once all of your tops have been glued on and the caulk has dried, then you may proceed with painting. When painting your crayons, you can save paint and time by not painting the entire crayon since the construction paper wrapper will cover most of the crayons. Once the crayons are all dry, then take a matching construction paper label and wrap around the matching color of crayon. Glue down the side of each wrapper end and press until dried and attached. Repeat to label all crayons. If the construction paper labels don’t go all the way around a crayon, don’t worry, mine didn’t either. You can arrange them so that you won’t even see the backs by slightly turning some of the ones on the sides, inward a tad.
I glued my crayon box lid flap to the back row of crayons to hide the gap that the construction paper labels didn’t cover. Now, it’s time for the box. Cut the bottom of the box, and the top out, or open the box top and bottom flaps inward and tape them to the inside so that there will be room for legs at the bottom, and crayons to stick out of the top. If you cut the top and the bottoms of the box, then tape the sides and corners of the box on the inside, because sometimes cutting the top and the bottom makes the box weak and it collapses easier. Measure the size of the person to wear the costume to determine where the head and arm holes will be. Take into consideration if you will want this to be a costume that you want to be able to sit down in. If the person shall be able to sit, then position the bottom of the costume at the person’s waste, such as this costume in the picture, so that the person wearing it may be more comfortable, and sit.
After you cut your holes for the head and the arms, put the costume on the subject for more sizing. With the persons head in place of the face cutout, take a pencil and strike a line inside the costume to show the height of the top of the person’s head.
Now it is time to paint your crayon box. Use your imagination or copy your favorite brand of crayons. I printed out the letters for the box and temporarily glued them into my desired position with a peel and stick glue stick, traced with a pencil, peeled them off, and then carefully painted the lettering. I used masking tape to get my stripes perfect! Once everything has dried, Take a piece of cardboard and make sure that it is at least 8 inches longer than the width from side to side of the inside of the box and at least 4 inches wider than the inside, front to back. Draw a rectangle to match to exact size of the inside of the box. This can be done easily by placing the opening of the box on the cardboard and position it so that the opening is directly in the center. Each edge of the cardboard sticking out from the box with the opening down and ready to trace, should be even with its opposite side. Then trace the box. Fold each side so that all four sides folded are all folded in the same direction. Gluing these flaps to the inside of the box at a height that is slightly above the mark where the top of the persons head will be, will give the wearer plenty of headroom and will be a “shelf” to hold the crayons.
I used cardboard to step up each row of crayons, like bleachers in a sports arena. When you place your crayons in the “shelf” that you just made, and you are satisfied with the way they look, then glue them down with hot glue. I used an old backpack, cut off the zippers and pouches and kept just the straps and padded fabric that touches the back when worn, then glued it with hot glue to the inside of the crayon box at the appropriate height that will fit my son. This makes it easier to wear, taking the weight off of the head and arms, and evenly distributing the weight of the costume to be comfortably worn on the back. You can also take an old pair of overalls and glue the straps to the inside on the back and the hooks on the inside front.
This crayon Halloween costume is pretty simple, and since I always have all of the materials used in my home, and I used mostly recyclable materials and cardboard that I have been already collecting, it cost me NOTHING but time to create this awesome costume for my 5 year old!
Related costumes:
 Cool Out of the Box Crayon Costume Idea
  Coolest Crayola Crayon Box Costume
  Coolest Crayons Costume
  Coolest Homemade Crayola Crayons Costume
  Coolest Box of Crayons Group Costume
  Sassy Crayons Group Costume
  Coolest Crayon Girls Group Costume
  Coolest Homemade Crayon and Marker (A Box of Personality) Group Costumes
that is so cute, did you make that?
That’s adorable!!!!
My friends and I are being different coloured crayons, and then we’re going to try and stuff ourselves inside a box!!!!