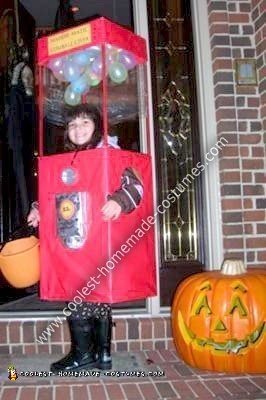
My daughter, Madelyn, REALLY wanted to be a gumball machine this year after seeing some of the ideas on this website. Last year, she was a robot, which won her 1st prize at her school’s Halloween party. Her 2 year old brother inherited her costume this year. We’ve started a tradition in our family of making our own costumes each year (a) it encourages creativity, (b) it’s something the whole family can do, and (c) we have A LOT of fun doing it.
Normally, we use paper-mache to strengthen the box foundation. This works really well, especially over the seams of the box where you use tape to hold the box together. The BIGGEST drawback of using paper-mache, though, is that if you don’t seal the paper-mache when it’s dried or put a primer coat on, the ink from the newspaper will continually bleed through every single layer of paint you apply…guaranteed. Don’t ask how I know this.
With all of this said, here’s how we built this Homemade Gumball Machine Costume.
MATERIALS
* 1 large box for main part of costume (32x15x15)
* 1 smaller box for “coin mechanism” (old fruit snacks box)
* Newspaper strips
* Paper-mache mixture (5 cups of flour to 1 cup of hot water)
* Red paint OR red holiday wrapping paper (2 rolls)
* Silver paint
* 4 tomato stakes
* Staple gun and staples
* 1 LED hockey puck style battery light
* 2 plastic bowls
* 1 bolt (1.5″ long”)
* 1 nut for bolt
* 1 flat washer for bolt
* 1 peanut butter jar lid
* 1 paint marker
* 1 pkg of water balloons
* 1 spool of string
* 1 roll of wide scotch-type tape
* paper-type adhesive for your “decal” applications
* 1 or 2 sheets of paper for your printer
* scissors and/or razor blade
* Possibly some saran wrap if it’s going to be windy on the day you wear the costume (as a shield so the balloons don’t tear off)
* LOTS of patience
DIRECTIONS
1) Cut the top 1/4 off of an assembled box (box size approx 32x15x15) then cut a large hole in the top of the box for the head and a hole on each side for arm holes.
2) Put a small hole in each corner of the top of the bottom half of the costume and then attach tomato stakes using a heavy duty staple gun to each corner of the bigger/lower half of the box. The stakes go through the top of the box and along the inside edge of each corner of the box. Be generous with the staples. The top half of the box that you cut off will go on top of the tomato stakes, in the same manner as the lower half, so adjust the height of the stakes to your liking.
3) Glue a plastic/Styrofoam bowl to the top of the costume for the decorative top piece.
4) Glue or tape a small rectangle box to the front of the costume for the “coin” mechanism
5) Paper-mache the top and bottom half of the box. LET DRY OVERNIGHT
6) Cut another plastic bowl in half and tape it just under the coin mechanism box in #5
7) Prime/seal the paper-mache to keep ink bleed through to a minimum
8) Paint entire box gloss red OR you can use solid red holiday wrapping paper but be careful of water/rain/tears on paper.
8a) If you use the wrapping paper, as we did, you will need to paint the coin mechanism bright silver before wrapping the box, let dry, then cut out mechanism in paper and wrap the rest of the box accordingly.
9) Paint coin mechanism bright silver and let dry
10) For the dial, we used the lid of a peanut butter jar, drilled a hole in the lid and put a bolt through it. Then, we used some of the scrap cardboard and folded it in half, then bent the 2 ends away from each other and cut them to fit into the base of the lid. Using really strong glue, we glued this cardboard inside the lid and over the head of the bolt. Once the glue dries (overnight) paint the new “coin dial” bright silver.
11) Once the dial is dry, poke a hole through the bottom half of your costume (to your preference) and put the dial bolt through the hole. On the inside of the costume, put a large flat washer and nut on to the dial bolt and tighten…just enough to let the coin dial turn freely. Trust me, other kids are going to be trying it out A LOT.
12) Make “decals” for your costume by being creative in PowerPoint, printing them off on normal paper, and then cutting around the edge of each one.
13) Apply the “decals” with paper type adhesive. Don’t use Elmer’s white glue, it’ll make the ink run when you’re applying the “decals”.
14) Using water balloons, blow them up about 1/2 way. Tie them together at the stems with string into bunches, much like grapes. If you use bigger balloons, you will lose some of the effect of the “ball” part of gumball. We found that the smaller balloons looked better than the larger ones.
15) Attach a small LED push on/off “hockey puck” style light to the top inside of the costume. This will help people see the gumballs at night when you go trick or treating and just walking down the street or in a dark room. We found our light at a dollar store for 99 cents and it lasted for 2 days straight and still works off of the 3 AAA batteries. Glad we got this.
16) Now attach each bunch of balloons to the top inside of the costume by the end of the string you used to tie the balloons together using wide tape. Think of it as hanging grapes to the top of the box so they’ll hand down around the wearer’s head.
17) Use a black paint marker to add little details to the coin mechanism for decoration (if you want)
18) If it’s windy the night of Halloween, you can use either saran type plastic or winter window sealer plastic (the kind you use a hair dryer to shrink). I found that this helped keep the balloons from blowing around. Also, only put the plastic on the 2 sides and the back ONLY. Keep the plastic off of the front so that your child (or you) can breathe and it will keep any fogging to a minimum on the inside. You don’t want a foggy gumball machine.
18) Have your child wear the costume and have a fun-filled evening. We gave our daughter a bag of gumballs to hand out to people who asked “where’s the gumball” after turning the dial. HA HA

Related costumes:
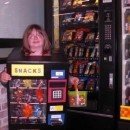 Coolest Homemade Vending Machine Costume
 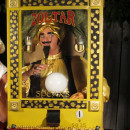 Cool Zoltar the Fortune Telling Machine Costume
 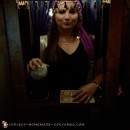 Vintage Coin-OP Arcade, Esmeralda Fortune Teller Costume
 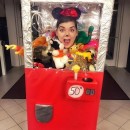 Claw Machine Costume – Clawing my Way to the Top
 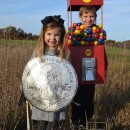 Cool Duo Costume: A Gumball Machine and a Quarter
  Top 7 Movie Character Costumes Tom Hanks Needs for Halloween
  Coolest Gumball Machine DIY Costume
 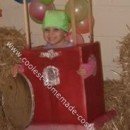 Coolest Bubble Gum Machine Halloween Costume
Your comment has been sent successfully.