Throughout nursery and early grade school, my favorite book had always been Where the Wild Things Are, by Maurice Sendak. Many years later, I couldn’t believe my eyes when I first saw a preview for Spike Jonze’s theatrical version this past summer, and it was at that point that I started thinking of a way I could recreate one of the monsters from the book as my Halloween costume for the year.
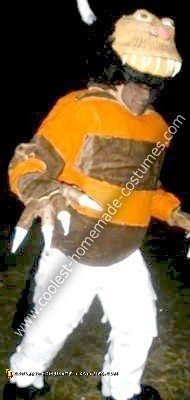
“Carol”, from the film, was an obvious choice from the start. Not only is he the “cover monster” for the book and the most recognizable “Wild Thing”, but his body and facial features seemed like they’d be the easiest, and most fun, to recreate. I decided to mix some of the characteristics of both the movie and book versions of Carol into my own Homemade Carol Costume from Where the Wild Things Are.
The actual assembly of this costume, including paper mache, painting and cutting etc, took slightly over 35 hours. This does not include the time taken waiting for paint and glue to dry, shopping for materials, or simply sitting and staring at the monstrosity I was creating and deciding “what next?”
A lot of the materials I already had and didn’t need to purchase, but, if you were to buy everything needed to create what is described below, expect to spend somewhere around $100. This is not for the weak of mind, body, or $$ – you are going to need to be committed for about a week or more if you want to get it right.
To create the head, I started out with a straw hat, which had a drawstring for your chin, and two 128 oz plastic bowls. The two bowls were hot-glued together at their rims to create a large plastic dome. The bottom was then cut out of the dome and hot-glued to the top of the hat, positioned slightly towards the front. The front brim of the hat was cut and glued to the bottom half of the dome, so as to help form the bottom lip and chin; the back half of the brim was folded down to help create the back of the neck. Duct tape was added to the top of the dome to ‘round’ the head off some more.
I then used a variety of duct tape and foam to create the facial features: nose, eyebrows, rolls under the eyes. I then duct-taped them to the plastic dome. Duct tape was used around the rim of the two bowls, where they were attached to each other, to help smooth out the seam. A tennis ball was cut in half, and then into quarters. Two of the quarters were taken as is, and used as the eyelids. The green ‘fuzz’ was peeled off of the other 2 quarters, and then wrapped in white duct tape to form the eyeballs. Brown and black paint were then used for the actual pupil and iris, with some red paint used to paint the veins in the eyes. The eye assemblies were both duct-taped to the domes, just above the rolls and on either side of the nose. Now it was time to paper mache.
I mixed two parts Elmer’s glue with one part water (about 8 and 4 oz. respectively), and used newspaper to start forming the face. Two layers were used, and then the entire face, excluding the eyeballs and the intersection of the two ‘lips’, was primed with two coats of white paint. This part was one of the easiest to describe, but probably took the longest in terms of making sure everything just “looked right” prior to moving on.
At this point it was time to attach the teeth. A “caveman necklace” from a costume shop was disassembled and the teeth were restrung with pieces of cut straw, used as spacers, to form a set of monster teeth. The original beads from the necklace were discarded. The teeth were then lightly duct-taped to the face, to hold them in place, and another layer of paper mache was added on top to secure them to the lips of the mask. This last part of the face was then primed with two coats of white paint and allowed to dry.
A first coat of light brown was used as a base across most of the face. Combinations of several brown, black, and white paints were used to paint the facial features, allowing each coat to dry first, and then the next applied on top to give a layering of hair effect. A pinkish-brown mixture was used at the tip of the nose and around the nostrils. Be careful when painting around the teeth as you want them to stay as white as possible. The horns were created by cutting two identical pieces of foam into long isosceles triangles, and then wrapping each of them with white duct tape, tapering one end of each to a point.
About 1 yard of black fur from a fabric shop was then hot-glued around the remaining uncovered areas of the head; the horns were then attached on either side of the head by slicing a slit in the black fur, pushing the horns through so they made contact with the plastic dome, and then hot-gluing them all together for a firm hold.
Last but not least, a very thin piece of black fabric, which was almost see-through, was cut and glued on one side to the bottom middle of the lower lip. This was allowed to hang down over the neck where my face would eventually be when wearing the costume, and the other side was velcroed down, to allow me to move it to the side if I wanted to eat or drink anything while in costume. This material partially obscured my face, but also allowed me to see while I walked around wearing the costume.
To create the top half of the body, I started with a plain brown sweatshirt (size XXL) from Walmart. I purchased 1 yard each of orange and brown fur from the same fabric shop mentioned above, and cut it into approximately 8” wide strips. These were then glued to the sweatshirt with tacky glue until almost the entire sweatshirt was covered. A black boa was purchased at the costume shop, and this was pushed through a slit in the brown fur in the back bottom of the sweatshirt, and attached directly to the sweatshirt with hot glue to form a tail.
For the claws, I bought Freddy Krueger gloves from the Halloween store, and then wrapped each of the ‘knives’ with white duct tape, to form claws. The remaining top portion of both gloves was then covered with brown fur.
To complete the illusion of actually being 7 feet tall, a long-sleeved undershirt was outfitted with several layers of foam in the front, and then large foam shoulder pads were duct-taped to the top of each shoulder, so that they came just above my ears when wearing the sweatshirt. This gave the appearance of Carol’s shoulders actually being much higher than mine.
The bottom half of the body started with a pair of inside-out grey sweatpants (size XL). I purchased about a yard of white “costume vinyl” from the fabric store, and cut about 120 scale shapes from it; these shapes were of various sizes, but most were around 4” wide and 5” high. These were then individually tacky glued all over the sweatpants, being sure to cover the pockets and any exposed seams. I found it worked best to start at the bottom of each leg, and then work your way up because this gives the scales a more realistic layered look.
For the feet, a pair of monster feet, used for either a King Kong or an ape costume, was purchased at the costume store. The bottoms of each were cut out, and I fitted a pair of old sneakers into them, hot-gluing the edges, so I would have comfortable footwear when walking around in the costume.
All that was left at this point were some finishing touches. The back ‘neck’ of the mask, where the brim of the hat was bent down, was covered in brown fur using hot glue, and any remaining “exposed” areas of the costume were covered in fur, either brown or black. I painted some gray streaks on the horns to give them a more ‘real’ look. I also added some suspenders to the sweatpants to help them stay up better since pulling the drawstring that tight was rather uncomfortable.
To put the Homemade Carol Costume from Where the Wild Things Are on, you need to first put on the pants, followed by the feet. The foam-muscle shirt and the outer fur-covered sweatshirt are easiest to put on both at the same time. I advise putting the muscle shirt inside the sweatshirt first and then throwing it over your head. Put the mask on next, pull the drawstring tight, and then put on the gloves- voila!

Related costumes:
 Coolest Home Made Carol from Where the Wild Things Are Halloween Costume
  Cool Carol from “Where the Wild Things Are” Costume
  Coolest Homemade Max and Carol Costumes
 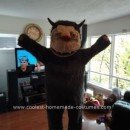 Coolest Homemade Carol from Where The Wild Things Are Costume
 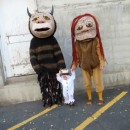 Where the Wild Things Are Family Costume: Let the Wild Rumpus Start!
  13-Year Old Creates Bonnie Costume On Her Own
 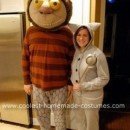 Coolest Carol and Max Couple Costume
 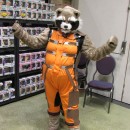 Cool Rocket Raccoon Costume From Gaurdians of the Galaxy
Your comment has been sent successfully.