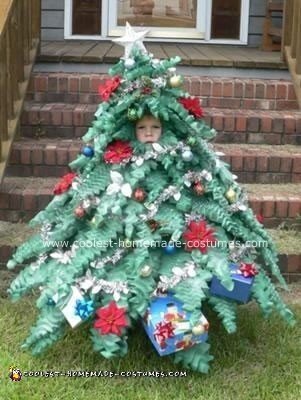
I don’t know about you, but for me, Halloween is one of my favorite holidays, running a close second to Christmas. My love of these two holidays inspired me to come up with my oldest son’s Mini Christmas Tree Costume years ago and replicate it again this year for my 3 year old.
SUPPLIES:
1 Ultra thin foam mattress pad – Queen
1 Ultra thin foam mattress pad – Twin
1 Stapler w/ staples
1 Scissors
1 Hot glue gun w/ glue sticks (Optional)
1 Pair of dykes -(Wire cutters for those of you who may be nomenclaturaly challenged-I made up that word… teeheehee!)
5-7 Cans green spray paint
1 Can spray snow
2 Large stars or snowflakes – Preferably concave
2 Large hoops – Staggered in size
4 Battery operated led string lights – Multicolored
1 Battery operated led string lights – Clear
1 Pair suspenders
1 Styrofoam cone
1 Piece of felt or similar material
1 Popsicle stick
Multiple safety pins
Various decorations as desired (NO GLASS!)
Paperclips, Medium (Optional)
What could be more fun, or safer than trick or treating all lit up as a Christmas tree?
This costume is rather tedious but oh-so-worth it when it’s finished. Start with a foam mattress pad and staple it in the shape of a toddler size cone. (Yes I said staple… I can sew but absolutely HATE it, so you will notice that everything done in creating this costume will avoid sewing at all cost!)
Place the cone over your little ones head, and using a marker, mark where you will cut the arm and face holes. Remove the cone and cut small holes in the marked area. Replace the cone on his head to check measurements, remove and re-cut. (You can do this as many times as necessary. It is easier to make small openings to begin with as you can always make them larger, but not smaller.
**Hint**
If a mistake is made on the arm holes, never fear, they can be hidden with leaves. The face can as well, but is more difficult to hide.) Fit the cone into the inside of the top of the tree and measure it to cut off as much as needed. After it is trimmed properly, remove it and glue felt to the bottom to make sure nothing is poking your little one in the head. Set the cone aside for future use.
I found two cheesy garland wreaths that I purchased and disassembled. I cut two of the rings out of the plastic base of the wreaths and used these to keep the shape of the cone. I saved the cheesy garland to help decorate the tree when assembled.
Using the hot glue gun, adhere the clear strand of lights through the front side of the star/snow flake and let dry. Cut one end of the Popsicle stick to a point. Glue this to the back of the front side of the star/snowflake and let dry. Liberally apply glue to the entire back side of the front half of the star/snowflake and attach the back side, hiding the wire of the lights. Let dry and reapply glue to the base of the Popsicle stick to reinforce.
I purchased a pair of suspenders that I attached to the bottom ring in the costume to help my son wear the costume without the entire weight of the thing resting on his head, as this thing, when completed, does tend to be bulky and can be a bit heavy, (I learned this the hard way with my first son… poor baby, however, he is 17 now and has no recollection of this… so… childhood trauma averted! LOL!). It may be more appropriate for a little older child. My son is pretty strong, but I think we will have to give him rides in the wagon for the longer stretches of trick-or-treating. (An unfortunate, but necessary, pitfall of commuting to the rich neighborhoods with greater expanses of property to traverse in order to obtain the coveted full sized-chocolate bars that are so crucial to a successful evening of trick-or-treating. I?m not above using my son?s cute factor to procure a little chocolate for Mama. After all, it was my blood sweat and tears that made his costume… and him!)
Next, cut additional padding into various triangle shapes to make leaves. (I find that the textured side makes for much more interesting leaves than the flat side.) Then cut smaller triangles all along the edge of two of the sides of the leaves. (I prefer to suspend the foam pad cone from the ceiling with a wire attached to the top of the tree at this point, as it is much easier to work with.)
Starting at the bottom of the cone, cut small slits above where you want to place the leaves in order to insert the stapler to attach them. Don’t worry, the leaves will cover the holes once it is complete.
For more body, first fold over the base of most of the leaves and staple the two corners together kind of like half of a burrito. This will make them stand away from the cone rather than lay flat. You can add leaves stapled flat intermittently until you get the shape and body that you want.
**WARNING!**
If you decide to use the full body leaves you will want to reduce the diameter of the cone, but not so much that it inhibits walking, lest your little one get stuck in doorways, narrow halls, and wipe other trick-or-treaters off the sidewalks completely! (Again, been there, done that! LOL! Of course, the last part can be viewed as either a drawback or an advantage! Hehehe!)
Once all of your leaves are in place you can start spray painting everything green.
**Caution!!**
Okay, here is where I state the obvious but necessary precautions; you should be in a well ventilated area and ensure that you have protective covers over everything you don?t want green. Although this is painfully obvious to most of us, it still needs to be stated for the same reasons that hairdryers have warnings against use while showering. “Seriously” LOL!)
Hint: Don’t paint as you go or, not only will you use a ton of green paint and time, but it will make the costume entirely too heavy. Use only what is needed. I like to use spray snow as well, so if you decide to do the same, don’t worry about white spots showing thru… you can just put spray snow there. Less paint is better in order to keep the weight down.
Once everything is dry you can insert the cone into the top and start adding the lights. The cone does not need to be adhered, as the final step will take care of this for you. Attach the battery packs at even intervals inside the costume with paperclips or wire of your choice, (I safety pin the wire at the top of the box in place until I am ready to insert batteries to make it more easily accessible until I am ready to make it more permanent. I prefer to use safety wire as opposed to paperclips, as it is more pliable), and thread the light strand through one of the already existing slits.
Using a punch or a small screwdriver punch holes where you plan on placing the lights and poke each bulb through while hiding the wire under the leaves. Place as many or as few as you would like but, again, due to weight issues, I recommend not using more than four sets of 20 lights.
**IMPORTANT**
Make sure you use LED lights that run off of 3 AA batteries rather than 2 C batteries. The LED’s will run for about 12 hours off of 3 AA’s and the C’s weigh far too much. Non LED’s won’t last as long and have bigger bulbs that are not necessarily brighter, but could create a hazard if broken. I found mine at Big Lots for about $4 each.
Once your cone and lights are in place, continue to decorate as desired. Be sure that you use plastic or similar less destructible and safer ornaments. Glass could pose a hazard if broken. (Once again, speaking from experience; I used some of our old ornaments on my first son?s costume. When he decided that he had had enough of toting his giant tree costume around supported by nothing but his spindly little 3 year old neck, he gave up and face planted on the sidewalk with a merry little tinkling sound as every bulb on his front side succumbed to the weight of child and costume alike. Fortunately, all of the cushioning from the foam leaves prevented any injury and slowed his fall exponentially. The little tyke looked like a small tree being felled by an axe wielding woodsman… “TIMBERRRRR”! Alas, he lay there exhausted until we agreed to remove his costume, which, admittedly did have a nice new glitter to it from the crushed glass, however, was not ideal for safety purposes. In retrospect, I may have wanted to use more practical decorations. In my defense; I was young and it was the early 90?s… Big hair hadn’t even gone out of style yet… so… it may as well have been the 80’s, which, we ALL know was not exactly a time known for safety precautions… take into consideration the amount of damage we did to the Ozone with all of that Aqua Net, not to mention our brain cells!! LOL!)
After your little darling’s tree is decorated, top it off by pushing the star/snowflake’s stick through the top of the cone, securing both in place. Hide the battery box for the lights beneath a leaf and secure with straightened paperclips or other wire of your choice. If you are so inclined, you can follow everything up by putting a dollop of hot glue on each of the lights to ensure they remain in place. Don’t go overboard on this, as you may find it necessary at some point to replace the lights if you end up using this costume multiple times and/or your child is as rambunctious as mine is.
**Warning!!**
When placing dollops of hot glue on any item, be sure that your skin is not one of them, unless of course you intend on using the ensuing big red blisters as an effective method of guilt persuasion to abscond with the afore mentioned chocolate bars! Conniving, yet effective in a, ?I went through 9 months of nausea and swollen feet, and 36 hours of labor in order to lovingly bring you into this world?, sort of way.
Good luck to you and I hope your chocolate hunting will be as fruitful as I know mine will be!
**DISCLAIMER** No children were harmed in the making of this costume nor the subsequent pursuit of cocoa products!
Related costumes:
 Christmas Tree, Cindy Lou Who and The Grinch Costumes
  Coolest Homemade Christmas Tree Costume
  Coolest Christmas Tree DIY Costume
  Cool Twinkling Christmas Tree Costume
  Cool Christmas Costume Idea – An Angel on a Tree!
  Cute Homemade Christmas Tree Costume
  Coolest DIY Christmas Tree Costume
  Coolest Christmas Tree Cake
Hi, great job! Thanks for posting the instructions too, very detailed and answers a lot of questions. Your creativity inspires me to make my child’s costumes from now on.
I think you should write for money this is so funny.. I am going to give it a go.. I am a big heifer so it’ll be quite a tree when all done. love it thanks so much.