Our family had just left the local zoo where my 3yr old daughter shockingly changed her mind about dressing up as Princess Elsa to going as a beautiful peacock instead for Halloween. It was a very productive outing I must say – in the short time we were there, it was decided that Mommy and Daddy would dress up as zookeepers (because zookeepers are the ones who care for the animals of course and if the kids were going to be animals then they needed someone to take care of them; my daughter explained), sister could be a peacock, and her 1½yr old brother a little lion. A perfect costume choice for him because after walking past the majestic animals at the zoo it was the only sound he made for the rest of the trip.
So, I went to work searching the Internet for the best store-bought lion costume I could find. I placed an order from Amazon and within two days received what I was hoping to be this amazing little lion. As I took the costume out of the package – pieces of the mane were falling off. I looked at my daughter who in her cute little 3yr old voice said, “Mommy, Em’ster (Emmett to everyone else but Em’ster to his big sis) IS NOT going to wear that – it’s coming apart and he’ll eat it!” I almost died with laughter inside, but replied, “You’re right, this is not going to work.” She then looked at me and said, “You should just make him one since you are making mine too. You can use his lion hat!” My daughter is only three but her thought processes and memory always seem to amaze me! I had forgotten that last winter he got a knit lion hat as a gift we never used and it would be perfect as part of a costume.
So, that is how my homemade costume count went from never making a costume before to making a peacock, two zookeepers and a little lion; all within a few days. I didn’t think that I had crafting in me but can proudly say that I pulled it off.
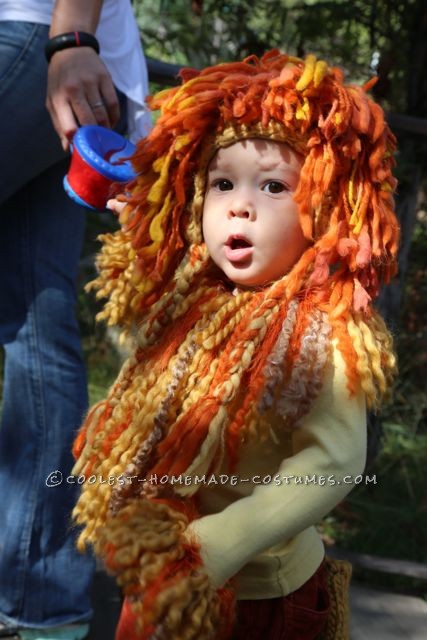
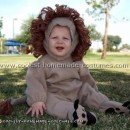
I was surprised at how easy and fun this costume was to make. It took me almost a week to do, but I was only working on it for an hour or two at night after my kids went to bed. I found out that I was pretty good with a glue gun, but definitely had more than a few battle wounds from the hot glue. I was very concerned that I would spend a bunch of time making the costume and then he wouldn’t wear it, but that wasn’t the case. He loved it and walked around growling at everyone – it was so cute and such a fun Halloween!
The week before Halloween we went back to the zoo for a special Halloween with the animals’ morning. Everyone was in costumes and I can’t tell you how many people stopped us to ask if they could take a picture, wanted to know where I bought it, or to just tell me how amazing our brave little lion looked in his costume.
The next day we had tickets to another Halloween activity at an amphitheater to see the symphony. My daughter really wanted to partake in a costume contest that was going on before the music started, so we entered her and her brother. He stood on stage next to his big sister and when asked what a lion says, growled at the audience. Our little lion took second place to his sister. I loved making all of our costumes, but seeing how much my little ones loved them was the best part. I don’t think I can top these but I will keep you posted. I’m sorry I didn’t take pictures throughout the process (really I didn’t think it was going to turn out as great as it did) but here is how I did it –
Materials Needed:
- Shirt and Pants of choice
- Hot Glue gun and at least one-two bags of Hot glue sticks
- Yarn of various colors – I used four – a mustard yellow, light brown, burnt orange, and a similar burnt orange thread-like yarn
- Elastic
- Felt
- Black Pipe cleaner
- Stuffing – or something to use to make the tail plump and stiff
- Knitting or crochet needles to make the tail and hat if needed
Steps:
1. Search his closet
First, for a yellow colored shirt – We had one that just happened to be mustard yellow long sleeve – perfect for our southern California weather that time of year.
Second, for some kind of bottoms – again we just happened to have a pair of burnt orange color cords that were the perfect color. I was planning on just using jeans until I came across these pants.
Third – find the lion hat!
2. Purchase yarn and felt
I took the lion hat and headed to my local craft store. I used it as a guide to match colors of yarn for the mane, arm and leg bands, and the tail. These are the colors I found.
Mane – longer in front and shorter in the back – step 2
Arm cluff – step 2
3. Hot glue
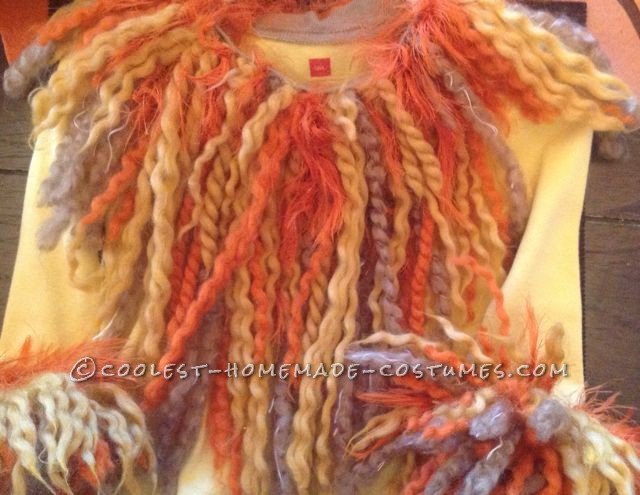
I took all of the yarn and cut various lengths to use for all of the pieces, and began hot gluing them around the collar of the shirt in no particular order but also alternating colors of yarn. Some of the pieces I took and glued in the middle so I would have two shorter pieces and some I made much longer for the front part of the mane.
**One of the few problems I had making this entire costume was with the mane – after I had it all done and went to try it on my son – I realized that the glue had shrunk the collar a little so it was kind of hard to get it over his head. I should have had something to keep it stretched to the normal shape.**
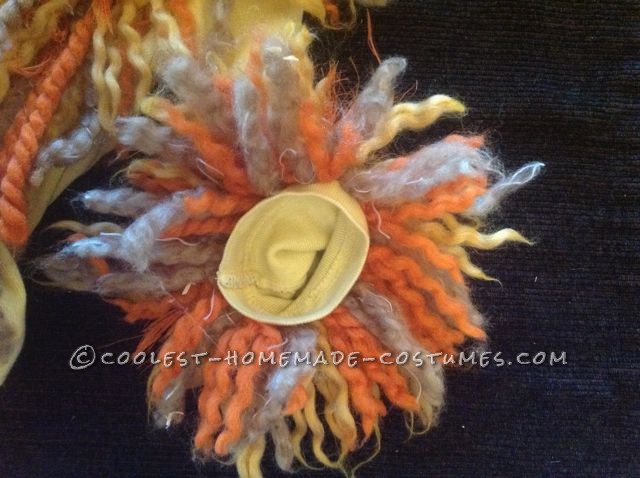
After going all of the way around, I then used the same technique of gluing the pieces in the middle to make various lengths around the ends of each sleeve.
**I used one of my son’s small toy balls to put in the end of the sleeve to keep it from shrinking like the collar.**
Leg cuff – step 3
4. Leg bans
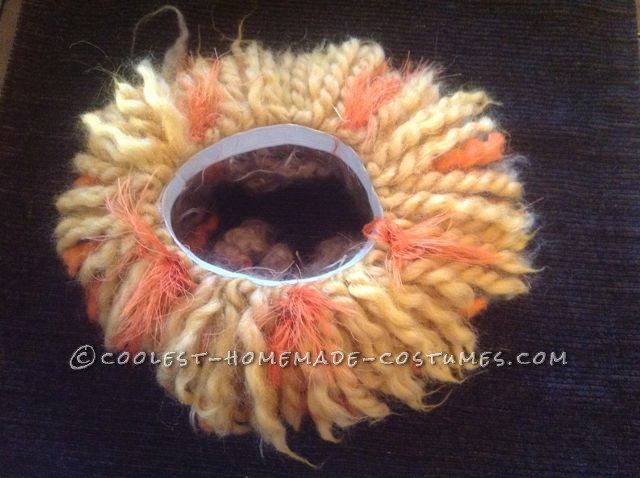
I measured around the ends of the pant legs with a piece of elastic, and then cut the elastic just a little shorter than what I needed. After hot gluing the elastic together to make a circle I placed it around the mouth of a wide mason jar to keep it from shrinking. I then started hot gluing the yarn around it in the same fashion as the mane and arm cuffs.
** Of all the pieces I made with yarn I wanted it to look full so I layered the yarn and then unraveled each piece**
5. Shoe covers
These were done with yellow felt, a fuzzy black pipe cleaner, and some elastic.
First I decided what shoes he would wear and then used them as a guide to cover with felt.
I cut out the shape I needed to cover his shoes and hot glued it in the back to make a kind of circle. Then I cut slits to make pleats that I could hot glue down on the inside. After the shape was done and the shoe was covered, I cut a piece of elastic to go across the bottom and hot glued it to each side keeping it in place.
Then took a black pipe cleaner and cut six – 1 to 2 in pieces for claws. I also cut six very small round pieces of the same color felt to use as anchors to clue to the felt covering the shoe.
I poked each piece of pipe cleaner through the center of each round felt piece and hot glued them together. I then hot-glued three felt claw pieces to the front top of each shoe to make it look like claws.
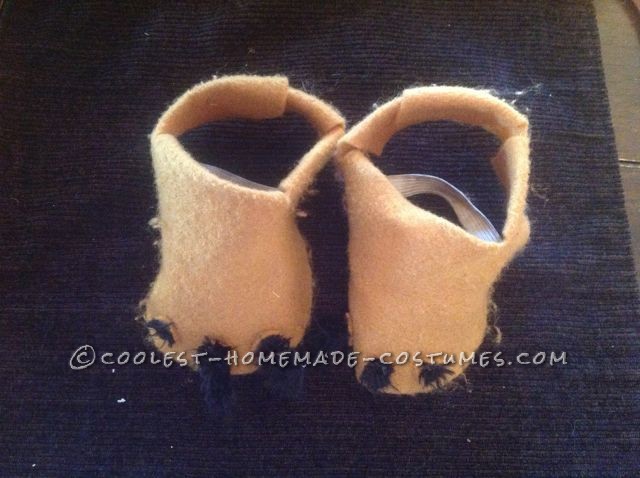
Shoe covers – step 4: They have been worn a few times
6. Tail
I wanted the tail to match the knit hat I already had, so I took out my knitting stuff and knitted a 2in x 20in tail in the yellow yarn. I tied off one end and stuffed it will a large pipe cleaner and stuffing before tying off the other end. The pipe cleaner gave the tail just enough firmness to bend it.
**I wanted it to be long enough to just hang off his pants, but I should have made it a few inches shorter because it was a little too long once it was on. After our first outing I tried to tie it up in a couple of spots to make it shorter.**
Once the tail was tied off on each end I hot glued various lengths of each color of yarns in the same way I did the rest of the costume and then unraveled them.
To attach the tail to the pants I took a long piece of the yellow yarn and threaded through the tail and then around a belt loop then threaded it back through the tail – repeating it through each until it was secure and then tied it off.
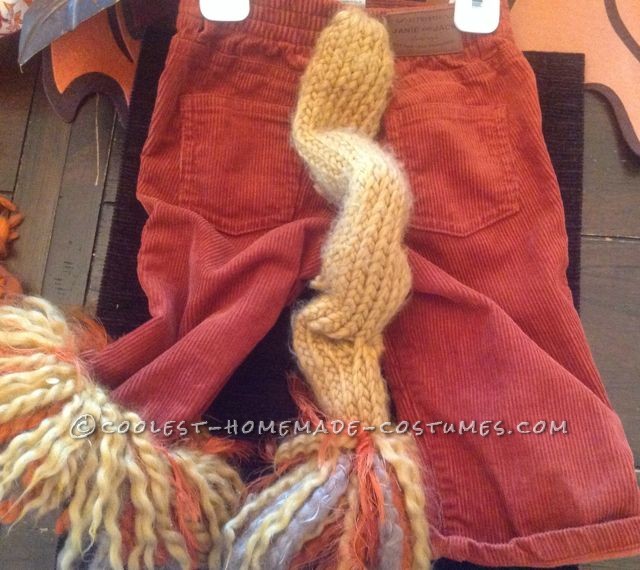
Tail – step 6
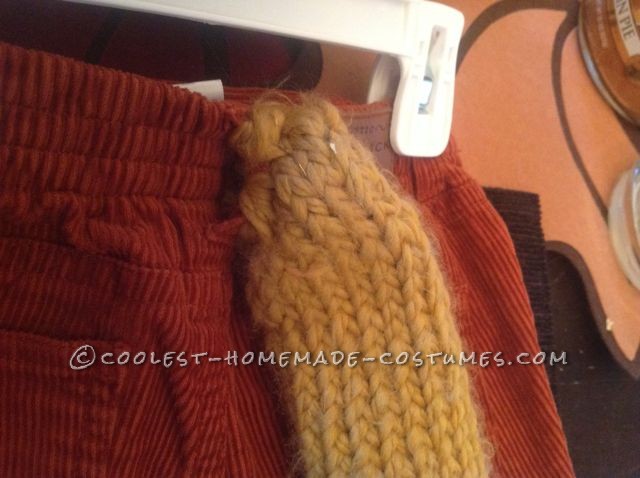
Tail attached close up – step 6 –
That’s it!
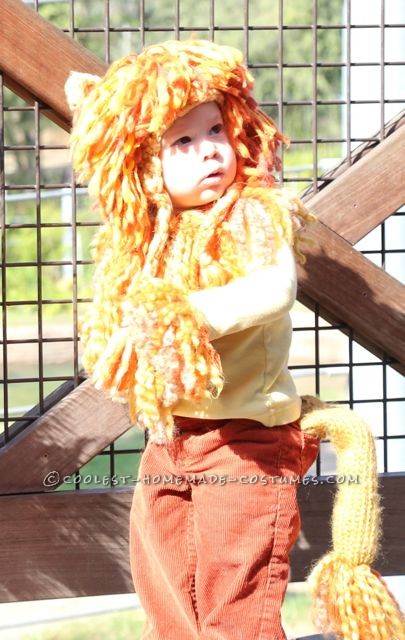
What a cute little lion

Out trick-or-treating

Related costumes:
 Coolest Homemade Lion Costume Ideas
  12 Coolest Homemade Parrot Costume Ideas
  Autumn Yarn Homemade Lion Costume
  50+ Coolest Homemade Scarecrow Costume Ideas
  A Very Original Homemade Peacock Costume
  The Wizard of Oz Family Costume
 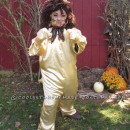 Original Homemade Layer by Layer Wizard of Oz Costume (Lion, Scarecrow, Dorothy and the Tinman)
  Beautiful Peacock Costume for a 3 Year-Old Girl
Your comment has been sent successfully.