Before I start on the “How To” of this scarecrow costume let me tell you that burlap makes the hugest mess ever. I have never worked with the stuff before so I had no clue that by the end of it all I would be picking it out of my eyelashes… not to mention the carpet. I am pretty sure my lungs have a nice layer also as fibers were floating in the air everywhere.
Also, if you’re not smart with the hot glue (like myself) EXPECT TO HAVE NO FINGERPRINTS LEFT ON YOUR FINGER TIPS! By the end I was covered in spray and acrylic paint, blisters on my fingers tips, hot glue gunk and strings all over my hands with a beautiful dusting of burlap fibers over every inch of my body.
We aren’t even going to a party. We did this just so he could sit on the porch for 2 hours and hand out candy to the trick or treaters… if we can get them to come near him.
How to Make this Scarecrow Costume
Costume Hood
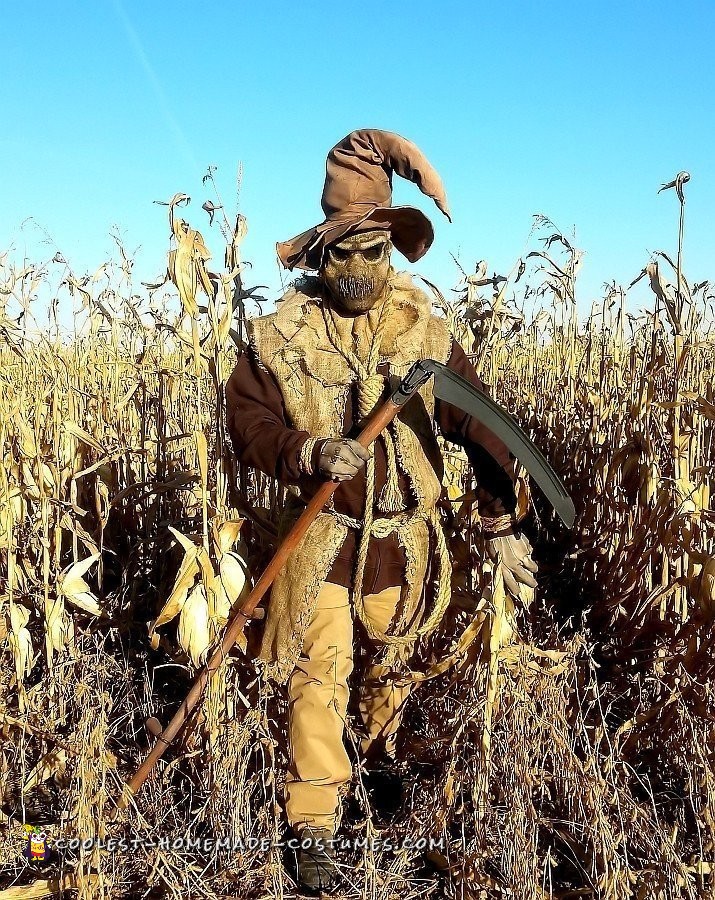
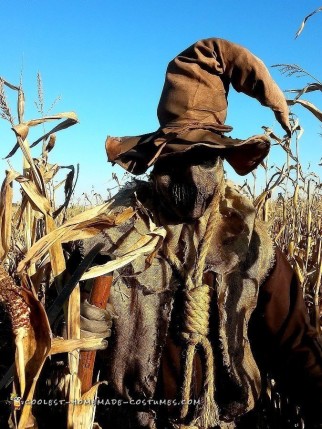
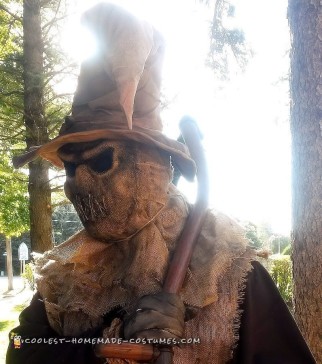
I used a cheap plastic face mask. The kind with the elastic strap on the back and just covers the face. My husband wears glasses so I needed the mask part to sit away from his face. I put memory foam pieces on the inside. The chin, forehead and cheeks area.
Using burlap fabirc and hot glue, I layered the mask until it became firm (about 4 layers). Remember that I said 4 layers. I rolled up burlap to form eyebrows, eye and cheekbone area and glued them down. Then I took a massive piece of Burlap (one that would cover all sides of his head) and hot glued the face mask in the middle taking care to form the eyes and nose area (large piece of burlap went over the created face mask). Cut out the eyes and glued see-through black material in them (from the inside). Burn marks 1-3 on the fingertips were created here. *insert adult language*
When I originally made the hood it had no mouth but he had trouble breathing so we had to put cuts in the burlap. We loved how it looked with no mouth but after about 3 minutes on his head and a touch of arm flailing he told me he had trouble breathing and his exhale was fogging up his glasses. Good thing for the arm flailing because the fact that, when he spoke, he sounded like he was 25 miles away. It gave me NO indication what-so-ever that he could not breathe through 4 layers of solidly hot glued fabric. Sigh.. fine.. we make a mouth *makes cuts in the burlap*. Next I sewed twine in a zig zag pattern to cover the slits (now he can drink with a straw AND breathe). In the temple area on each side I hot glued a strip of burlap. That way when he puts the hood over his head I can tie those two straps around the back of his head. Holding his mask against his face firmly.
I put the hood on him and used a piece of twine to gather it under his neck and cut the neck ruffle how we wanted it. Be careful how tight you try and tie the twine. I think I had once again tried to cut off his air supply on accident. Atleast I could hear him loud and clear this time when he told me to let up. No arm flailing though.. so it was sort of a let down. *giggle*
Using arylic black and dark brown paint I dirtied up the burlap and accented the areas I wanted to be really pronounced. I also used black at the end of each piece of twine because the twine left smale holes in the mouth area and I did not like seeing them. The black paint hid them well! The black paint also hid the burn marks on my fingers *win*!
Burlap Long Vest
I took an old sleeveless t-shirt of my husbands and layed it on the burlap to draw my outline for cutting. I just extended it and made it longer. I sewed twine down the length of the front along with some X marks on other areas. I ran a bead of glue about 3 inches in from the edge of the fabric. Burns 4-7 happened here. That way when I frayed the shoulders, bottom and front the fray would only go so far and stop at the glue. Using the same paint as the hood I dirtied up the twine and vest. Ahhh smell the fresh potato-ish scent of burlap in the air!
Sweatshirt and pants. Anything brown will do.
Work golves dirtied with black and brown spray paint.
The rope for the wrists, waist tie and noose were also dirtied with black and brown spray paint. My husband made the noose and I do not wish to know how or why he knew how to make one. I will now think twice about cutting off his air supply in next years costume.
The hat we bought but it was way too light and super clean and all perfect. So I again used the black and brown spray paint along with black and brown acrylic paint to make it look old. I shoved newspaper up the hat to make it stand how I wanted.
Weapon is an actual hay sickle. We really loved how this evil scarecrow costume turned out!

Related costumes:
 Homemade Walking Cemetary Halloween Costume for a Woman
 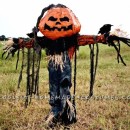 Coolest Pumpkin Patch Scarecrow Costume
 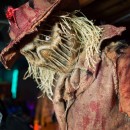 Terrifyingly Scary Homemade Scarecrow Halloween Costume
 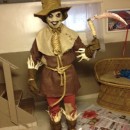 Scary Scarecrow Costume
  750+ Horrifyingly DIY Spooky, Gory, Dark and Scary Halloween Costumes
 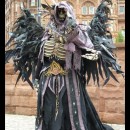 Scary Undead Necromancer Costume
  50+ Coolest Homemade Scarecrow Costume Ideas
  Coolest Homemade Treehouse Costume