So every year I love to do something fun and different for Halloween; this year I wanted to do something with 90’s kid nostalgia that was easily recognizable but not commercially available.
Usually I have a few ideas bouncing around but can’t make any solid decisions until I visit the Goodwill store. This year, I really wanted to be a bad guy from The Super Mario World game but couldn’t totally decide who or how.
On my first stop, I found almost everything I needed to become the Piranha Plant so that was Fate! What I bought on that first trip was: Collapsible Laundry Bin ($2) and Light Green, Dark Green, and Red Fleece Blankets (shown in the before picture – they were $5 each). I already had a cheap dollar store yoga mat (Free/$1) and large brimmed sunhat (Free/$2) and that was enough to get me started. I worked on it for about five weeks but it didn’t really take that much time. I’m just a procrastinator and life can get in the way. But I digress.
First off, I removed the bottom and zippered top of the laundry bin so that I could pull it up around my waist. This was used to make the green tube that the flower comes in and out of in the game. Since I was using blankets as fabric, I had to be cautious about cutting as I could just run out and grab more at the store. One of the reasons I love working with fleece is it is very forgiving and hides hot glue well. Which I use a LOT of!
Measuring the bin against the blanket, I cut down the blanket so it was about 3″ longer than the height of the bin. To attach it, I just hot glued the blanket to the inside top and bottom of the bin – I didn’t glue any on the outside as I wanted it to fall naturally and also wanted to keep it collapsible for traveling in cars and what not.
To make the raised edge of the tube, I measured how tall I wanted it to be (4″) and cut strips of the yoga mat and then layered the strips on each other to get the width that I wanted. I wrapped the strips around the top of the tube to get the size of the circle and hot glued/duct taped the whole thing into a large circle. I should mention that early in this process, I bought myself a new more heavy duty glue gun – my dollar store one was just not up for the job!
Once I had the circle, I covered it with the remaining dark green fabric, there is actually part of a Santa embroidery on the underside but it wasn’t visible – waste not want not!
I glued the fabric so that the edge was at the top ‘corner’ of the circle. At this point I had no idea how I was going to keep this thing around my waist.
At this point I realized that I should use black fabric to fill the space between the tube and my body so that you couldn’t see the structure of whatever would be underneath. I was thinking suspenders would be my only option and conveniently I have a few pairs from my time working at a tuxedo shop. I also had left over black fleece from a different project and I only needed a little.
Hindsight is 20/20 and I would definitely recommend attaching the black to the tube green BEFORE gluing, but again, this is hindsight, so awkwardly I sewed the black to the excess green to make the ‘skirt’ for lack of a better word. Then I attached the whole circle/skirt to the top of the tube with hot glue.
Satisfied with what I had so far, I started on the head as this was the real challenge. I wanted it to be large enough to give the illusion it was right off the screen without making it so big that it was unrealistic to wear out to a bar/party.
I figured the diameter of the laundry bin, now tube, would be proportional and it also worked out that was almost the diameter of my sunhat 19″ diameter it was.
To draft the pattern, I used Google to get the formula and found a great tutorial from shishigirl.blogspot.com. If my circle was going to be 19″, then d=19″ bunch of math later I had drafted my ‘peels’ of the ball, cut them from the red blanket and sewed them together leaving one edge open.
Optimistic that it actually looked like a ball when sewn together, I was also slightly nervous about what I had gotten myself into and if this would even work.
I hot glued some of the extra red on the bottom brim of the sun hat and trimmed it down, again hindsight I wouldn’t have trimmed it as I removed all seam allowance. Ah well, live and learn.
This is when I realized I needed one more blanket to go much further – white to make the lips, teeth and dots so off to Salvation Army this time and I found one again for $5.
Another problem with this head was how I was going to fill it. My reading online and previous experience told me not to use traditional stuffing as the weight would be too much and need extra support.
I considered using packing materials, foam peanuts, bags of air or bubble wrap but these were
a) hard to come by
b) hard to work with and
c) more expensive than I anticipated
So back to the drawing board. After more thought, I decided bean bag filling would be the best, lightest option. Walmart had body pillow size bags for $20 so that was that. Bonus: I still have over half the bag left for future projects!
Next step was the lips, I wanted to sew them between the hat and ball to have clean lines. I just eye-balled the measurements. I think they were about 3-4″ doubled plus seam allowance. I stuffed them with the bean bag and some traditional fluff and pinned them in with the hat/ball sewing only the top front half.
When trying it on, I realized that the three top peels and three bottom wasn’t going to work, so I had 2/3 (4/6) of the ball on the top of the hat, and two for the bottom/chin.
Confession: I usually sew drunk and when doing the head, I was at least one bottle of wine in, so these details are a little fuzzy, but I managed to: stuff the head with beanbag filler, sew the inside back closed, sew on the bottom lip, cut a neck hole, cut and glued on the white dots, drafted, cut and sewed the teeth and had pinned them into place on the lips. There were nine teeth in total – four on the top and five on the bottom.
For the stem, my original idea was to make a whole dress green to make my body the stem, but then decided proportionally it wouldn’t look right.
During this time, I was also going through a lot of personal changes and part of that was downsizing my admittedly excessive closet. This was also a perfect time for me to do that as I make frequent trips to goodwill during Halloween season. In my pile to donate was a cheap black dress (maybe $10-15) I had only wore once and then accidentally shrunk in the wash. So instead of making my whole body the stem, I would just sew a stem on the black dress, thus conserving fabric while getting better proportions for the illusion – win/win
I cut the strips of light green I think 8″, but again I just eye-balled the proportions and sewed one up the back and one up the front with extra at the top going up to the top of my neck.
Then I folded the tops over and sewed them to allow something to go through to hold them up some sort of tie choker necklace.
Feeling confident in my progress, I basically set it down for 2-3 weeks.
Last major thing I needed to do when I picked the project back up again was make the leaf hands. I really hadn’t thought about how to do this.
Luckily, I ended up getting sick and having to stay home from work a few days, so I used that time to do a final push to complete the costume – I had found out my plans for Halloween had fallen through and didn’t know where I was going or even IF I was going anywhere, but getting the project complete was important, so I continued on.
To draft the leaves, I just Googled leaves and measured out proportions that would work with the little fabric I had to work with. I had to play with these a while to get the proper support, stuffing and proportions to be practical since I still needed to be able to wash my hands, etc!
What happened in the end was me adding an inner layer of dark green felt I also had in my scrap bin (free) and stitched the vein lines on to hold the stuffing/ give more detail. Then I just cut slits to allow me to come out and a support around my palm and middle finger that could slip on and off easily.
The arms were just a tube of the green fleece that I cut open around my forearm to create the glove with the leaf. Then I just attacked the wrist and sewed the other end under the front body stem.
I put a light green hem on the skirt to give me a bit of length since I wouldn’t be wearing the tube during transit. And that was that, dress complete. :)
Last necessary item was how I was going to keep the outer tube on, I really didn’t want to use suspenders as even black ones would ruin the illusion I was going for.
Without a real plan, I just started and decided to figure it out on the way. I knew it would have to be a belt, so I made that out of a thick elastic (approx $) and two metal key clip things I also have had forever (free!) so I could loosen it for getting in and out, the belt had to be tight to hold up the whole tube without sagging.
I sewed the back half of the belt to the back of the black fabric at the top of the tube but not the front – I wanted to attach a fanny pack or pockets inside for extra storage and needed to have access.
Now how to keep it from sagging or sitting too far forward or back. There was a large metal support spring in the laundry bin that held it up but also allowed it to collapse to flat. Using strip of cotton fabric, I put the tube/belt on and attached three straps from the belt to different point on the support spiral to hold it in place, two in the front, needed one at the entire back. This took some trial and error, but eventually, I got it right and secured the support with sewing, safety pins and hot glue. PERFECTION!
To finish it off, I added a small (actually too small) fanny pack bag to the front left of the belt to keep wallet and lip balm.
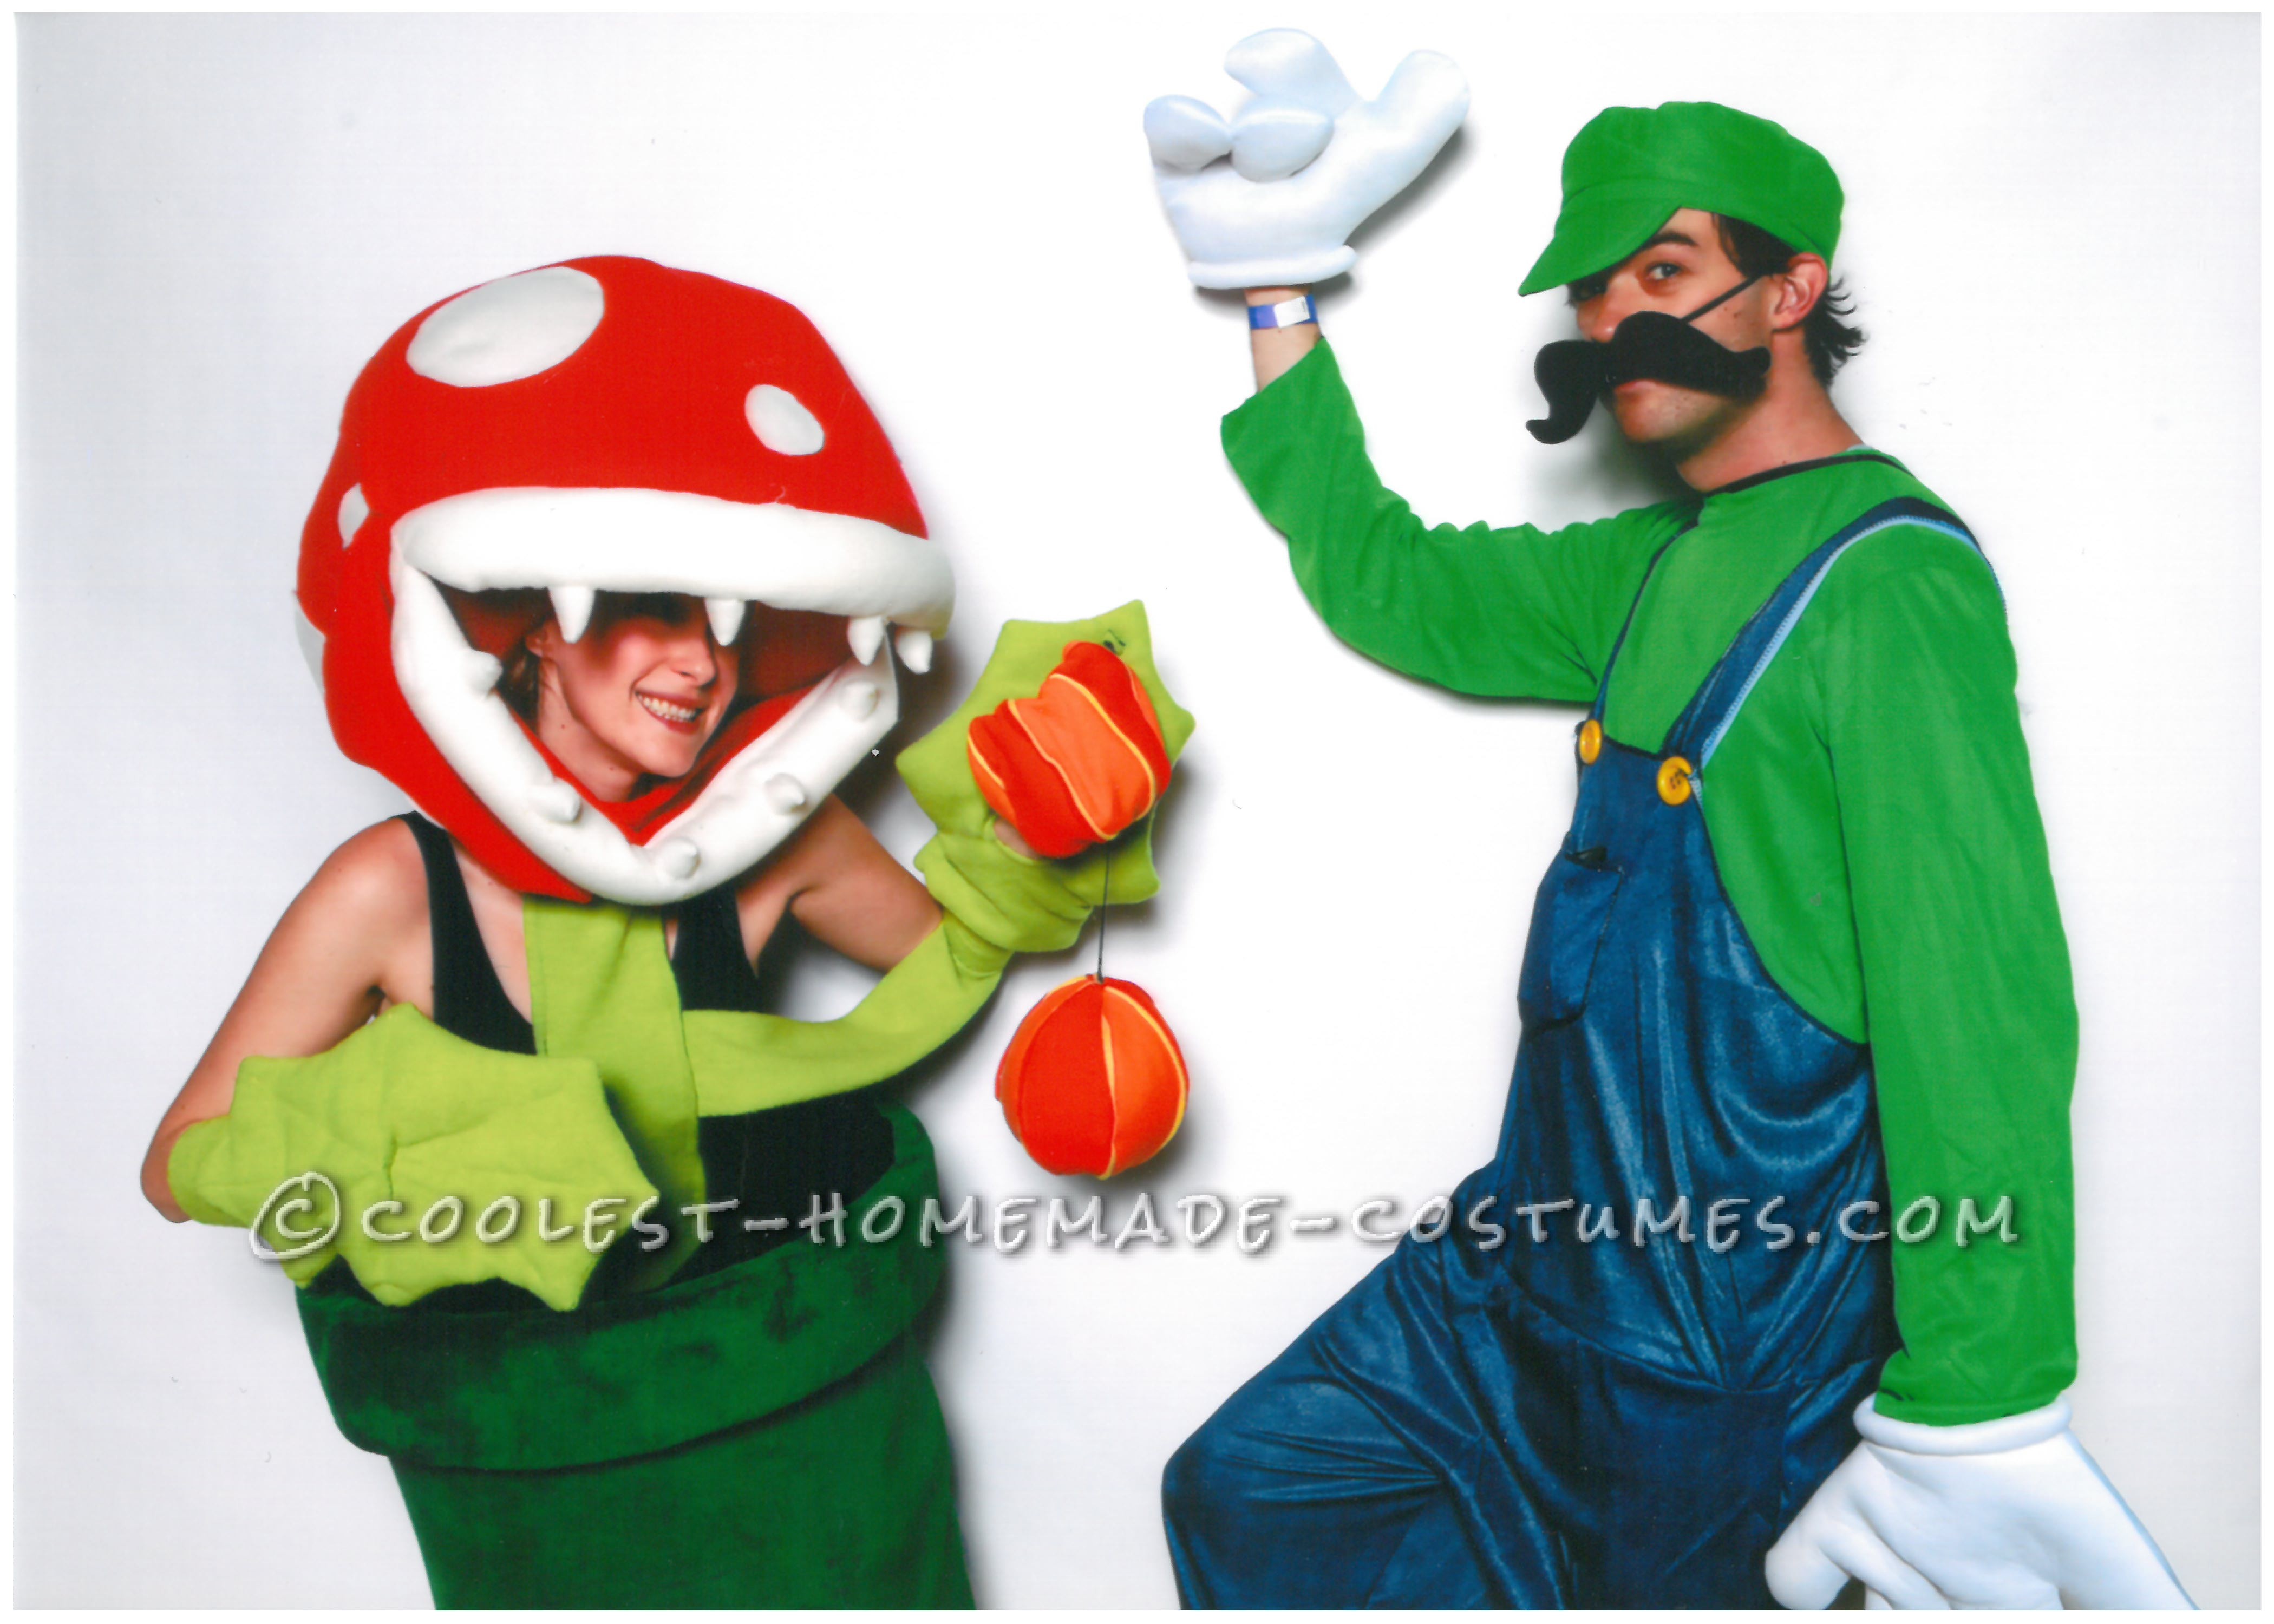
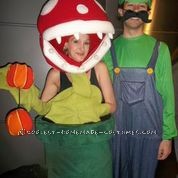
Now, I’m a stickler for details and love to incorporate accessories into my design. The whole time I wanted to make a three fireball purse like the three the shoots in the game. Let’s just say easier said than done!
My idea with the three balls would include a top one that I would sew in a beer koozie, middle would have a zipper pouch for wallet/phone and then a 3rd just stuffed with bean bag filler to complete the look.
I drafted the same style ball just smaller, using the size of my koozie as reference and cut all the pieces. Long story short I tried at least 3 ideas until I got to the final product. The day of, I had completed my idea of the three balls, but it just didn’t seem right, so at the last minute I ditched the middle ball and it worked so much better!
Ended up wearing the final product to a Halloween Party at the Museum in my city with my new boyfriend who is Italian (genuine Italian Luigi – I told you I was a stickler for detail!) and had never celebrated Halloween before – not even as a child. His costume was store bought, but it definitely added to the whole look!
The museum had a costume contest where three judges chose who would be entered, a photographer took your photo and at the end of the night they projected them on the wall with a code to text/tweet your vote. I ended up coming in 2nd, winning a gift certificate for a professional photo session with the photographer from the party.
Overall, it was a huge success and I’m so pleased with the final product.
Total budget was approx $60-75 including the fabric I bought for the balls, plus a lot of sweat equity!
Thanks for your consideration and Happy Halloween!


Related costumes:
 13-Year Old Creates Bonnie Costume On Her Own
 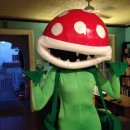 Fantastic Mario Bros Piranha Plant Halloween Costume
  Sassy Samus Costume from Super Metroid
  Coolest Homemade Mario Brothers Halloween Costumes: Bowser, Dry Bones and Petey Piranha
  Amazing Yoshi Mario Kart Halloween Costume – Entirely Homemade!
 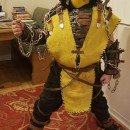 Cool Homemade Scorpion Mortal Kombat Halloween Costume
  Coolest Piranha Plant from Mario Bros Costume
  Cheap Sub Zero and Kitana Costumes from Mortal Kombat
Your comment has been sent successfully.