Hello people of the world!
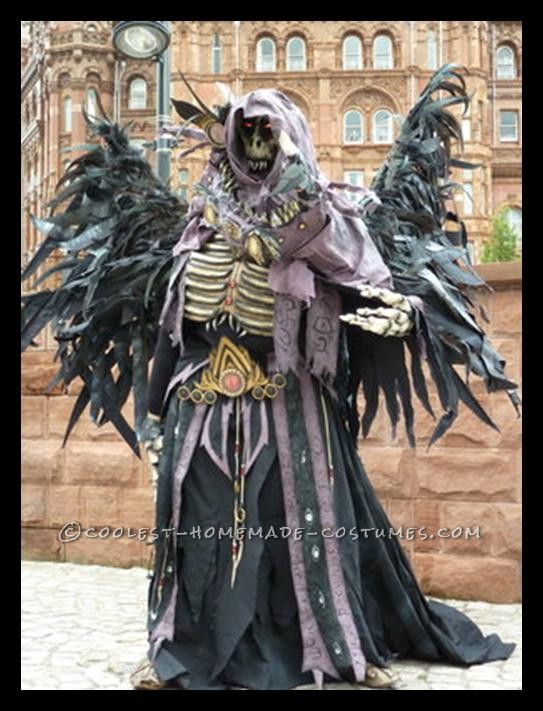
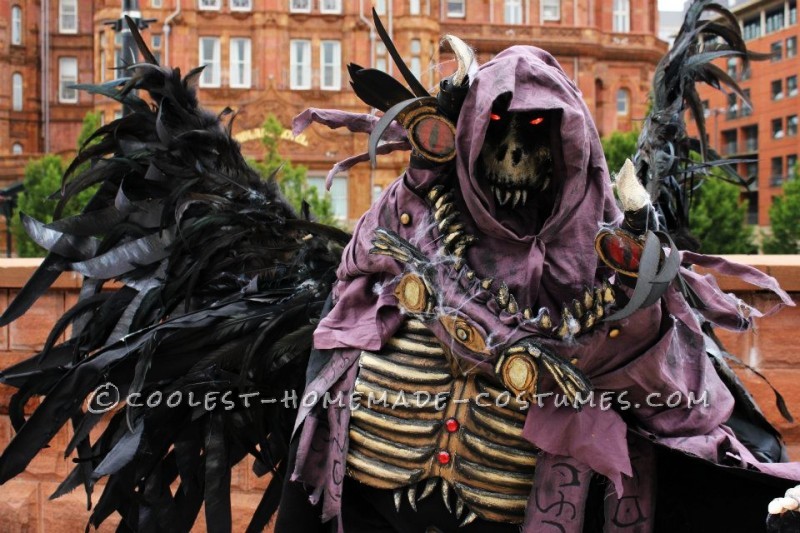
I am an unemployed woman who loves her hobby! Costume making! I love my hobby so much that it constantly takes over at least half my room at a time (usually my bed so I have to sleep next to cello tape and pencils!) But enough about me! Lets get to why you’re reading this… The ‘Undead Necromancer Costume’. This is one of my favourite costumes I’ve made. He’s big, he’s bad and he’s ugly! But mostly, he’s scary! I wore him to a convention once, and stood very still until people came up close… then, BOOOO!!!! I think I scared just as many adults as I did children!
Even with those fun moments this hasn’t been the most comfortable costume to wear. You have about 5kg worth of wings on your back, a full face mask with hood, and VERY limited vision. Underneath all that are two more layers and a long sleeve black top! Plus one of the added features (smoke) I had to bend one of my arms up behind my back for hours, I think I got cramp about 5 times.
Undead Necromancer Costume
Materials
No costume is complete without the materials to make it in the first place! So below is a list of all the materials I used when constructing the beast:
- Black Fabric
- Purple Fabric
- Shoes
- Craft Foam
- Red Gems
- Belt
- Wooden Curtain Hoops
- Red Beads
- Clear Gems
- Glass/Plastic Lenses
- Sandpaper
- Upholstery Foam
- String
- Hot Glue Gun
- Black Long-sleeved Shirt
- Self Cover Plastic Buttons
- Elastic
- LED Lights
- Wire
- Battery Pack
- Red thin plastic sheet (carrier bag)
- Heat shrink
- Hinges
- MP3 Player
- Loud Speaker
- Smoke In A Can
- Plastic Craft Mask
- Suede Straps/String
- Cobweb Fiber
- Papie Mache
- Old Rucksack
- Feathers
- Wood Dowel
- Wood Board
- Screws
- Cotton Glove
- Heat Gun
- Thermo Plastic
- Wire
- Old Sheets/Cheap Fabric
- Drawing Materials
- Black Spray Paint
- White/Grey Spray Paint
- Acrylic Paint – Gold, White, Black, Red
- Planning
Materials needed for this step:
Drawing Materials, Old Sheets/Cheap Fabric
Planning is THE most important step of anything you do. Without planning the fundamentals of your costume can be completely wrong, meaning the finished product will be; wonky, sore to wear, not fit, not accurate or just plain wrong!
I did my planning in the following way:
Firstly I got as many different reference pictures as I could, from all angles (unfortunately there was only one for this costume!!).
Then I drew the costume myself, filling in all the missing angles with what I thought it might look like.
With this drawing I then drew it out again in sections, showing how the costume would be layered for a real person to wear it, and how the costume would stay on (e.g.
buckles).
I ended up with 11 different layers:
- Hood & Mask
- Shoulder Mantle & Cape
- Under Cape
- Rib Cage Armour
- Long Sleeve Top
- Gloves
- Bracelet
- Wings
- Shoes
- Belt
- Skirt
Once I knew what everything had to look like I grabbed some cheap fabric from a charity shop! (You can use old sheets, but make sure you don’t want them any more
before cutting!)
This fabric is going to be used to make the templates for the costume so I can make sure things fit before using the more expensive materials. I drew out shapes like the skirt and cape onto the fabric and kept checking the sizes on myself to see if it’d work.
After drawing all the pattern pieces I laid them onto the real fabric and cut everything out.
Electronics
Drawing
Skirt and Belt
Materials needed for this step:
Black Fabric, Glue Gun
This was quite simply the easiest step out of them all! For the pattern I simply folded the fabric around me and glued down where it joined (So I didn’t get stitch marks). I left it nice and baggy, especially around the back so it looked old and flowing.
The Belt
Materials needed for this step:
Old Belt, Glue Gun, Black Fabric, Purple Fabric, Acrylic Paint- White, Red, Gold, Black, Suede Straps/String, Wooden Curtain Hoops, Craft Foam, Clear Gems, Wooden Dowel
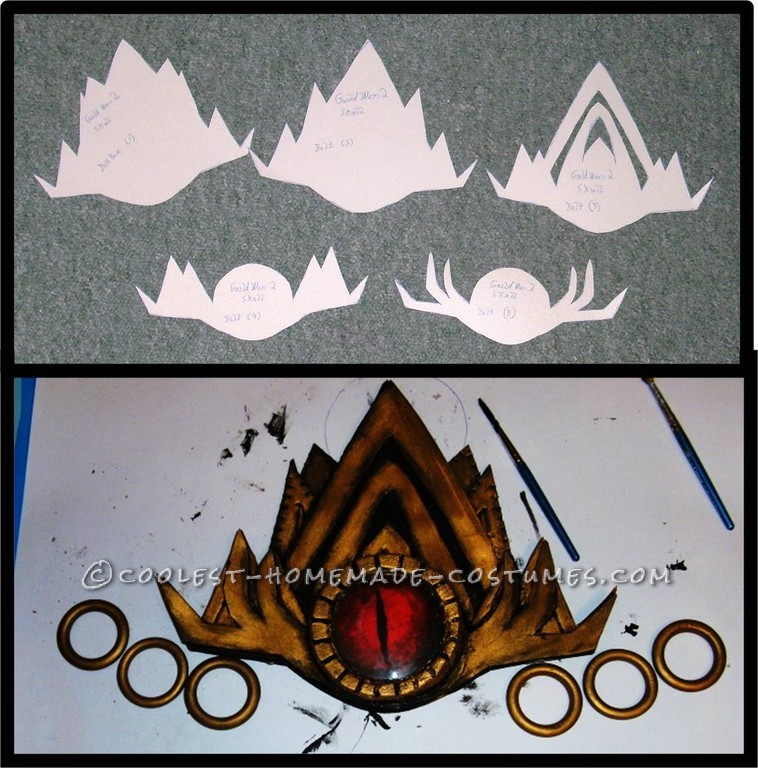
The belt was defiantly the most intricate and fun part of the costume!! I started off with a basic old belt from a charity shop. This part can be a little tricky to explain because it’s made up of so many parts!
One of the most fun, and annoying at the same time was the ‘ladder’ type addition. These were painted bits of dowel tied together by suede strips. Sounds easy right? NOPE! I had to cut and paint 26 bits of dowel exactly the same, then tie them to the strip with the same spacing on each side. Once they were done they simply tied to the belt!
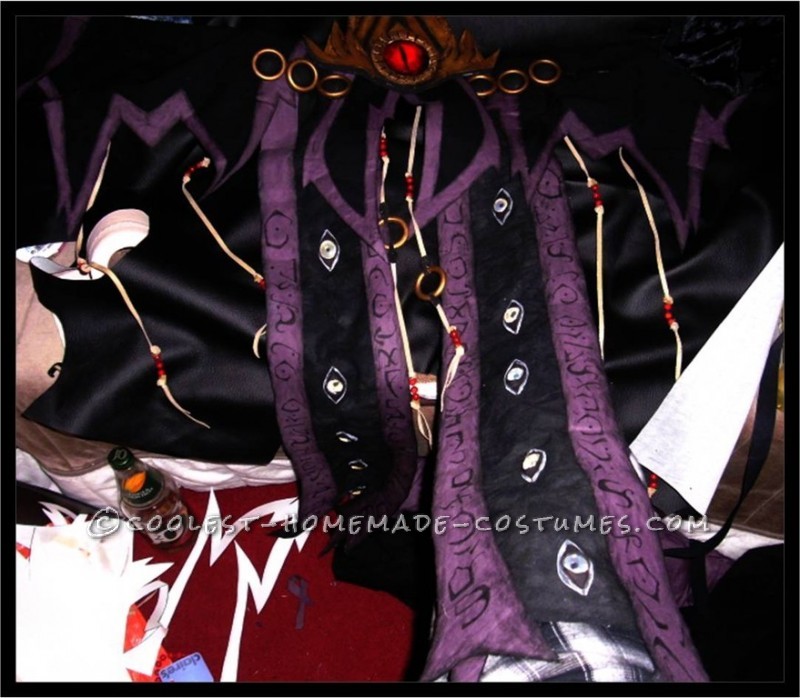
The part I’m most proud of in this belt are the long ‘flaps’ at the front. I started by cutting out the templates for the shape onto the black fabric, then copied it onto purple so I could cut out the side edging accurately. I glued them on top of each other so that they wouldn’t fray, I didn’t get any stitch marks and so the fabric would be stiffer. After I had the basis I painted on the patterns and glued some clear gems over the eyes in the middle. These were then covered again with a piece of craft foam to hold them in position. Once finished I simply folded the fabric over at the top and glued leaving a gap, so I could thread the belt through.
Next is the part cats like to play with!=O The ‘dangly, stringy things’ as I like to call them. I simply threaded some red beads onto a piece of suede string and tied it off to a wooden curtain hoop. These were then tied onto the belt. Sounds simple again, but when you have a cat constantly trying to impress me by catching it’s prey, things can get a lil irritating (but cute!)
The belt buckle is the last part of the belt and is pieces of craft foam layered on top of each other. The eye detail is a painted piece of card with a glass lens over it (I found a load of them at a recycling shop).
Skirt Progress
Belt
Ribs and Under Cape
Ribs
Materials needed for this step:
Paint, Beige, Gold, Black, String, Foam, Red Gems
The rib cage amour was probably my least favorite part of the costume, because I feel I could have done a lot better, and made them bigger. I used my fabric template I cut earlier to make a chest plate shape, then used this to cut out a sheet of foam.
On top of this I planned out where the rib shapes were going to go, and cut them out of a separate sheet of foam. I glued them on then carved a curve around the edges with scissors so they didn’t look so square.
Gems were attached with glue after I had painted the ribs with a mix of black, beige and gold paint to give it that weathered feel.
Once finished the ribs were simply tied around my chest with bits of string!
The Under Cape
Materials needed for this step:
Black Fabric, Purple Fabric, Clear Gems, Red Gems, Glue, Paint – White, Black
This was probably one of the least noticeable parts of the costume, yet the most pivotal! It is the part that hides everything you don’t want people to see on your costume (soo shuuusssshhhh).
The start is pretty much the same as the belt’s large flaps; cut out template, put onto black fabric, then use purple for edging & paint, however the main difference is the dangly flaps at the front. I had to re-make these about a hundred times because I couldn’t get the scale of them right compared to the rest of the costume. Plus it was really difficult sticking them onto the rest of the costume right, because they had to hide the edges of the rib cage.
Mantle, Mask and Hood
Mantle
Materials needed for this step:
Purple Fabric, Clear Gems, Red Gems, Glue, Paint – White, Black, Wire, Foam,
Plastic Self Cover Buttons
Defiantly the most confusing and time consuming part of the costume. Just figuring out how to do this in the first place made me almost pull my hair out!
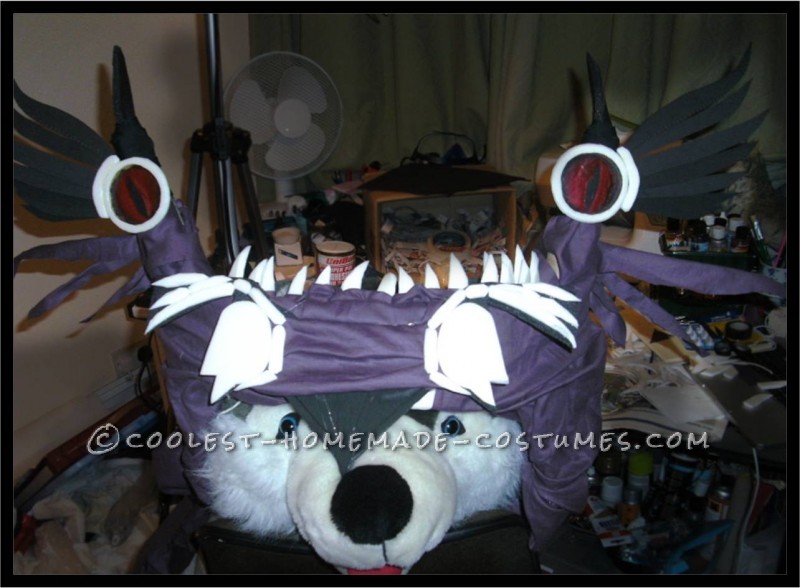
I ended up with a base of a strip of foam in a circle and two cardboard cones on either side (I had my giant wolf toy holding it up for me).
This part didn’t really have a template. I simply grabbed a chunk of fabric and draped it over the foam. This seemed to work pretty well so I just stuck with it and stuck it in place!
All of the little details on the front are layered foam, apart from the two oval gems, which are simply slabs of dried hot glue! Nice cheap and simple, with a sort of misty gem effect. The teeth around the opening of the top was the most time consuming as I had to cut out each one from a block of foam, carve it, paint it, then seal them! I even put a strip of fabric around the base of each one to help it look a bit smarter.
The parts sticking up at each side are the cardboard cones. I wrapped them with fabric and stuck another one of those ‘eye gems’ on each point. The parts sticking out to the side are strips of fabric strengthened with wire, so I can shape them and have them defy gravity!
Mask and Hood
Materials needed for this step:
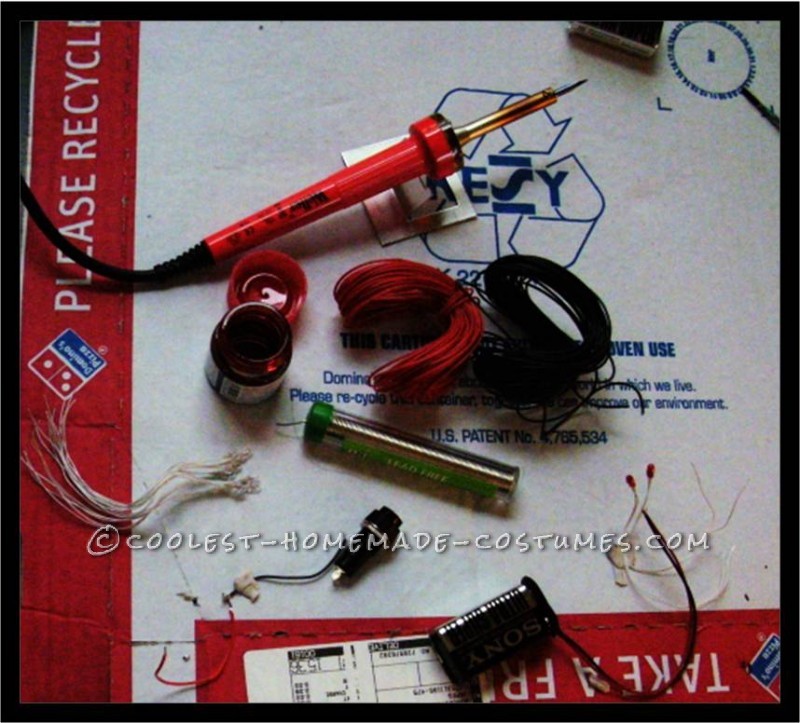
Purple Fabric, Plastic Craft Mask, Papie Mache, LED lights, Wire, Battery Pack,
Elastic, Paint, Beige, Black, Craft Foam, Netting, Upholstry Foam, Red thin plastic
sheet (carrier bag)
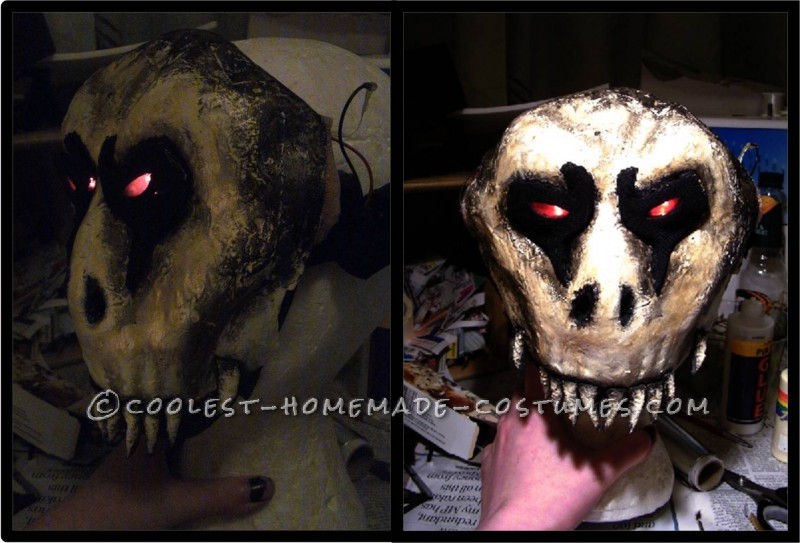
The piece that makes the entire costume complete! The mask. I started with a plastic craft mask, and built the shape I wanted ontop of it with
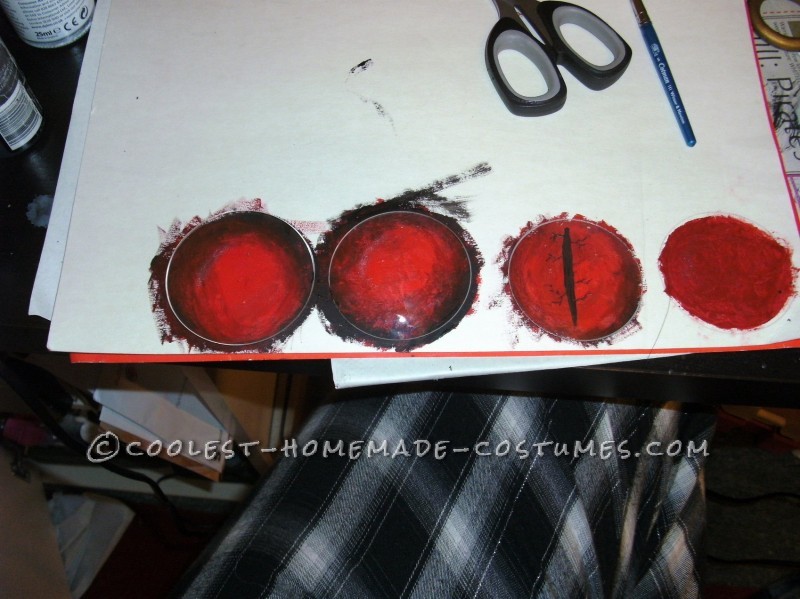
upholstery foam, so I could get the skull look (making sure not to cover the eye holes and nose holes). Once the foam was on and shaped I soldered together the circuitry for the LED lights so I had one for each eye. Then I got a black piece of craft foam and cut it to the shape of the outline of the eye. Once I’d done this I lined up the pieces on the mask so I could cut two holes in them. One for the LED to shine through (mask eye) and one for me to see through (real eye). Over the mask eye I glued a small piece of red plastic from a carrier bag, so it would diffuse the light of the LED, and over my real eye hole I put some black netting so no one would be able to see inside.
I backed the LED with more foam so that it wouldn’t shine inside the mask and blind me. The switches and battery packs were hidden in little pockets I made along the elastic that was holding the mask on.
Mask

Webbing
Gloves, Bracelet and Wings
Gloves and Bracelet
Materials needed for this step:
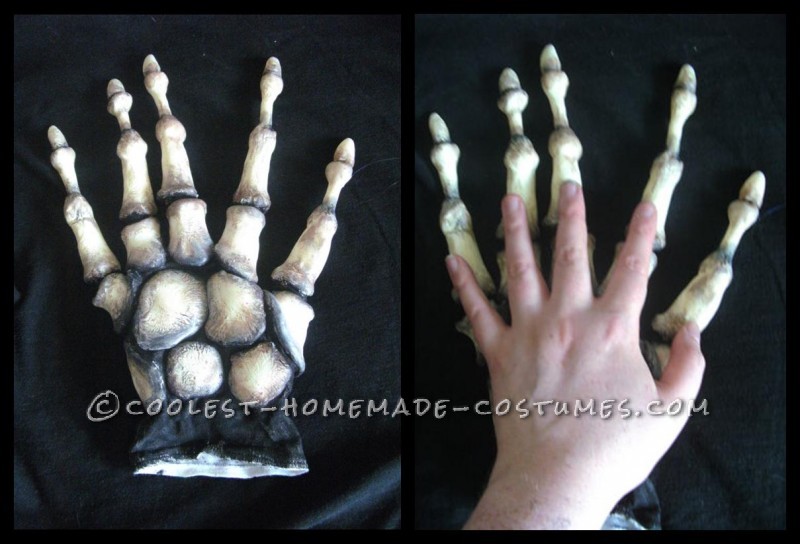
Cotton Glove, Thermo Plastic, Heat Gun, Bracelet, Black Fabric, Paint, Beige, Black
The gloves caused quite a stir among people as well! They make your fingers really long and pointy, so it looks perfect when you slowly wave, or point at someone while starring at them. I started with a base cotton glove and started heating up little clumps of thermo plastic with the heat gun. I then shaped them while holding them next to the glove, so they sort of fused together. Once all the pieces were attached to the glove it was a simple case of paint paint paint!
The bracelet was mainly there to hide the join between my long sleeve shirt and the the glove! It was a cheap bangle from a charity shop, painted with the same colors from the costume so it fit the theme. Then I stuck a piece of the black fabric around the inside to help hide the join.
Wings
Materials needed for this step:
Feathers, Fabric, Wooden Dowels, Wooden Board, Cardboard, Old Rucksack
This was a later edition to the costume, as I felt the back of it just wasn’t interesting enough. The wings weigh a massive 5kg! So I have very sore shoulders after wearing them along with the rest of the costume for a while. I started off with drawing out how I wanted the outline of the wings to look on a giant bit of paper. I then planned where wooden supports should make up the inside structure of the wings. Once the wooden structure was made I stapled netting on so I could then sew and glue real feathers along with fabric made feathers and cardboard made feathers into the shape of the outline. All of this was then mounted onto and old rucksack, which I could hide underneath the capes of the costume.
Gloves
Shoulders
Finishing Off
Materials needed for this step:
Cobweb Fibre, Sandpaper, Grey Spray Paint, Black Spray Paint, Scissors
Now for the scary part of the whole costume build! The distressing of the costume, here all of your hard work can be for nothing if you do something wrong. Buuuuut if you don’t do it, the costume will look all brand new! And to be honest, when have you seen a minion of the undead walking around in brand new clothes? …
I thought not!
I started with a piece of sand paper and rubed it along the edges of the fabric to pull it apart and fray slightly. I also did this on patches further in the costume so that it had marks and scruffs. Along the bottom of the skirt and each of the capes I used scissors to cut flame like shapes into the fabric, so it looked like it’d been tattered over years of wear.
The next step is to take a spray can of paint in the opposite colour of the fabric. For example on the black fabric I lightly sprayed grey onto it, so the costume instantly looks musty and old. Over the purple fabric I gave a light spray of black to dull the colour down.
Lastly is the most fun part of aging! Adding fake cobwebs!! I attached a video about how to do this, and I think the end result is worth the effort.
Added Extra’s
Materials needed for this step:
Hinges, MP3 Player, Loud Speaker, Smoke In A Can
There is always something else you can add to a costume, and I’ve been lucky enough with this one to have the opportunity to do just that! I ended up making the wings swing in the wind by mounting them onto hinges. I also made one of the arms in the costume fake (dangling down by my side) so I could use that hand behind my back to control the other two features; a voice box & smoke in a can.
I’m female so when I talk to people in the costume it’s a little bit weird. So I downloaded some scary male voices onto my mp3 player and hooked up a speaker
inside the hood to make it seem like my voice. I got clips saying “Greetings”, “I don’t smell that bad for a dead dude, do I?” & “Boo, scared yet?”.
The smoke was my favorite effect! When ever someone wanted a photo or I was talking to them I gave the can a squirt and a mysterious fog appeared around me!
Unfortunately it didn’t photograph very well though.
Undead Necromancer Costume
Video:
http://youtu.be/UgTv3dQ0NXI

Related costumes:
 Creative Tim Burton’s 9 the Movie Costume
  750+ Horrifyingly DIY Spooky, Gory, Dark and Scary Halloween Costumes
  Coolest Homemade Scarecrow Stalker Optical Illusion Costume
  Epic Handmade Killer Croc Costume from Batman: Arkham City
  Coolest Medieval Gargoyles on Stone Pedestals Couple Costume
 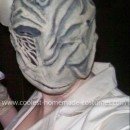 Coolest Silent Hill Bubble Head Nurse Costume
 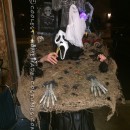 Homemade Walking Cemetary Halloween Costume for a Woman
  Coolest Child Rainbow Brite Costume
Your comment has been sent successfully.