Even though, Halloween is in fact today, my 2012 Halloween get together has been and gone, I’m still recovering. Even though Halloween is full of scary, bloody covered costumes, I decided that wasn’t me and decided that wasn’t for me. After recently watching the popular and comical Pixar film ‘Wall-E’, I had to give it a try. How hard could it be, its just a yellow box…
Preparation and Materials
Before you dive into cutting, sticking and painting everything I got everything together. To make Wall-e i used the following:
Materials Used
- 1 x Cardboard box – High Strength (preferably around the right size for your body shape.
- 2 x Cardboard box – High Strength (for cut outs and the rest of Wall-E’s body e.g. tracks, hands etc.)
- 1 large thick poster container
- 1 medium thick poster container
- 2 shoe laces
- 1 x scalpel
- 50 meters of 38mm Masking Tape
- 25 meters of 38mm Black Duck Tape – To strengthen the costume.
- NOTE: Do not use on the outside of the costume. Interior only as hard to paint.
- 1 Perminant Marker
- Paint brushes (Various sizes)
- Glue Gun and 7mm glue sticks (optional)
Paints / Spray Paints Used
- 250ml White Wall Paint
- 250ml Yellow Wall Paint
- 100ml of Black Paint
- 50ml Metallic (optional)
- 50ml Brown Paint / Small can of Brown Spray paint
- 12ml Paint
Making the cut outs and body
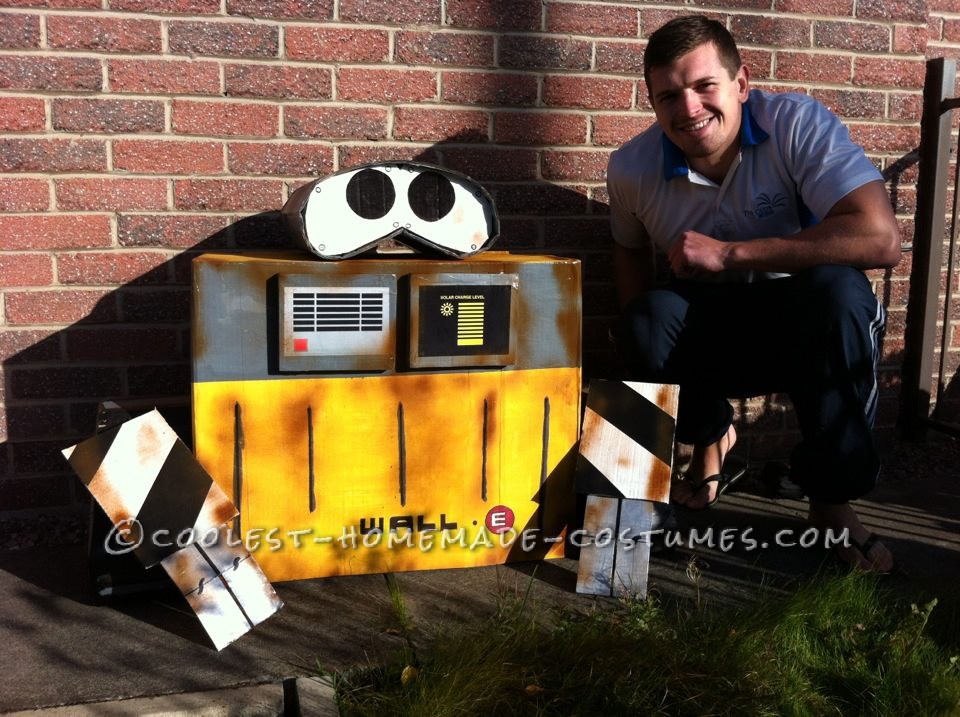
The first thing I concentrated on was the main box which would form the body of the costume. For this is found a box that fitted my body shape. I was initially going to go for a box that was a cube shape or more square than the one you can see in the photos but I thought with me heading round the local bars, this probably wasn’t practical, therefore went for one that was more rectangular.
THE BODY
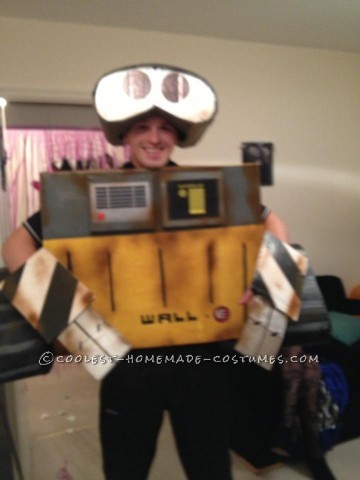
Cut the bottom of the to the length of your torso, baring in mind that the top of the box needs to have the flaps left on to form the shoulders of the box. Once cut to length, you need to mark out the holes for where your head and arms are going to stick through. Once cut out, try it on for size see if its adequate and if not further make amendments until happy. Apply masking tape aroudn all the cut edges and corners to make it easier when painting and to strengthen.
THE TRACKS
For the tracks i simply used 3 pieces of card. One about 38″ x 8″ . This is to form the outside card to wrap around and form the tracks and the other two pieces of identical card to fit inside the tracks front and back to give it structure. The plan was to cut the two identical inside plates, and wrap the longer piece of cardboard around. Use masking tape to stick one cardboard plate around the long piece of card, and then do the same with the other. Just to add more of an effect I cut out three equal circles that would be glued to the middle of the tracks to maek it look a little more realistic.
THE HANDS
The hands were the easiest of the costume. For this I simply cut two identical pieces in the shape of the hands, and then two rectangular shapes to form the forearm. These will later on be taped together and painted. I will then use duck tape and to small strips of card to attach later on to be able to fit my hands through. Ill go into that later on.
THE HEAD
The head was the tricky part. For this I cut out the inside shape that would form the front eyes and then using this as a template I cut out 3 other identical cut outs to be used to structure the inside of the head. For the outside, I cut out a rectangular shape 50″ x 12″ which would like the tracks be wrapped around the eye templates. To make it easier to bend the larger piece of card around the templates, bend the card every inch or so. My find it easier to use a ruler to assist.
Once done, start with the front template and tape around the template taping the inside with duck tape to the larger recently bent card. Start with the end of the long 50″ x 12″ in the bottom center of the eye template.
Once done, apply same process to the back bending and taping the inside with the stronger duck tape. After finished, both ends of the 50″ x 12″ should now be more or less together wrapped around the templates. You may need to trim the card slightly to fit, Once together, tape the ends together on the inside. After masking tape the outside of the templates to close up any gaps. These will then be painted over later on.
BACK
As I’ve used a rectangular box, I decided to bulk it up a little more by adding the flaps and bits of card to the back. For this I used the same concept when creating the tracks. I cut out four trapezium shapes and then two long rectangular strips. The idea was I’d use two trapezium shapes and the inside templates, then tape those to either side of the strips. Do the same with the other three bits of card then once all taped up the idea would then be to tape this to each side (positioned vertically) of the back of the box to create two thick sections that stuck out. I would then finish it off by adding a flap to tape to the top of the stuck out sections.
You may be wondering what I used the poster packaging or containers for. Well, these would be used to make the exhaust type shapes. So for this I cut the larger poster container at both ends so they were say 8″ in length. I then cut the smaller poster containers to around 10″. The idea would be to place the smaller container inside the larger to create that exhaust type shape. These would later on be attached between to the above mentioned Trapezium shapes at the back of the box.
FRONT
For the front I found two images on the world wide web to make the two buttons which would glued on two thick pieces of card to give that outverted affect. Either use thick card or masking tape three equally sized rectangles together for each button.
Attaching it all together
The main things to concentrate on is the main body and the bits that form the back and front as these all need to be the same color and you need to paint over the masking tape marks, so this should be the first thing that is done before painting.
Painting and applying Permanent marker
I first applied a white undercoat to all the cut outs and bits of cardboard to make it easier later on when applying the other paints.
Once dry I then got to work on the main body of Wall-E and painted the whole thing yellow. You may need to apply more than once coat, but remember you are wanting Wall-E to look old and give it that tired look so perfection is not needed.
Once all dry then work on the grey front section and the tracks. For the tracks I used a black paint and for the front I used a grey. For this either buy a grey paint or mix white and black.
Apply grey color to top section of front or box and apply same colors to the front two rectangular button panels and Wall-E’s head avoiding the front section. Neatness here is not a problem, as you can neaten up and apply white to eyes once dry.
Paint hands Metallic colors and for forearms, I used duck tape to create black stripes. The white paint was left on from when I painted everything white originally.
Once all the paint is dry, you can then start by applying the small detail such as the WALL-E sign the lines on the hands and eyes.
The last bit of painting is the exhausts (Poster Containers) which I painted black and grey. Once dry I put small holes through each and fed through both them and the Wall-E box at the back to position and attach them in the correct place. The shoe laces were then tied inside to keep attached.
Finishing the head and hand straps off
THE HEAD
To finish the head off I first of all cut a hole at the underside of the head for my head to fit into. Obviously you don’t want to go crazy with the cutting so best to start small and then keep trimming until its perfect for the size of your head. Once it was cut out, I used the rest of the templates that I had previously cut out to make the head more sturdy and strengthen.
At the point when you put your head in it probably wont be the most sturdy thing ever, so to stay strapped to your head I got a thin piece of card 22″ long and 2″ thick and wrapped around and taped in a circle. Trim down to fit the circumference of your head. Tape all around to further strengthen.
I then cut out another piece 3″ thick and 9″ long that would be attached to either side of my circular shaped card. If you put this on your head it should fit snug. If not change measurements to fit your preferences. I then taped this into the Head. Creating a mold in which to stick my head in to keep it stuck to my head.
HAND STRAPS
Now that the hands are all painted stick the them to each of the forearms and once sturdy then you can create the straps to keep them attached to your arms. For this I simply used two bent pieces of card 5″ long by 1.5″ thick and taped to each side of the hands. The idea is that my arms would then fit through each. Make sure to apply quite a lot of duck tape to strengthen. one of the straps went across my hand. This way it didn’t become flimsy. If you position it just right, you can still hold your beer NO PROBLEM! The other I taped a few inches above my wrist. Apply to both hands and test out adding more tape if required.
Last bits
To finish off, just apply the small lines down the front of the box (see pictures) and paint the red ‘E’. Once all dry you can then apply the rusty look by using a brown spray paint. Use this to go around all the edges applying different thicknesses to create the rusty look. Finally its done.
THAT’S BASICALLY IT, BOYS AND GIRLS!
My apologies if the instructions were hard to follow but to be honest, there isn’t really a right or wrong way of making this Wall-E Halloween costume, I guess as long as you feel happy with it and you’ve enjoyed making it, what else matters. Thanks for your time guys.
Best of luck.

Related costumes:
 Creative Tim Burton’s 9 the Movie Costume
  DIY Wall-E and E.V.E. Costumes for the Happiest Kids Ever!
  Coolest Homemade Wall-E and Eve Couple Costumes
 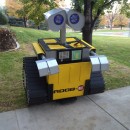 Awesome Homemade Wall-E Halloween Costume
  Coolest Homemade Minion Carrying a Box Illusion Costume
  Homemade Maleficent The Magnificent Costume
  65+ Coolest Homemade Pokemon Costume Ideas
 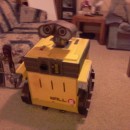 Coolest Wall-E Homemade Halloween Costume
Your comment has been sent successfully.