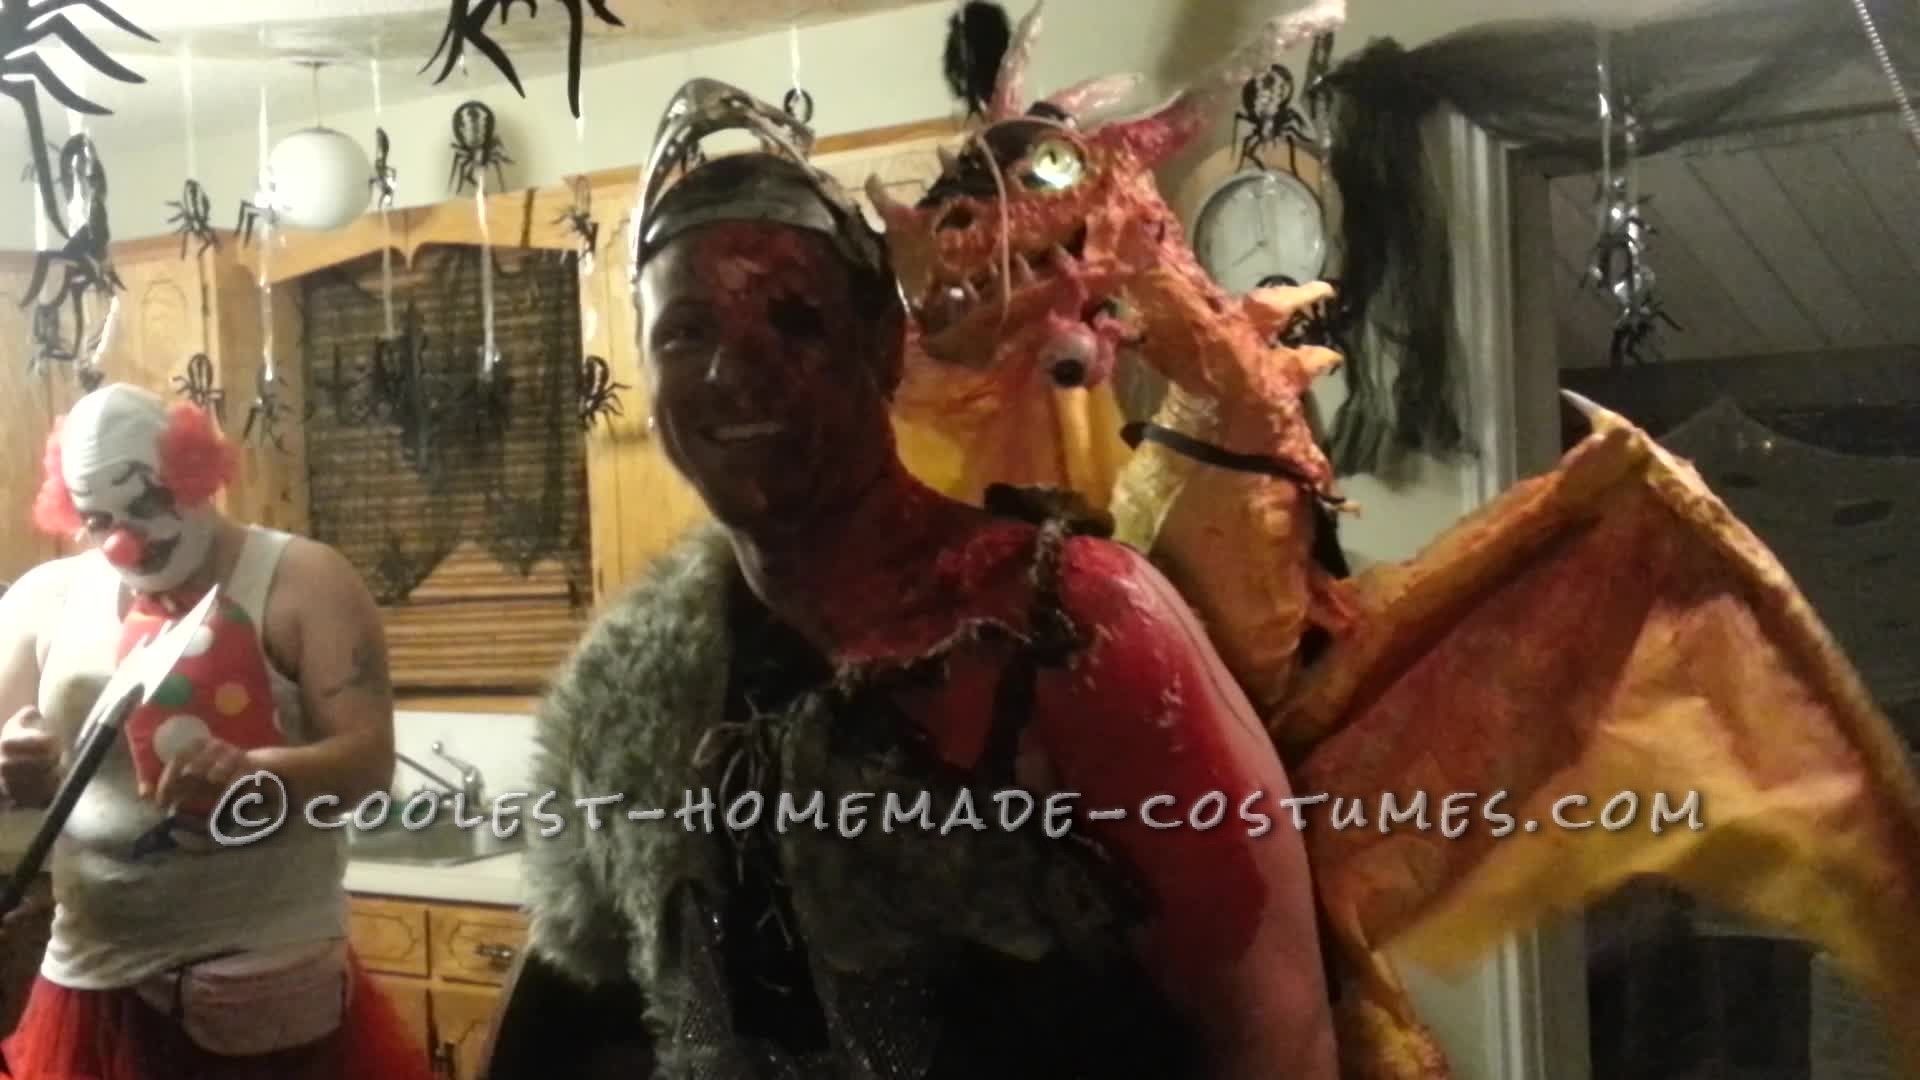
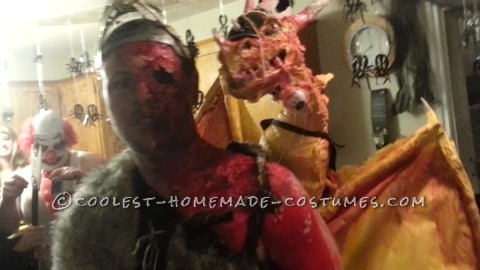
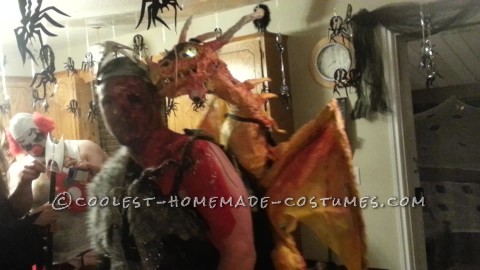
Here’s my Dragon Trainer gone wrong costume.
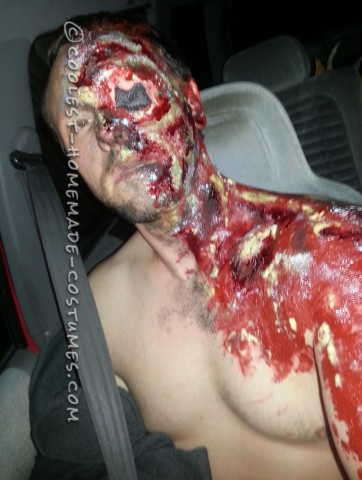
I had other costumes in mind this year and even started them but was watching “how to train your dragon” and it came to me, what if it went wrong and the dragon didn’t like their trainer. So I decided to make a shoulder dragon that moved and gore myself like it was attacking and eating its trainer.
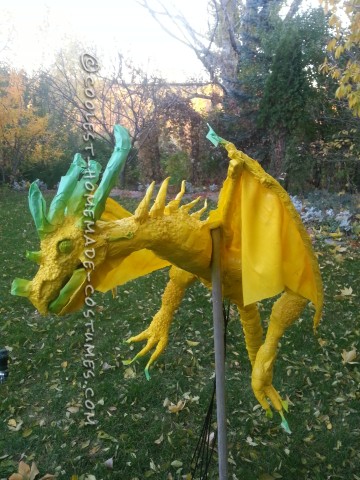
First I started with the head. Supplies I used for the head, newspaper, tape, paper clay, glue gun, taxidermy eyes, mold latex, fake teeth from a Halloween cave man necklace, aluminium strips. Screws, led lights, brake cables, threaded bar, L brackets, lite fabric, spray paint.
- use tape and newspaper to make a ruff shape of the head and lower jaw
- use the paper clay ( commercial sold paper machie ) to sculpt the detail head and jaw
- using the aluminum strips make a frame work for the lower jaw (a hack saw and drill will cut and make holes for the screws very easy)
- mount the jaw frame to the lower jaw with hot glue
- cut threaded bar slightly wider the width of the head and insert it at the back bottom of the mouth to hinge the lower jaw
- using L brackets suspend the lower jaw from the head
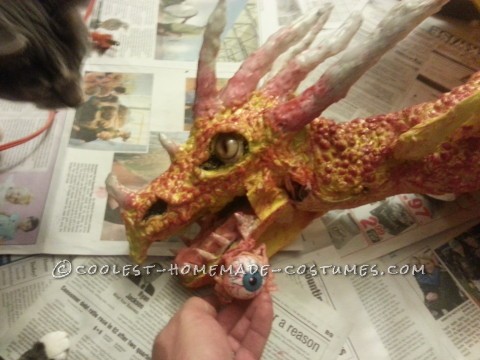
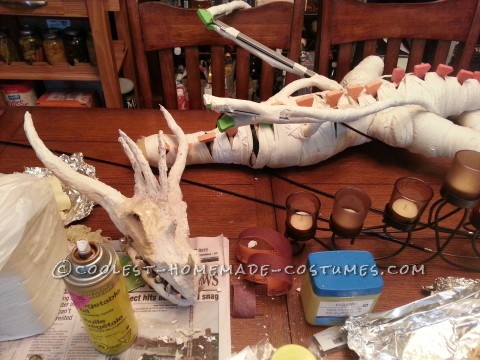
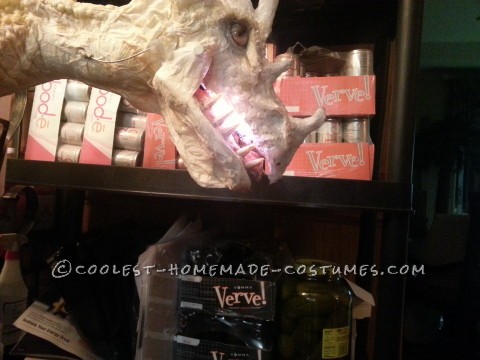
- drill holes in the upper jaw and lower jaw to insert the fake teeth, hot glue these in
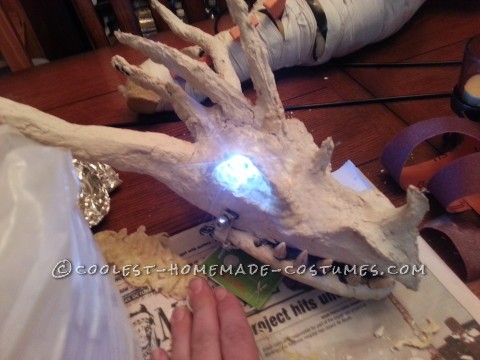
- drill holes in the eye sockets to wire the led lights through and glue the taxidermy eyes over top of them centering the pupil to the light
- bring next set of leds with push button kill switch threw the back of the lower jaw and glue in with the button mounted at the back of the mouth so when the jaw opens it pushes the button to turn on the lights and when it closes it lets off the button turning the lights off
- use the hot glue gun to now completely coat all horns and spines on the head with glue. If you want the horns a curtain colour paint them before this step then cover them to give a hard horn look
- using the hot glue gun cover the head in dots of glue to make texture for the head like scales in any pattern you like
- leave the head at this point till later
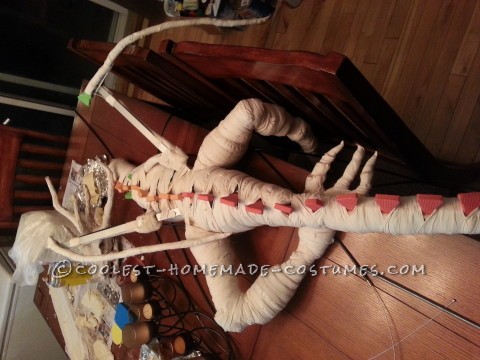
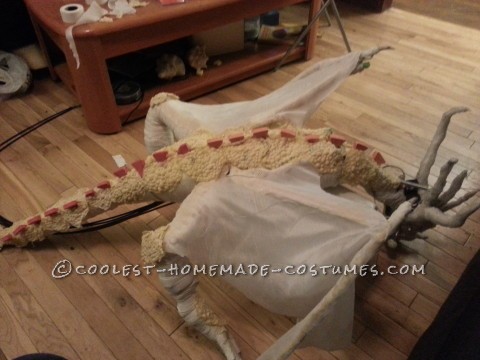
Next I moved to the body. I used an old couch cushion, hockey tape, puzzle like foam mats, fake teeth large size, marker, electric knife. Use the maker to draw out the shape of the body and neck of the dragon as one then a tail and legs as separate peaces to attach after. Use the electric knife to cut the shapes out.
Take the hockey tape and tightly wrap the shapes in a spiral motion. As you do it you will see how it works and be able to modify it as you go. This will take the shapes and make nice rounded edges and take on a real shape. If a spot seems to thin just cut extra strips and add them and tape around them till you get the shape and look you like. I used the puzzle like edges and cut them into a strip but you can just cut a strip it you want to.
Lay the foam strip down the body so half hangs off the bottom, then tape it on fully and use it to continue down attaching the tail this way. If you use the puzzle shapes have then pointing up to give a cool look of spines. (You might have to put a peace on the bottom to hold the tail on more secure.) Then use the hockey tape to do the same with the legs and attach them after to the body at what ever angle you think looks best.
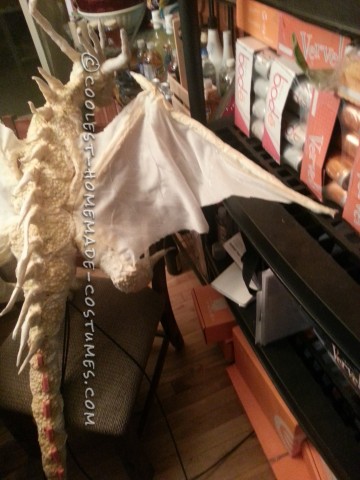
Wings time, I used two strips of foam per wing, aluminium strips, screws and lock nuts, break cables, fake teeth, lite fabric, hockey tape. Need two strips of foam, the thicker you make the strips, the thicker the wing arm will be.
Cut two aluminium strips pre wing, first strip should be as long as the first half of the wing arm plus 6 in. min. The second peace should be about 3 to 4 inches. Connect the two pieces together with a screw so they spin freely and have the smaller one 1 in over hang to connect the bike cable to make the wing flap.
Use the hockey tape to wrap the foam to the aluminum bar with the extra 6in hanging out the bottom and keeping the little bar moving in a wing motion free. Push the extra 6 in into the body where you want the wing then tape it on securely.
Take the second foam and attach it on top of the small piece and tape it all the way down to make a light weight outer limb but remember to keep it moving free. Run a bead of hot glue all the way up the limbs of the wing in the open position and lay the fabric on it and press it down to hold, when glue dry cut the wing to fit the shape you want.
Legs are done the same as the body. Do them separate then tape them to the body after. This will help it look like there is muscles in the legs. At the end of each toe I hot glued in a claw and taped up to it.
Run all the cables and wires down the belly an again tape them down to protect them and stop them from moving.
In the end of the neck take a 6 in min soft spring and hot glue it in the neck about half way then hot glue the other half of the spring in the back of the head leaving about 1 in between the neck and head so the head can bounce and move around.
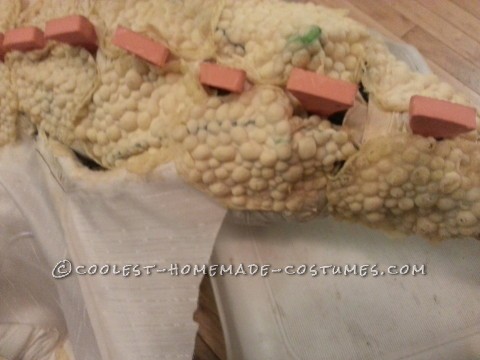
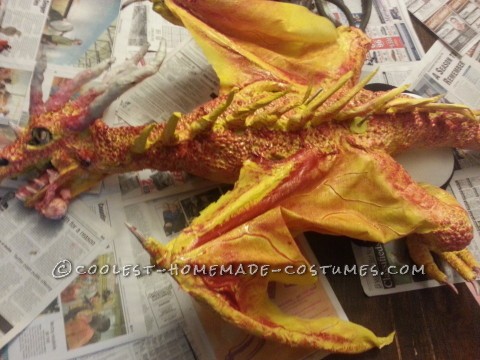
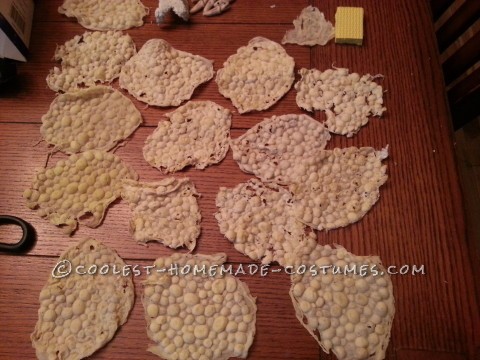
Now to make the skin, you can do this 2 ways you can just spray paint the whole thing the colours you want then paint on a layer of modelling latex or you can use never dry clay to make little balls of clay ranging in all sizes but no bigger then 1 cm, make tons and when you think you have lots make some more. Take each ball and cut in half and randomly place the flat side down on a big peace of plastic or suranerape on top of alunimum foil. But each half ball up to each other so when your done you have a big bumpy mass, fold the ends of the aluminum foil up around and use cooking spray and spray all the clay then pour plaster of Paris over the whole thing and be sure to cover it well. Let it dry solid then use a knife or pick to take the clay out.
Now you can use cooking spray again to spray the plaster mold then paint it with multiple thin layers of molding latex, the thinner you make each layer the faster it dries you put it on thick and you will be there for weeks. When dry pull it all the edges up and then you can just peal the skin out of the mold. Paint your creature with latex molding and lay the new skin on it and flatten it down on it and let dry, after dry latex the edges again let dry and you are ready to paint it any way you like.
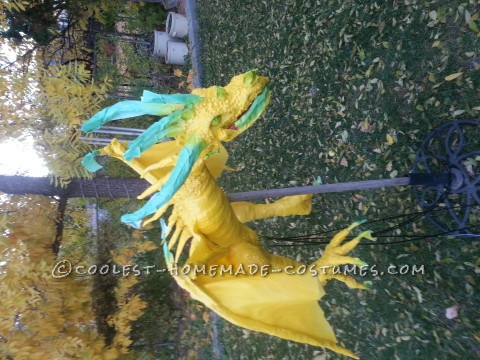
Now it’s all painted and done you can do like me and mount it to an old back brace or add some straps so you can wear it on your back and then attach the break cables to your belt and you can walk around and pull on the cables to make the stuff move. Look like you have a pet dragon.
Happy to explain in more detail for anyone wanting to know more, just ask.


Related costumes:
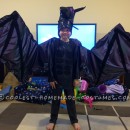 Coolest Minecraft Ender Dragon Costume with Articulated Wings
  How to Build a Cool Dragon Costume
  Coolest Homemade Play on Sushi Costume – Dragon Roll and Rainbow Roll
 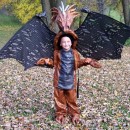 Original Homemade Winged Dragon Halloween Costume
  Dramatic Dragon Group Costume
  Coolest Mythical Creatures (Unicorn and Dragon) Couple Costume
  Tallest Fire Breathing Dragon Costume Ever!
  Explosive Dragon Costume
Your comment has been sent successfully.