
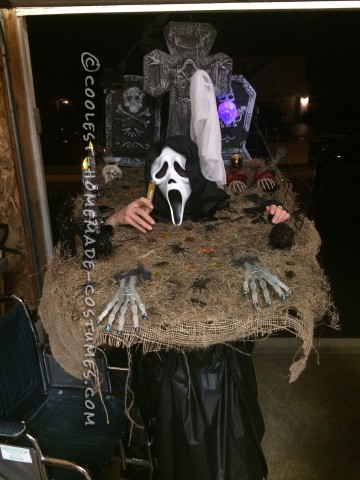
In August, I started looking into ideas for my Halloween costume. I came upon your site and I found my Halloween costume for this year. It was the walking cemetery that a man made. I am 5′ tall and 115 lbs. so I needed to make the costume fit and work for me. So off to Michaels craft store to see what I could find.
I wanted a foundation for my costume to be light weight yet stiff. I found Black Chalk foam boards 30″ x 20″ with two in a pkg. Then I got one pkg of 11″ x 14″ black foam chalk boards with four in a pkg. Next was an 18″ floral craft ring (not Styrofoam). Then a piece of Styrofoam 28″ x 12″ x 1″ thick. I laid the two larger pieces of foam board end to end with a space in the middle to form a neck hole. I used two of the smaller boards on each side to hold the two larger pieces together and to finish forming the square neck hole.
I super-glued the foam boards together. I glued the floral craft ring around the neck hole for support. I glued the Styrofoam On the underside of the back for weight. I put black duct tape all around the edges because they were white. I also put black duct tape around the neck so I wouldn’t scratch my face and neck getting in and out of the costume. I realized the Styrofoam on the underside was also white, so I spray painted the back with black Rustolume spray paint.
Now for the fun part! I laid out the Styrofoam tombstones. They came with stakes which I duct taped to the foundation so that I could take the tombstones on and off. Then I laid out the burlap and cut it to hang over the side about 1″. I also cut out the neck hole. I started pulling and cutting the Spanish Moss to fit around the tomb stones. I laid the two small hands out and ran the ends under the burlap and duct taped them down.
Again I worked the Spanish Moss under and around them. With Tacky glue, I started to glue the burlap and moss down to the foundation. Let me tell you, this is messy! I had to get enough Tacky glue on so both the burlap and the Spanish Moss would stick. Then I had to press them into place. The Tacky glue is not fast drying so I had to keep pushing it down. I got it all over my hands. Luckily, it washes off and it dries clear.
I used a drill bit to put a hole in the Styrofoam skeleton head so I could run the snake through. I used tacky glue to glue the head down. I had to put books on it to hold it down until the glue dried. To keep my cat from falling over, I used another drill bit to put holes in the foundation to slip the cat feet in. I put duct tape over the holes on the underside of the foundation. For the Skeleton head votive, I took a urine spec. cup (I work in a hospital) and turned it upside down and put duct tape around it.
I used a small drywall saw and cut a hole in the foundation and popped it up through. I super glued the votive to the bottom of the speci. cup. I kept working and gluing the Spanish Moss and burlap down as I went along. The rat is light and it squeaks when you squeeze it. I used tacky glue to glue it down on top of the Spanish Moss and the burlap.
The only fence I could find was a 9′ x 8′ white folding garden fence on clearance at Menards. It took three coats and 2+ cans of black Rustolume spray paint to turn it black. I set it around the foundation and I pushed it into place. Just that easy.
I wanted the hands to look like they were coming out of the ground ready to touch and grab someone. In the garage I found some small scrap pieces of aluminum siding from my house. It gave the hands the lift I wanted but at the same time being light weight. I duct taped the siding in place. I tacky glued the freaky black fabric to the bottom of the hands. I cut A slit in the burlap and ran the hands underneath and duct taped them in place. I laid the burlap and Spanish Moss in place and tacky glued them down. I painted the nails black and blue and I bedazzled them. Just like I would do to my nails if I had the time.
Oh, my costume was looking just like I hoped it would! I was so excited! The costume was coming along great and on my time schedule. Okay, time for a dress rehearsal. The costume fit over my head just fine. It balanced on my shoulders great. It looked great.
Now to see how it would fit in my car. Oh NO! I can’t fit through the door ways! Can you believe that? Now What? Don”t panic! Are you kidding me? Do I take it apart and start over? No time, just one week before the Halloween party. Think! I’ve got it! I take the dry wall saw and carefully cut the edges off about 2″. If I lean the costume sideways I can fit through doorways. I can’t cut the sides back any more so it will have to work.
I also discovered my costume was too wide for my arms to reach over and get to my face. How am I going to eat and drink? Oh my God! Another problem! Again don’t panic and think. Again, I took the drywall saw and cut two small circles just in front of the neck hole on each side of the foundation. I camouflaged them with the burlap, Spanish Moss and the black leaves from the roses. I also put black duct tape around the edges so I wouldn’t scratch my arms up.
I repositioned the fence. I needed to take one corner of the fence apart and overlap part of it behind one of the tombstones. It works! I duct taped the fence into place around the edges. I wanted my ghost to look like it was floating in the air. I tried three different weights of coat hangers. The heavy one weighted down the foundation way too much. The ghost crash landed with the light weight wire. The middle weight one was perfect.
I spray painted it black with the Rustolume spray paint. I wrapped narrow black duct tape around the coat hanger, the stems and some leaves from the black roses, in a few spots. The stems gave the hanger a little more support. Then I wove the coat hanger in the ends of the fence behind the tombstone. I used black twist ties to secure the wire to the fence for more support. The wire was bendable enough so I could get the costume into my car without taking the wire off.
To add the finishing touches, I tacky glued the snakes, roaches, and leaves into place. I used spray adhesive on the spiders.I got it all over my fingers and it wouldn’t wash off. I had to use nail polish remover. On top of that it didn’t dry clear. My spiders looked like they had white fungus on them. Oh well. It wasn’t too noticeable.
I noticed the Spanish Moss was shedding off my costume when I tipped it sideways. So I used a little hair spray to hold it in place. I would have to be careful around candles at the party. I didn’t want to go up in flames. I screwed the light up skeleton to the tombstone with a special screw for Styrofoam. I added a little duct tape around it for more support.
For my clothes, I wore black scrub paints and A long sleeved black T shirt with skeleton heads on it. I wrapped the black freaky fabric around my neck. I tried a black plastic table cloth over my head like the guy did who I got my idea from. The black table cloth was dangerously too long and wide. I could just picture myself with my costume on, tripping over the black table cloth and falling and breaking my neck. A large black garbage bag was a much better fit.
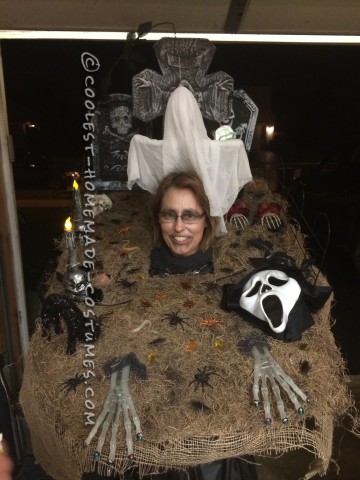
I cut a head slit and arm holes in the bag. My Scream mask came from Walmart. I knew I wouldn’t keep it on long because my glasses kept fogging up when I wore it. I brushed black eye make on my face to give me a creepy look when I took the mask off.
Time to go to the party. That night it was very windy. That happens when you live south west of Chicago. I had my costume sitting on the trunk of my car while I secured the tombstones down with duct tape so they wouldn’t fly off like kites. All of a sudden I saw my costume try to sail off my trunk with a gust of wind. I grabbed it and set it on the ground where it was protected from the wind. I used twist ties to secure the two black skeleton head tapers to the fence. Here we go!
Most people were not sure who was under the costume until I took my mask off. Most people, especially the guys, thought the costume was great. The questions I kept getting were: is it heavy, and did I make it? The house was too crowded for me to fit in with my costume so it stayed in the garage. I think that is why I got 3rd place. Some people didn’t know that costume and I went together. No matter what, I had a blast making the costume! I made the costume so I could store it in the attic. Maybe one year one of my Grandsons will want to wear it. That would be the best honor!
Here is the list of supplies and stores:
MICHAELS CRAFT STORE
- Black chalk foam board 30″ x 20″ 2 in pkg $12.99
- 1 pkg of 4 black foam chalk boards 11″ x 14″ 8.99
- Styrofoam 28″ x 12″ x 1″ 6.99
- 18″ floral craft ring 4.99
- small styrafoam skull head 1.59
- 1 lady skelton hands 1.99
- ” ” 1.99
- Taper skull head 3.99
- ” ” 3.99
- Glow in the dark hands 4.99
- Hanging ghost 3.99
- Black flameless tea lights 4 in pkg 4.99
- 6 black glitter spiders 1.74
- 6 colored glitter spiders 2.49
WALMART
- Scream mask 4.97
GOODWILL
- 16 oz bag of Spanish Moss 1.99
- Black flowers 1.99
MENARDS
- 9′ x 8′ folding garden fence 1.89
- Black Duck tape 2.50
- 1 can Rustolume black spray paint 5.76
DOLLAR TREE STORE
- Small tombstone 1.00
- ” ” 1.00
- Black plastic rat 1.00
- Black table cloth 1.00
- Pkg of multicolored leaves 1.00
SPIRIT HALLOWEEN
- Lighted skull hanging on tombstone 2.99
MEIJER
- Freaky black fabric 2.99
- Large tacky glue 3.89
- 1 pkg snakes 1.00
- 1 pkg of roaches 3.99
- 1 large tombstone 4.99
- 1 can black Rustolume spray paint 5.77
- ” ” 5.77
- Super Glue 2.77
” ” 2.77
Total (if I added right) is 121.20
I had the burlap and the small duct tape on hand so I don’t know the cost.

Related costumes:
 750+ Horrifyingly DIY Spooky, Gory, Dark and Scary Halloween Costumes
  Coolest Homemade Classic Movie Monsters Group Halloween Costumes
  140+ Mesmerizing Headless Scary Halloween Costume Ideas
  Evil Scarecrow Costume – Scarecrow of The Corn!
 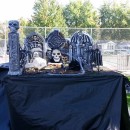 The Walking Cemetery Halloween Costume
  The Ultimate Grim Reaper Costume
  Coolest Corpse Costume
  Scary Undead Necromancer Costume
Your comment has been sent successfully.