
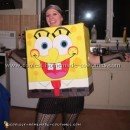
This Is How We Made This Coolest SpongeBob Costume:
- To make this SpongeBob costume, we used a square box (cut horizontally), then made it thinner and taped it with duct tape.
- We used about 10 car sponges, cut horizontally into fifths.
- Used any extra pieces for filler.
- Glued on sponges with glue gun and cut holes for eyes.
- Used white construction paper, blue marker and black small hole netting for eyes (to see).
- Used brown and red felt paper for shorts and tie.
- Used black marker for belt.
- White long sleeve shirt and tube socks with red and blue lines with markers.
- We secured a child’s plastic army hat inside box to help secure on my sons head.
Kids loved touching this outfit. It turned out great. So many parents came up to us asking to take his picture. My husband and I enjoyed making this costume. I love the idea that it is actually sponges. My son had a great time wearing it and no problems being able to see.
On getting the supplies for the costume, we weren’t sure to go with a big piece of foam or actual sponges. I looked at foam but wasn’t impressed. I liked the look of divest in the actual sponges. We searched our local stores for a good sponge and found two car sponges at our local Auto Zone. We then had to order more and had them delivered to our local store the next day. Everything else I was able to purchase at Walmart. This costume didn’t cost more than $20. We had about five hours into the costume. We needed to wait a day or two for the glue to dry. We started with wood glue but it just wasn’t sticking that well. Sponges kept sucking in all the glue. We turned to the hot glue gun, and that did the trick, worked perfectly. We finished quickly after that.
Now my son has the SpongeBob sitting in his room as a decoration.

Related costumes:
 65+ Coolest Homemade SpongeBob Costume Ideas
  Coolest Homemade Spongebob and the Gang Group Costume
  65+ Coolest Homemade Pokemon Costume Ideas
 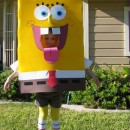 Homemade Spongebob Costume: People Thought SpongeBob was Part of the Show!
  Coolest Spongebob Halloween Costume
 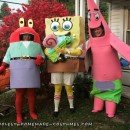 Coolest DIY SpongeBob Halloween Costumes
 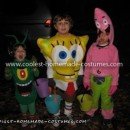 Coolest Spongebob, Patrick and Plankton Costumes
  Coolest Homemade SpongeBob and Plankton Couple Costume
Your comment has been sent successfully.