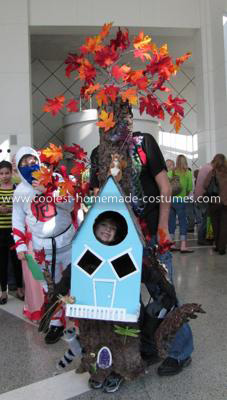
“What do you want to be for Halloween?” I asked my barely 4 year old. I’m imagining something that’s not too hard to make, like last year’s Astronaut or the “Boy Fairy” from the year before. He thought about it for a little while and told me “I want to be a tree house.” I sort of laughed because I’ve never actually seen a tree house costume and I assumed that within a few days that answer would change. Besides even though I consider myself to be somewhat crafty, I’m no Martha Stewart, and that seemed way outside my limited abilities. A week later the answer was still the same. I wasn’t committed but I started sketching out ideas in my head.
I considered all the ways to make a tree and the house. Foam, paper mache, fabric… All of them had their drawbacks. I was wondering if I could use the stuff my husband used to fill some cracks for the trunk, but it’s not cheap and I didn’t have the money to experiment. I checked 2 local stores and there was not material that was suited for a tree trunk. Besides that just wasn’t the look I was imagining.
I wasn’t making any progress so I started searching online for ideas. Surely someone at some time had made a tree house costume. Days later and with thousands of photos viewed I still had not found a single tree house costume. I’d found hundreds of houses and dozens of trees, but if anyone had put them together they hadn’t posted the picture in such a way that I could find it. I did however find a tree right here on Coolest Homemade Costumes, using the very foam I was wondering about for my tree. I read their write up and decided that it was just what I needed.
Now I had to figure out what to make the house out of. The soft foam I wanted to use was too expensive. I’d have to buy it and then make a fabric cover. Sure it would be great because it would be flexible and more comfortable but my budget wasn’t nearly that high. I settled on a cardboard house. If I made mistakes cutting cardboard I wasn’t out a bunch of money.
As it turned out I made a lot of mistakes making this costume, but most of them I didn’t figure out until I was nearly done and I didn’t have the time to start over, even if I’d had the money and wanted to do all that work. I’ll try to detail the problems so hopefully someone else can avoid them.
I started by forming the stump from poster board. The person who made the tree I was using as a guideline said they used cardboard and it sounded like they removed it after the foam was dry. I think they said they had to line it with fabric because it was itchy. Neither of those seemed like a good option to me and I hoped I could just leave the poster board inside. Which I did.
This is a good place to point out that when you make a stump your natural inclination is to stand up the form and spray the foam on the way you would wear it. You can’t do this. The foam takes time to dry and it won’t stick well to something like cardboard. You have to lay everything down and spray it that way. It takes a lot of time because if you were to try and spray where the cardboard is curved too much it would just slide off. I’m not sure how many spray, dry, turns I had to do to get all the way around but at least 4 or 5 for the large bottom trunk. The top trunk was easier.
My first problem came when I didn’t stuff the trunk well enough. I believed I had left a generous amount of room around my son so that we could easily put the stump over his head and I flared out the bottom to give him room to walk so the stump could come close to the ground.
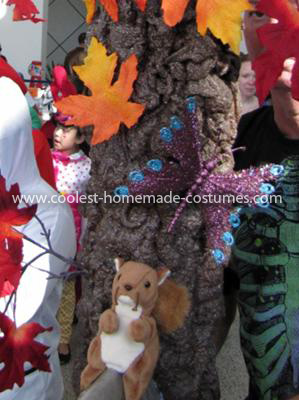
The weight of the foam warped thin poster board and while it gave the trunk a pleasing natural look it was now tight enough that my son would not let us put it over his head. I could lift him up and drop him into it but I had planned to make the costume 1 piece and now I had to figure out how to make it so a 4 year old could carry both parts. It also took a lot more foam than I expected from reading the bottle. I bought 2 cans and I had to go back and buy 3 more. Although I might have been able to stretch and use just 4 if I hadn’t decided to try and make a tree spirit face. I was thinking that if my house part didn’t turn out right my son could wear the spirit face as a mask, but once again I didn’t realize how heavy the foam was and the “mask” that I used as a base flattened out too much to put on someone’s face. I want to make sure that anyone who attempts this understands that the paper stuffing I used under the mask will not be sturdy enough; use something that can’t be crushed under the weight of the wet foam. I painted a pair of large brown gloves to match the tree trunk and I sprayed foam on those to look kind of like branches coming out around his elbows.
For the mask that ended up on his basket I cut holes in a sturdy paper plate and bent it to conform to his face. I had bought a cheap Halloween mask to use but it smelled so bad he refused to keep it on for more than about a minute. I free hand sprayed the face with sun like spokes coming out. I want to say I have very little artistic talent and it was not hard to make it look like a face with the foam. It held up pretty well to 2 days of abuse on the basket but some of the tips did break off.
Next I set about cutting out the cardboard for the actual house part. I looked at quite a few tree house pictures to get some ideas for the cute one he ordered. I tried to convince him that a haunted tree house would be really cool, with the idea in mind that hey a haunted house didn’t need to look quite as perfect as a cute one. He wasn’t having it. So I cut carefully. I was pleased when I didn’t have to get out the extra box I’d bought for back up. I used 1 box to form the house and a 2nd one to make the roof tall like I wanted it. I cut off all but one flap on the front and used the flaps to cut triangles to fill the extra height.
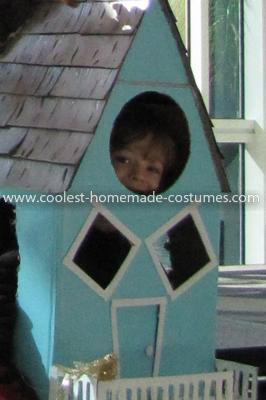
I made several more mistakes that I wouldn’t discover until much later. I don’t know where my head was, (maybe someone borrowed it for their Halloween costume?) but it seems like such a stupid thing to forget now. I didn’t fit the house to my son. I just cut out windows and the door and even though I thought to myself “I need to make arm holes on the sides so I can’t put windows there” I didn’t do them. I also didn’t figure out how to rest it on my son’s shoulders without making it too heavy for him. Maybe because at the time I was cutting, the tree trunks weren’t finished and I hadn’t realized that I might not be able to make it one piece. Next I folded and cut the one bottom flap that I’d left to resemble a porch and railing. I used the excess flaps to add sides to the railing to finish it out and to add support. I cut out rectangles from the railing to make it look like a wooden one. Later we painted those white, along with the 2 side rails (Daniel painted those) and then I glued everything together.
I had let my son pick out what color he wanted to paint his tree house and I was so excited to see how the nice turquoise shade would look that I rushed out and painted it in the middle of the night. Thankfully I’m pretty good at spray painting; even in the dark so it turned out nice. (note: a coat of primer would have saved some paint.) I brought it in the next day and started working on transforming it into something cute. I decided to use white craft foam as a frame around the windows and door to dress them up a bit. I thought it looked really nice and so did my husband.
I’d already decided to use foam for the shingles on the roof too, but I still had to decide how to make them look a little nicer than just plain foam. I’d seen a few metal roofs so I decided that silver would look nice with the light blue that my son had picked out. I wanted a layered look and something a bit rustic. I started with black craft foam which I cut into 3 inch strips. I painted it with grey primer that I had left over from something else. I did a kind of streaky job of that wanting to give it dimension. Next I used some dull silver and did the same sort of streaky thing. It looked pretty good like that but I wasn’t satisfied. I had some shiny silver acrylic craft paint in a kit I’d bought and I decided to streak some of that on too. I let Daniel help me with the next 2 steps. It looked much better and I was going to leave it, but I got a wild hare, or hair or maybe it was a pumpkin and I decided to add some black grain type details to it. We didn’t get crazy just a few streaks here and there. It was just the effect I wanted.
I think it was while I was waiting for that to dry that the stumps finished drying and I realized the problem with the bottom one shrinking. I thought suspenders would work for the stump and shoulder pads for holding he house up. Only I couldn’t find some used shoulder pads and I did the “ignore the problem for now and something will come up later, technique” that seldom works, as I continued to work on what was going right.
It was time to paint the trunks and after months of drought it was raining. I was runing out of time so I found an old blanket made a place on the porch. I started with dark brown primer/paint trying to cover it well especially inside the nooks and crannies. Next I layered on some stone textured paint in a brown that was a few shades lighter. I didn’t try to get this into the shadows. After it dried I decided that it was a bit dark for my liking and I headed back to the store for an even lighter shade of the textured paint I’d used. I sprayed that coat very thin and I didn’t try to hit every angle. Now I was ready to start adding the details.
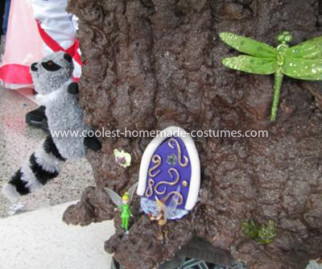
My son wanted animals and bugs on his tree house costume. We had picked out some sparkly items from the Christmas section. A dragonfly, butterfly and a gold bird he liked. He also picked out a raccoon from the dog toys (the only one we could find that was small and cheap.) and a few of my old beany babies that he wanted on the costume. We’d been talking about making “fairy doors” for a fairy garden, and he told me he wanted one of those too. I already had sculpty clay for our future project and other crafts we wanted to try so I got that out.
The only thing we’d used sculpty for in the past was to press leaves and acorns into so we really weren’t sure how it would work. I let him use the rolling pin to thin it out some and then got him to roll small thin snakes (I had to tweak them a bit) while I finished rolling and then cut the door. We chose a glass stone to put in as a window and I cut a hole for that and pressed it in. I let him help me scroll the snakes into designs on the doors. We made a thick snake in a contrasting color for the door frame. He made a small ball for the door knob and after pressing everything on, we baked our creation. I added a little detail gold to accent it and it was ready to attach to the bottom of our tree. We spent 10 minutes or more while my son decided upon the best position for Tinkerbell and Terrance. Oh and “don’t forget my scorpion, that I wanted” so I found that and it got a touch of hot glue too. I was thrilled with the results so far.
Next I hot glued the shingles on the roof. Suggestion: don’t try to use one of those tiny hot glue guns for large projects. I couldn’t find my regular one so I tried to make do with that one. Thankfully my husband heard how frustrated I was and called a neighbor to borrow hers. What a godsend that was. Except for the very bad burn I’m sporting on my index finger because I dropped a large drip of extra hot glue near the tip. I stuck to the low setting after that. I was sure I had plenty of shingles to more than cover the roof but as it turned out I barely made it. I think I overlapped more than I had allowed for. If I ever do a roof again I’ll make sure I make enough for twice the area I plan to cover so I don’t risk running out and I don’t have to use pieces I would otherwise have tossed. The ridge cap on the roof ended up a little off center, but overall the roof looked much nicer than I imagined. So I laughed it off as one of those things that give it character.
I was ready to attach the top of the tree. I decided that it would look best if I put it in the back and cut a V so it went over middle of the roof. We discussed having it veer out from the side but made one of the few smart decisions I was going to feel like I made awhile later and decided that it would be better if we had some balance. Another smart decision might have been to center it on the roof so it wasn’t “back” heavy. But that would likely have made it harder to “fix” later when we realized that if we didn’t do something drastic all my hard work was going to go to waste.
I started adding the leaves. I had thankfully used some foam to loosely fill the top of the top trunk, so I had something to glue to. When I needed to cut one of the branches that the leaves were attached to, I couldn’t find wire cutters and I only had a few thicker wires to snip so I decided to use my kitchen shears. One was being stubborn and I changed the way I was holding the scissors to get more leverage. Snip! Ouch! It was a nice cut but at least I didn’t quite need stitches. Out came the Band-Aid box again this time to stop the bleeding. By this time my right hand was pretty sore, but thankfully I’m a south-paw.
I was loving the way everything was looking and Daniel was begging to put on the rest of the pretty things we had so we glued those on. Most of the pretty bugs and animals didn’t interfere with the rest of what we needed to do but the beautiful gold bird on the rail had really long tail feathers and I can’t tell you how many times those got stepped on as we maneuvered the pieces around over the next 24 hours, finishing up.
Now we had gotten to the tricky part, fitting this amazing costume on a 4 year old so he could move around in it. Hindsight is 20/20 and for such a lofty project wheels would have been the smart thing. Why didn’t I think of that sooner? But since we couldn’t get it over his head wheels really didn’t seem like an option anyway.
We added suspenders to the stump part of the trunk and that worked great. Then I measured him and cut arm holes where I thought they should go on the tree house and add some homemade shoulder pads made out of cardboard and coke bottles. But when we tried to put the house on he kept saying “it hurts!” and “I don’t like it!” “Where does it hurt?” I asked, so I could fix whatever was wrong… Besides the fact that his face was not even close to any of the windows and everything was way to top heavy. “The house hurts!” LOL “No honey I mean what part of your body is hurting?” “Everywhere!” Since the house wasn’t touching every part of his body I didn’t think that was likely. But he was barely 4 and I didn’t think I was going to get a better answer. It was clear that I was going to have to figure this out on my own. I quickly marked where I thought the arms needed to be moved to so his face would be centered on the attic window and removed the house. By now I’m really regretting gluing the top trunk on before I get all of this done. Even more so because it’s only once I put the house on top of him that I realize how tall the top is and how tiny he is. I make the arm holes larger. We try the top on again. The face hole is still several inches too high and he’s still yelling that it hurts. I cut the arm holes even larger and glue the pads in this time to see if it will make it more stable and try again. I can’t figure out how it’s still about 2 inches off and when I say that to my husband he tells me well the shoulder pad things were tilted and it was down on his arms some before. I snapped at him “You couldn’t mention that sooner if you could see it?” I move the arms one last time and knowing I can’t move them any higher I glue them on. Since my son wasn’t ready to try it on again I glue some yellow foam over the bottom windows so his shirt won’t show thru. We try it on again and everything seems to line up right. Except for Daniel is still saying it hurts and he’s screaming to get out. And I feel stupid because now I can’t see inside since I covered the blasted windows too soon. I pull the cheery yellow foam out trying to see what on earth could be hurting him and I can’t find anything. He is screaming to get out and I’m pretty much in tears. I hurriedly marked where the house and the stump should meet. I take the top off and tell him in a very upset tone: “If I can’t figure out what’s wrong you can’t wear the costume. I’ll just have to find a bigger kid who isn’t too little to help me fix it and who doesn’t care if your awesome costume isn’t comfortable.” Not my proudest mama moment. He started crying and I felt horrible. We took a time out to cuddle while I apologized and told him I’d fix his beloved costume even if I had to stay up all night. Then I held him until he fell asleep.
Now I just had to figure out how I was going to keep my promise. I decided if there was any hope at all I was going to have to go back to my plan to make it all one piece. We discussed rather removing the top of the tree and cutting it down would be enough and decided that it wouldn’t. When I attempted to remove the foam from the windows it tore badly and was unusable and I’d only tacked those in. My roof would be in shreds if I tried to take off the trunk so we decided to leave that as a last resort.
Next I was going to need wheels of some sort. I was wishing more than anything that I had been able to find an inexpensive wagon or that we had someone we could borrow one from but neither were an option after midnight when we were supposed to be a Halloween event by noon. I told my husband we have to find something with wheels to get at least 1 set of wheels under the back of this. I also need a 2X4 or something to brace the entire thing. We found a 2×4 but decided it was too heavy and after more scrounging settled on a piece of PVC. I measured and had him cut it the right length to reach from the top of the roof to the bottom of the tree. I started to duct tape the pipe in place. I ran out of that and switched to gorilla tape. I added some hot glue too trying to get it as stable as possible. It looked good and with wheels he shouldn’t have to put the weight on his shoulders or back. Now what to do about those wheels. I searched thru the toy box while my husband searched outside. He found a skateboard. At 4 we felt our son was too small to balance on a moving skateboard so that left taking it apart and using the wheels. It wasn’t ours but it looked old and banged up so we decided that we’d risk the owner’s ire and take the wheels off. He owed us anyway. A small piece of wood, some screws and more hot glue and we hoped it would hold. I wrapped some more tape around the wheels with a prayer. After wheeling it around a bit we decided that we could make due with just 1 set of wheels because everything balanced pretty well on them and one of us was going to have to help him anyway.
I decided that another thing that might help my son to accept the costume was being able to see out better. I didn’t want to take any chances that so figured out what the largest hole I could cut at the attic was and I used my knife once again. It meant removing the foam around the window so he could have a better view, but at this point the pretty factor didn’t seem as important as having a child who was happy with his costume after weeks of being excited over it.
Now we only had one thing left to attend to. There was no other option. I had to cut a slit in my beautiful stump so that I could pull it apart enough for my son to allow it over his head. It felt so wrong as I did it. Cutting foam is easy. Making it look nice as you cut it not so easy. When I was finished it was very noticeable, but I’d used every last drop of the dark brown paint when I made the shoulder pads that I had now decided to remove and it was close to 4 AM so I was going to have to be glad it was in the back of the costume and hope no one else was as observant as I was. I moved the Tree House costume to a safe place and went to get a few hours of much needed sleep.
When we woke up in the morning and crossing our fingers helped our son into it he was thrilled. At the Halloween event we attended he walked around smiling like crazy. He got a ton of compliments as my husband helped him walk around with everyone asking “did you make that?” A lot of people took pictures as we went trick or treating. The best part of all was that he won the little costume contest. He was so cute saying “I can’t believe I won my first contest. I so e’sited.” He had to call his grandma and grandpa and tell them all about his “awesome” costume and what a good job I did on it. It was worth the weeks of work and the frustration to see his happy face dancing around talking about his costume.
We wanted to show off Daniel’s costume so we took it several places and had a great time. But where we live there are no sidewalks and the houses are spread out which meant sometimes we had to get in and out of the car. After 2 days of dragging around the house on Halloween night we decided that it was just too much. But we still wanted to use the stump part of the costume. I freed it from its tether and replaced the “suspenders” to hold it up. Daniel had a little winter hat that looked like a raccoon head so he put that on, got his tree spirit face basket and we went trick-or-treating. We still got tons of comments on how cute he was and we managed to have a 2 one costume. We had the best Halloween ever.
Thank you for giving me a place to share it.

Related costumes:
 Original Girl in a Tree Illusion Costume
  Homemade Artistic Tree Woman Costume
 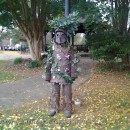 Family Tree Costume
  Original Homemade Shel Silverstein The Giving Tree Costume
  50+ Coolest Homemade Scarecrow Costume Ideas
 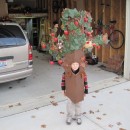 Coolest Apple Tree Child Costume Idea
 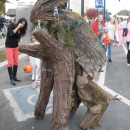 Cool Walking Tree Costume on Stilts
  Coolest Homemade Haunted Tree Costume
Your comment has been sent successfully.