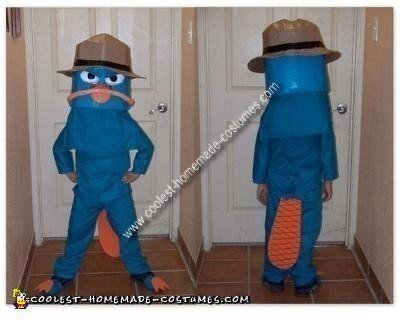
This Homemade Perry the Platypus aka Agent P Costume, or “Agent P” from the popular cartoon, Phineas and Ferb, is simple to make with only a few materials needed. Though these instructions may seem long, it’s not too challenging to accomplish making an awesome costume using these detailed steps. Most materials listed can be found around most any home.
Materials: cardboard, several sheets of newspaper, flour, water, salt, large bowl (all for paper mache mix), masking tape, hot glue and gun, scrap Styrofoam in planks or thick pieces (the kind that you’ll find used for cradling new electronics or other breakable items new from the box), Great Stuff (spray foam in a can, you can find at any hardware store), sewing machine, turquoise colored material (yards needed may vary depending on size of person who will be wearing the costume) and thread , or you could just try to find sweat pants and shirt or hospital scrubs in that same color, Large sheet of orange craft foam, brown marker for making lines on the tail, scissors, box cutter, paints in the colors of the character and paintbrushes. You’ll need measuring tape to take needed measurements of the person you’ll make the costume to fit. It might also help if you had a printed picture of the character as a reference to work with. Most of the materials I had already, so this costume didn’t cost much at all. It is made of mostly recycled materials!
Instructions:
Take measurements of the person who’ll be wearing the costume. Make sure that you get the space in between the eyes, top of head to chin, from shoulders to chin, head circumference or crown, in order to make sure the mask fits properly and the eye holes are in the appropriate place.
Keep in mind that trick or treating is at dusk and dark, so make sure that the person can see well or there will be accidents!
Drawing out the mask: You can make a large eye hole and cover with screen (like from a window or door, you can find easily at any hardware store) and paint the screen the color of the place which it will be on the mask. The person inside will be invisible, but will still be able to see where they are going!!! I didn’t do this with this costume that I made, but I saw this really good idea from another costume submission and thought it might be helpful.
Okay, back to the instructions of the mask according to what I did. Refer to a picture of the Platypus and draw out the face of on a large sheet of cardboard so you’ll know where to build upon. Try to make it large enough to be relevant to the size of the person’s body. Terrible at drawing? You can get a large sheet of white paper or tracing paper, watch “Phineas and Ferb” and pause it (if you have DVR) at the perfect moment on Agent P’s face. Put your paper against the TV screen and trace. Then, turn the paper over, put against a lighted surface such as the TV or window, and trace over the lines that you see from the other side with colored chalk (dark colors work best) or charcoal, or you could just make dark lines with a pencil (careful not to press too hard on certain TV screens!) Now, put your traced paper on the cardboard that you’ll be transferring the image to with the chalked side down, press firmly with a pencil while tracing back over the lines again. Voila! You should have a perfect, or nearly perfect image to work with! Even if you can draw well, this easy trick really saves time and is easier on your patience!
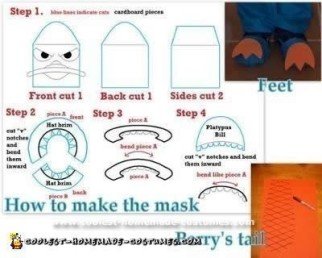
Perry the Platypus’s head is as wide as his body, so make the mask as wide as the person wearing it. Cut the eye holes just in between the eyes and the top of the platypus bill on your face that you dew out. With the cardboard that you drew the face on, there will be 3 more sides that are just as wide as the front. I drew the hat on the cardboard so that the hat will and face will be one solid piece. That way, when you get ready to glue on the hat brim and the bill and eyes, you’ll know where to put them. The side pieces of the mask should be as tall as the front and back pieces that you’ll cut out of the cardboard with a box cutter. BE CAREFUL! I have added a drawing to explain what the pieces you’ll be cutting should look like. Follow the instructions in the order that they appear on the drawings I’ve included at the bottom.
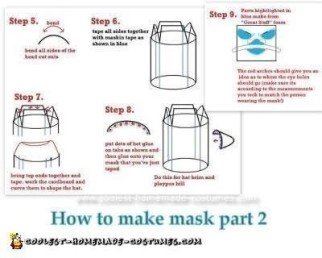
Cutting, Bending, and Taping the mask: When you will bend the cardboard, it is easier to start at one side and start slowly curling the cardboard as if you were rolling it like a newspaper.
Making the Eyes: Once you’ve followed the bending, taping, and gluing of the head pieces, then get your Great Stuff spray and spray 4-5 lumps of foam on a scrap piece of cardboard. It is recommended that you do this outside, or in a place where you can make a mess. This stuff does NOT clean up easily without acetone, so wear gloves and junky clothes. Follow the instructions indicated on the can. The lumps of foam will double in size and take about 2 hours to cure (harden and dry). After the foam has cured, you can carve the pieces of foam into the shape needed for the eyes. I just used scissors to clip off pieces until it looked right. Glue the eye pieces in place with hot glue. Then cut the two pieces for the top and bottom of bill (indicated in picture step 9) and shape as you did the eyes. Glue in the appropriate areas. Get some small scraps of cardboard and form the angry brows for Perry’s eyes. Each should be in the shape of a long triangle. Tape those over the tops of the eyes with the larger end of the triangle being in between the eyes. By now your mask should start having a personality. It should look angry or serious, not scared.
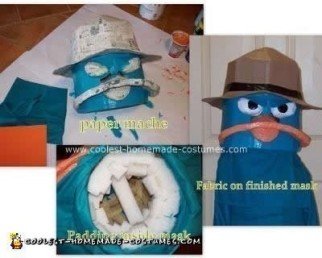
Paper Mache: Once the glue is dry, you can start the paper mache to give the mask an overall hard, durable shell and to fill the cracks and make look uniform. Paper mache is a mixture of flower, warm water, and salt in a large bowl in a consistency that is a little thinner than white gravy. You may need about a medium sized bowl full. Cut strips of newspaper. I just tear it down the page in about 1 or 2 inch wide, long strips. It may take up to 12 pages of shredded newspaper to complete. Completely paper mache by dipping strip in flower mix, and run fingers down strip to get off excess mix. Apply and repeat until the whole thing is covered. Let dry. If it is a nice sunny day, place outside in direct sunlight for speedy drying.
Painting and Padding: Once all is dry and you think no other applications of paper mache are needed, you can paint! Once paint is dry, use the chunks of Styrofoam to make padding on the inside of the head (kinda like a hard hat or a bike helmet). I have included a picture of the padding inside the mask of my costume.
The Top and Bottom/ Fabric: If you choose to use sweats or hospital scrubs, you?re almost done. If you are going to make your own top and bottom, you may want to buy a pattern for the size you will need. I just made made my own pattern from measurements I took and sewed the pants and top. Also, I made a “bootie” type covering out of the material that slips over the front of the shoes and then cut out platypus flippers from the orange craft foam and glued to toes of the shoe slips. I just used a safety pin and pulled the fabric tightly under the shoe and then fastened the material so that it won?t slip off the shoe. It was easy, and though it may get torn up from walking, it will only be used for a short while. You can also just simply cut out the feet from the craft foam and glue on to the bottoms of each pant leg so that it hangs down over the shoes or hot glue a twisty tie to the back of each platypus flipper and then tie the twisty ties on to the shoe laces or Velcro straps of the shoes.
The tail of the platypus is made from craft foam as well. Draw out the beaver like tail, draw criss-cross lines and go over them with a brown sharpie. Cut out the tail and glue or sew to the bottom of the shirt in the back. I sewed mine with the sewing machine. The machine stitched very well over the foam. A zig-zag stitch might hold the best. Depending on if you have one available, you can use a life jacket underneath your platypus top to give it that boxy look that Perry has. That’s what we used, but you might be able to use a pillow and a belt or nothing at all if you prefer.
Lastly, I took some extra fabric and made a drape on the mask that covers the person’s neck by getting two pieces of fabric, hemming the sides that will show, and hot glued the un-hemmed edge to the inside of the mask towards the bottom rim. One piece in the front and the other in the back so that there is a split at the shoulders.
I hope you enjoy making this Perry the Platypus aka Agent P Costume as much as you or your child enjoys wearing it. Being familiar with these techniques, you can make just about make ANYTHING that you can imagine!

Related costumes:
 Coolest Perry the Platypus Costume
  Creative Tim Burton’s 9 the Movie Costume
  65+ Coolest Homemade SpongeBob Costume Ideas
  65+ Coolest Homemade Pokemon Costume Ideas
  Homemade Kids Minion Costumes
  Awesome Homemade Shrek and Donkey Costumes – 9 Years in the Making!
 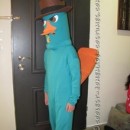 Cool Perry the Platypus Costume
  Coolest Homemade Mrs. Nesbitt/Buzz Lightyear Costume
Hi Texas!
Can you send to me via email full size pics of this awesome Perry Costume? we have the material and ready to go..
don’t want ot paste my email address here – you can find me on face book – send me a message and i will reply with my REAL email would that be ok?
redwolf in AZ
http://facebook.com/karyn.redwolf
or
karyn.redwolf@facebook.com
Could you also send me bigger pictures?
stephaniedperry@yahoo.com
This costume is amazing! My son loves Perry and I was dreading making a costume till I saw this. I am wondering if you could email the larger images of the instructions? rhijorgensen@hotmail.com
This costume is amazing! My son loves Perry! I am wondering if you could email the larger images of the instructions?
hbeeler77@gmail.com
Thank you!
Can you email the full image to dnmramirez@gmail.com
Would you also send it my way? Thanks!
wendy_music1@yahoo.com
I also love the idea for this costume. If you could please send the instructions to roughah@ameritech.net. I would really appreciate it! Thanks so much!
I too would like to have larger images and instructions please. Send to my email. hb_trinh@hotmail.com
Thanks a bunch