Originally I came to this site for inspiration, and inspiration I found! I took the dead frozen head idea and made it my own. My son, who is 4 years old, dresses up every-single-day-of-the-week, so for Halloween he was on board to do something a bit different.
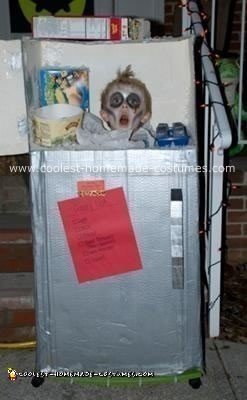
The Homemade Head in Freezer Costume was an instant hit and for almost 2 months it was all he could talk about. I had no idea how I’d go about making it, but armed with a bunch of boxes, rolls of tape, paint, and many more details, I somehow pulled it together just in time for Halloween. In fact, I made it on October 29th and stayed up till early the next morning and then finished it by 3pm on October 30th (which was the night for our mall’s trick-or-treat). In total it took about 15 hours to make.
SUPPLY LIST:
– Boxes (to create the fridge/freezer and handles)
– Silver mirror finish spray paint (for the fridge & freezer handles)
– White paint (for the inside of the fridge)
– Textured spray paint (for the inside of fridge)
– Gray paint (for the entire exterior of the fridge/freezer)
– Silver metallic paint (to give the fridge/freezer a stainless-steel look)
– Faux snow (to glue in place in the freezer to help with the frosted look)
– Lots of clear packaging tape
– Some black tape too (since I ran out of clear)
– Silver tape (used on the freezer door)
– Double sided tape
– An ice cube tray
– Clear beads and aluminum foil to make the fake ice that filled the ice cube trays (made in the oven)
– An empty “Kids Cuisine” box for the freezer decor
– An empty “Turkey Hill Mint Chocolate Chip” ice cream container, where the candy would go.
– Some scrap paper to make the sign “Place Candy Here If You Dare…”
– Markers
– The bottom of a 3-drawer storage system, which we put the box on that so it was easier to move around.
– Some white tissue paper to hide my son’s shoulders/body
– An empty “Lucky Charms” cereal box, the cereal, and spoon
– Glue
– Make-up for my son’s face and fake blood
– Paper and a magnet for the “grocery list” part
– Plastic pull-ties
MAIN ASSEMBLY:
First I had to measure and cut all the pieces for the fridge/freezer. I used a big long box as the main frame, but had to add another box to that to get it to just the right height for my son. Each piece was separate with everything being taped together. It would have been way easier if we found a box that was the perfect size, but we didn’t have one available so we just had to piece each section together.
Cardboard sections:
– Fridge door
– Freezer door
– Sides (2 sides, 4 total pieces)
– Back of fridge/freezer (2 pieces)
– Inside freezer, this used 2 side panels and a thinner front panel (3 pieces total)
– Door handles (2 pieces)
Then I just taped everything together the best I could and adjusted it as I went.
PAINTING IT:
I started with the inside of the freezer. I painted it white as a base, and then, once that was dry, I used the textured spray paint to give it a frozen look. The textured spray paint is the kind that looks like stone. Off-white was the lightest shade available. It took one entire can of textured spray paint to coat the inside of the freezer and the back of the freezer door. I attempted to paint white on top of it, but it didn’t work so I threw that idea out. It may have worked if I had more time for the textured spray paint to dry.
ALL THE DETAILS:
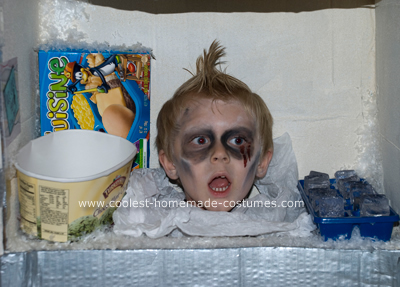
I first arranged the details inside the freezer.
I glued/taped in a “Kids Cuisine” box – which, of course, was empty. I chose that specifically since my son is 4 and thought it would be more appropriate for his age (and kind of add to the humor of it). I glued on some faux snow to help give the top of it a frosted look, as if it had been sitting in there.
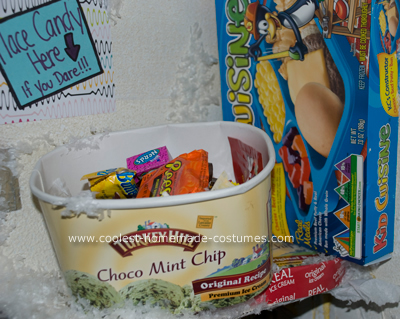
Then I added an empty ice-cream container and glued it in place. I had it leaning forward (sitting back on its lid). Then in case someone wouldn’t know where to put the candy (although I usually told them anyway), I made a little sign next to the empty ice cream container saying “Place Candy Here”, (arrow pointing down), “If You Dare..”. Then I added more faux snow around and even on the ice cream container for the frozen look.
On the opposite side of the freezer I used Velcro to attach the empty ice cube tray since I felt it would hold in better than glue. I then glued more faux snow around and on the empty ice cube tray. I then made faux ice for it – 14 pieces in total. I used clear beads for the ice. To make them was really simple – I just used a wooden block to wrap aluminum foil around to create a mold for the ice. We made the mold 2 times as high as we wanted the ice cubes to be. Then I filled the ice molds with the clear beads and melted them down in the oven. It takes about 55 minutes to make these at 375 degrees. I made them in two batches. After they cooled I just removed the aluminum foil (which got stuck to some areas) and I placed them in the ice cube tray, kind of sitting up and out so they were more noticeable. I could have glued these in place, but I wanted to be able to use them afterwards so I just put them in when we were ready to go.
Next was the tissue paper. I just glued it around the cardboard base in the freezer and when my son popped his head through I just adjusted it so you couldn’t see his shoulders.
Then I took an empty “Lucky Charms” box and glued it on its side on the top of the freezer. After that, I glued individual pieces of cereal on top to make it look like they had spilled out. I cut a piece of cardboard out the width/length of the cereal box opening and glued a bunch of cereal to that part. I then taped it near the opening of the box to make it look like the box was full of cereal that was spilling out. Lastly I glued a spoon to the top for an added cereal touch (and to cover up a spot my husband had messed up!).
Then there was the fridge door grocery list. I’ve seen it done with pictures and ABC magnets, but I wanted to do something different. I made a grocery list on red paper and used a real magnet to attach it. Both the paper and the magnet were attached with double sided tape. The grocery list had everyday items (eggs, milk) and also more sinister items that pertained to the dead head in the freezer (shovel, blood remover).
PUTTING IT ON WHEELS:
We knew this wasn’t going to be easy to walk in, I mean, it’s a big box and a 4 year old! I used the bottom frame of a 3-drawer storage system on wheels and attached the entire fridge/freezer to it. We used those plastic pull-ties to make sure it stayed in place. If we had had more time to make this, we probably would have figured out something better, but this was all we had on hand.
Putting it on wheels made a world of difference, although it was still a little hard to walk on – especially if the road/walk way is uneven or bumpy (like bricks or cobblestone). (We did try adding a board on the bottom for my son to stand on but that did not give him enough support so we had to take it out). Finally my son managed to walk, although slower than the other kids, but that was okay because EVERYONE stopped us to check it out and take pictures.
FACE MAKE-UP:
I used white, black and gray make-up to give my son the dead head look seen in this picture (although it didn’t last long since he was always touching his face!). I used a shimmery white instead of a flat white because I wanted to make him look frosted. I then applied a little fake blood coming out of one side of his eye. I couldn’t put any blood on his neck because he was too ticklish but that would have added to the severed-off head look. The make-up didn’t take long – maybe 10 minutes in total.
THE REACTIONS FROM PEOPLE:
I was shocked at the number of people stopping us to check it out, commenting about how awesome it was, and taking photos. At least 100 people stopped us – it was crazy, but so much fun and such a compliment!! The faux ice was a big hit as well!
Since Halloween is a 2-day thing where we live (mall trick-or-treating on day 1 and real Halloween on day 2), by real Halloween people had already came up with a nickname for my son and his costume: Freezer Boy! They’d stop us and say: “We’ve heard about you. Can I please take a photo?”. My son really was shy on day 1 but by day 2 he was doing his “dead head face” and happily posing for photos for everyone that stopped him.
Almost everyone had a reaction to his costume; it was mainly laughter and “Oh my goodness, check that out!” Sure, a dead head in a freezer isn’t a typical costume for a 4 year old, but we’re not your typical parents either.
FINAL THOUGHTS ON THIS COSTUME:
We were extremely flattered with all the attention that his 2009 Halloween costume received! Now I just have to top it next year and create something even cooler (no pun intended).
Next Halloween I’ll give myself more time to make a costume. I wanted to start building the costume two months prior to Halloween, but work got in the way. I’m happy with how it turned out and I can only imagine what I could have come up with if given more time. If you plan to make this costume I’d suggest giving yourself plenty of time. It may look like one big box and seem easy, but, if you really want to make it unique and different from other Head in Freezer costumes, then you need to put originality and thought into it – which takes at least 15 hours of work.
I hope we can inspire other people for next year’s Halloween, and Halloween’s to come! It was a blast this year, and all the hard work and lack of sleep was totally worth it!

Related costumes:
 Coolest Scary Fridge Costume
 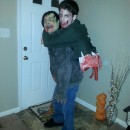 750+ Horrifyingly DIY Spooky, Gory, Dark and Scary Halloween Costumes
  Coolest Homemade Head in a Freezer Halloween Costume
 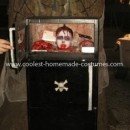 Coolest Frozen Head in Refrigerator Costume
  Original Homemade Head in Freezer Costume
  Homemade Head in the Freezer (Running Fridge!) Costume
  140+ Mesmerizing Headless Scary Halloween Costume Ideas
  Coolest Freezer Head Homemade Costume
Your comment has been sent successfully.