We love making our Halloween costumes. We got many compliments this year and were able to participate in a parade this Halloween Sunday. Many people kept asking us “How did you make this?” Please see the answers below.
Jessie:
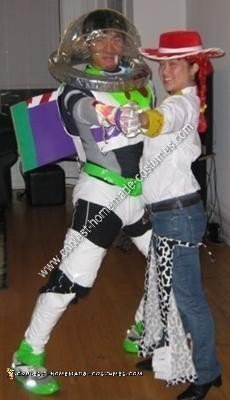
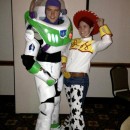
For the Jessie the Cowgirl costume, we bought a white blouse, yellow felt and cow pattern cloth. We cut the cloth and then sewed it onto the shirt to make the cuffs and the front of Jessie’s shirt. Next, we took a red marker and made Jessie’s loopy design. For her buttons, we took two pieces of white, cardboard paper and cut them into circles. Then we covered the edges in silver duct tape. We used double-sided tape to stick the buttons onto Jessie’s shirt. We also bought a red, double-braided wig, but tied the braids together to simulate Jessie’s hair. For the cow pattern pants, we cut the cow pattern cloth the same length of the jeans. We attached frills on the bottom of the cloth and added a buckle behind each thigh to secure the cow cloth.
Buzz Lightyear:
Buzz was a bit of a challenge. For the helmet, we took a foam hoop and wrapped it in silver duct tape. Then, we used a wire hanger and formed in into a hoop that went over the foam hoop. We took 4 more hangers and made them each semi-circles. Two semi-circle connected with the initial hoop at two, opposite points. Also, we bent the semi-circles to make 90-degree angles and cut out the foam underneath. This allowed us collapse all the wires at the back of the helmet as well as pull one piece 180 degrees in order to trigger the other semi-circle to move up to a 90 degree angle. Next, we used packing tape to make the transparency of the helmet. Between the collapsible hangers, we taped the other two semi circles to help keep the helmet shape. Lastly, we added a key chain ring at the chin area and a clip in the helmet in order for the helmet to lock on when closed. We secured the original hoop by wrapping more silver duct tape over the wire hoop and foam hoop.
For the chest, we took a Spartan chest guard, cut it in half horizontally and then hot glue gunned it with white poster paper. At the shoulders, we installed two small hinges and secured them with glue and green duct tape. This allowed the chest guard to open and close. The design of the chest guard is primarily done with green, red, white and blue duct tape. Lastly, we added two key chain rings and a clip on each side of the chest guard in order to “lock” it after someone puts it on.
For the wings, we took a green, cardboard, science fair board and cut it into 4 pieces of equal length and width. We glue gunned two pieces to each other to make two wings that were green on both sides. Then, we laid purple duct tape down horizontally across the wings to simulate Buzz’s green and purple wings. Next, we cut both wings about ¾ the length of the original length, but left a circle in the top, middle of each wing. We then inserted a 2” diameter plastic plumbing pipe between the circles we had cut in the wings and inserted the remainder of the pipe into the back of the chest guard. We used duct tape and a metal anchor to secure the pipe to the back of the chest guard. Now the wings were attached to the back and were in the down position. To raise the wings, we took plastic tubing and attached it along the top edge of both wings, behind buzz’s neck and at both shoulders. We inserted rope through the tubing and tied a knot at the ends. The ropes crisscrossed in order to provide more tension when pulled. For instance, the rope coming out of buzz’s left shoulder raises his right wing and vice versa. We covered the tubing in red and white duct tape as well as green duct tape at the shoulders. Lastly, we attached the ends of the ropes to clear, shower rings and added white, adhesive, wall hangers at the bottom of the chest guard, but we turned them upside down. This allowed us to pull the strings down, lock them into place and keep the wings up when we wanted to.
The belt was made with green duct tape and a tap light was built into the middle of it. The leggings were actually red wonder woman leggings that we covered with white and green duct tape. The shoes were simply wrapped in a green border. As for the gloves, these gloves were white gloves from a previous costume, but now with green and purple duct tape. We attached a red flare light to the right glove to simulate Buzz’s laser.
We chose to wear a long sleeve, grey thermal, and black/grey under armor over that to replicate buzz’s arms.
The pants are simply black gym pants with white boxer briefs and white duct tape around the thighs.
For more footage, please see our recently posted video:


Related costumes:
 Awesome Buzz Lightyear and Jessie Homemade Halloween Costume
  Coolest Girl Couple Buzz Lightyear and Woody Costumes
 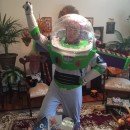 Coolest DIY Buzz Lightyear Costume
 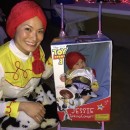 Cool Mom and Baby Costume: Toy Story Jessie Doll in Box Costume
 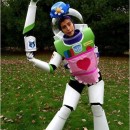 Coolest Homemade Mrs. Nesbitt/Buzz Lightyear Costume
 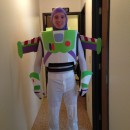 Best Buzz Lightyear Costume Ever!
 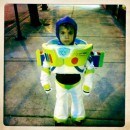 Cool Toddler DIY Halloween Costume: Buzz Lightyear Costume Like No Other Buzz!
 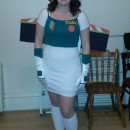 Cool DIY Female Buzz Lightyear Costume
Very cute costume! The work on the Buzz especially is really nice.
How cute! This is such a creative idea and you guys did a great job with it!
Lots of time and care must have gone into the costume, but the finished product is absolutely amazing – you should be very proud of your work. Undoubtedly blows away the costumes the Buzz and Jessie costumes that people bought from stores.
Badass wing work. Awesome job!
Hey it’s Buzz and Woody!
Really great costumes!
John – you are a rockstar. I don’t know how you do it, but these costumes are awesome, as always! Can’t wait to see what you do next year!
John – your costumes always blow everyone away!
I love these costumes! So creative!
A week or so ago, I watched AND listened to the Video, and there was an awesome song that went along with the video… due to releasing the rights of the song (I guess), You Tube has blocked the music and you can no longer listen to the music… =( I am so BUMMED! My hubby & I got our costumes for Buzz & Jessie all together and wanted to practice a dance to the song that was in this video of the coolest Buzz Lightyear & Jessie the Cowgirl Halloween Costume 30, but I did not know the name of the song(it is very popular right now; I should know it), and/or also the artist… CAN YOU PLEASE HELP & provide me with that??.. we can go from there. THANK YOU, THANK YOU, THANK YOU!! And, HAPPY HALLOWEEN, my favorite holiday! =)