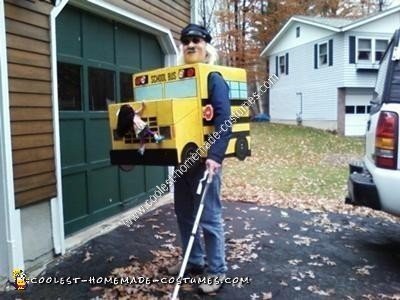
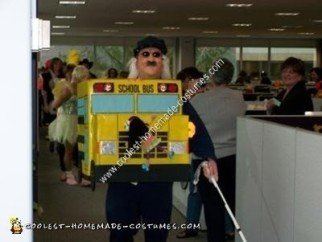
The idea of a Blind School Bus Driver Halloween Costume didn’t strike me until two weeks before Halloween, and as is the case with any rushed project, hindsight is always 20/20 (ooh, nice pun!).
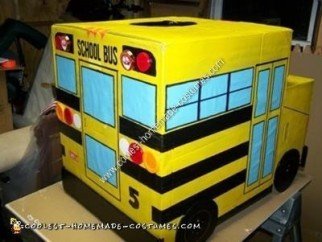
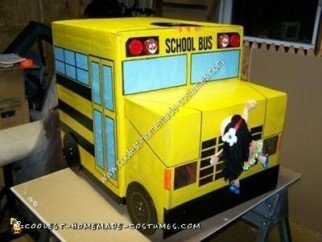
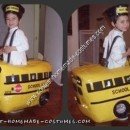
Body: The bus body is two cardboard boxes – the smaller box (engine compartment) is essentially the size of a box of printer paper; the larger would generally be the size a television would be packaged in. In my case, these were the shipping boxes of a Dell computer. I outlined the smaller box on the side of the larger about an inch from the larger’s bottom edge, cut 4” slots in the outline and cut the top edges of the smaller box into corresponding 4” tabs, with tab depths measured equally for a flush fit. Once the boxes were attached by working the tabs into the slots, I folded each tab over on the inside of the large box and taped them all down with threaded packing tape. Now comes the spray paint – two cans of grey primer and two cans of yellow to cover it all.
Bumpers and Wheels: The bumpers and wheels were cut next from additional cardboard and painted black. I covered the cut edges of all six pieces with black electrical tape so the corrugation of the cardboard could not be seen. Bumpers were affixed with an overhang of an inch below the boxes’ bottom edges, by pushing brass clasp fasteners (round-headed like a nail / spread them open once they’re through) through the bumpers and boxes. I taped over the fasteners on the inside of the box just as I had done with the engine compartment tabs. The heads of the fasteners were painted black to blend with the bumpers.
Wheel size is dictated by the size of the side of the engine compartment – here it turned out to be about a 7.5” diameter, which matched nicely to the Tupperware lid that I used for tracing to cut them out. Wheel rim edges were drawn using a compass and then traced with a gold paint pen; lug nuts were free-handed in the same gold. Affixing the wheels would be the very last step of the project – I feared they would not be sturdy enough to support the weight of the bus while I was leaning all over it during the rest of construction.
Black markings: School bus markings vary in specific details. Generally, you need to keep in mind that windshield and window height is horizontally continuous all around, and the black body side stripes need to wrap around the back corners of the bus. The size of the rear brake and directional lights will dictate the spacing needed between the upper two black stripes.
When marking the lines for stripe painting, measure down equally from the roof edge. Once measured, the stripes were marked off with painters’ masking tape to ensure clean lines when painting. All black markings were done with a small can of black latex paint and a brush. The black background for the signal lights at the top corners of the front and back was measured out, drawn, and painted. Be sure to allow adequate space for the “school bus” lettering. The backdoor was drawn out with a black marker and a straightedge ruler, as were the front grill, the side door, and the body lines on the engine compartment.
Lights: The red and orange taillights, as well as the red upper signal lights, are the cut-off bottoms of Solo plastic drinking cups (red ones you can find year-round; orange ones only come around during Halloween). They are affixed with round, sticky-sided Velcro tabs. The orange upper signal lights (with white jack-o-lantern faces on them) actually blink, and are really four trick-or-treating necklaces to be worn so the kids will be seen when they’re out and about. I simply cut the cords off and attached the blinking pendants to the bus with the same Velcro fasteners I used on the other lights. This allowed me to quickly and easily detach them, press the On button on the back of each (to make them blink) and reattach them. The white back-up lights are just paper circles glued to the box. The headlights are rectangular pieces of thin cardboard wrapped in tin foil (shiny side out) and glued to the front. The orange directional lights next to the headlights are blank address labels colored with an orange marker.
Windows: Blue file folders, cut to size, glued to the box, and trimmed in black with a marker.
That Poor Little Girl: I figured out the angle I wanted her on the grill, then used a nail to punch a hole on each side of where the ankles, wrists, and neck would lie, and fastened her by looping plastic zip ties through the holes and around each extremity. This presented another challenge, as I had forgotten that the engine compartment was completely enclosed (the open side of the smaller box is against the side of the larger). I cut a trapezoid-shaped hole on the inside of the large box in order to gain two-handed access to secure the zip ties behind the grill. The added bonus of this necessary additional cut-out was that it essentially created a glove compartment inside the costume, great for carrying whatever (generally, your friends’ stuff – purses, wallets, etc. – believe me, your friends will find you both hilarious AND handy!).
“School Bus” Lettering: I managed to find narrow 2” high vinyl letters, but they were block-style (each black letter was printed on a white square), so I had to die-cut each letter with an Exacto knife before applying them. To ensure the letters would be straight and centered between the front and rear sets of signal lights, I marked off the bottom edge of the lettering location with painters’ masking tape, and applied the letters outward from the center point between the signal lights.
Stop Sign: A small cardboard octagon, wrapped in reflective red tape. The letters came out small even though they were the largest font available – they’re printed on white address labels, and I colored the background red and stuck them on the sign. I used Liquid Paper (White-Out) to draw the white octagonal border. I attached the sign with a 1” hinge and miniature bolts/nuts/washers, so it would swing out and back like the real thing.
Arm and Head Access Holes: Arm cut-out is roughly 7” wide, 8” high, 2” from the top and 3” back from the front. Head cut-out is 7” wide, 13” long (front to back), 3” in from the side and 3” in from the front. I covered the cut edges of both holes with black electrical tape to clean up the look. Both holes are cut with rounded corners, but for the arm hole, only at the top – the bottom edge was cut along a straight line on top of a black side stripe. When I was cutting the head access, I quickly found that I was cutting through two layers of somewhat unsecured cardboard (the bus roof was originally the bottom of the large Dell box; the second layer I was hitting was the bottom inner flaps). After I finished cutting the hole, I used threaded packing tape to tape down any loose flaps and seams in the interior of the bus, giving it a little more integrity, which probably helped after I realized that the roof edge that separated the two cut-outs could also be used as a handle when carrying or moving the bus. When lowering the bus over your head, you’ll need to put your arm straight up through the arm hole first; it’s impossible to put your head through first and then your arm.
The Final Details: I fashioned a vanity license plate on the back (“CANT C U”) out of an address label at the very last minute; a better job could have been done. Wheels were attached with the same brass clasp fasteners that I used for attaching the bumpers, with one fastener at the center hub and one at the highest lug nut. A huge missing detail (ran out of time) would have been a drawing of a screaming kid in one of the back windows, pounding on the glass to be let out.
The Driver: The bus driver hat and the white half-wig are holdovers from previous Halloweens, as were the two old man masks I used (different parties). I borrowed the blue jacket from my brother, and the shades were one of many old pairs of mine (and they were just right). The walking stick is an old downhill ski pole that was missing its basket; I covered the Rossignol logos with (what else?) black electrical tape.
Materials / Cost / Labor: Two cardboard boxes, extra cardboard, spray paint (grey primer and yellow), small can of black latex paint, sponge brushes, markers (black, red, orange, yellow), Solo plastic drinking cups (red and orange), red reflective tape, black electrical tape, blue file folders, blinking necklaces (not necessary, but a nice added touch), vinyl lettering, clear plastic zip ties, clear (Gorilla) glue, small hinge and hardware, Liquid Paper, address labels, tin foil, brass clasp fasteners, threaded packing tape, and one victim…uh, I mean, one little girl doll. I dropped somewhere in the neighborhood of $70 for the materials that I didn’t already have, and I’d guesstimate that I spent a good 24 hours total out in my storage shed where I was building it (though I tend to take my time to get the details just right, and there’s a working stereo and fridge out there, too).
Over the past 8-10 years, I’ve come up with some really good, every now-and-then prize-winning costumes; this Homemade Blind School Bus Driver Halloween Costume is the first one that I actually had to construct. It was a fun learning experience, and I wish I’d thought of it sooner so I would’ve had a little more time to get everything just right. Just the same, it got a lot of attention, and it was the grand-prize winner at this year’s office Halloween parade (around 200 voters on my floor of the building). Now the problem: the original cardboard boxes were just taking up space in my shed and were going to be destroyed – now I’ve got a bus to store in there instead!

Related costumes:
 Coolest Homemade Yellow School Bus Halloween Costume
  Coolest Small Block Chevy V8 Engine Costume!
  Coolest Homemade Bus Stop Halloween Costume
  Coolest Drag Boat Racing Costume
 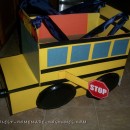 Adorable Homemade Toddler School Bus Costume
  Coolest Homemade Car Engine Costume
  Coolest Homemade School Bus Costume
  Awesome Backhoe Loader Preschool Halloween Costume
Your comment has been sent successfully.