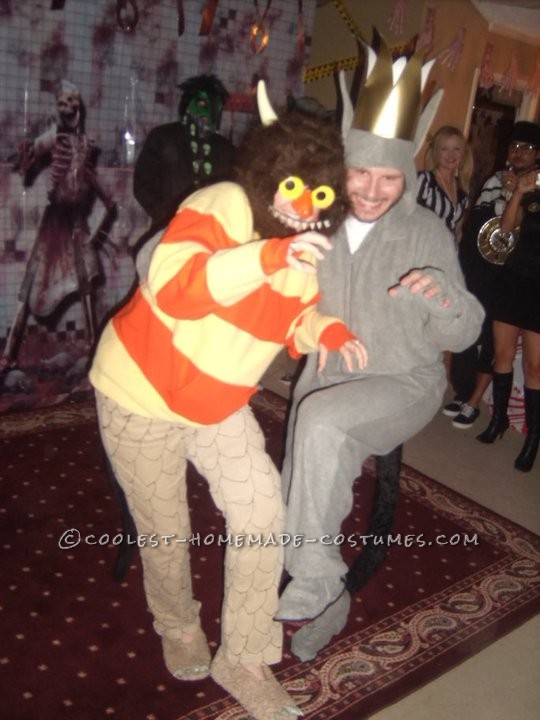
As with all of my Halloween costumes, I came up with the Where the Wild Things Are idea less than a week before and was working on it up until we walked out of the door. We just purchased the Max onesie for my husband, but I (of course) had to make Carol by hand. I took my inspiration from the Carol Bobble Head, and it turned out to be one of the hardest costumes I’ve ever made, but was totally worth it. Everyone loved it – especially my glow-in-the-dark eyes, horns, toenails, and teeth, which looked great in the black lights!
My typical plan of attach for costumes is to find pre-made clothing and then alter it to my taste, and 2010 was no different. I purchased an orange hoodie online (thank God for Amazon Prime!), and went shopping for the perfect color pants at TJ Maxx, Ross, and Marshalls. While I was searching for the pants, I happened upon a great pair of fuzzy, nude colored slippers so I snagged them up as well. I went to my local craft store and bought some sticky Velcro, some orange, brown, yellow, and glow-in-the-dark puff paint, and some glow-in-the-dark stars like I had on the ceiling of my room when I was a kid. I had to go to several material stores before I found the right colored fur material for Carol’s head, but thankfully I found it in time – I snatched that up as well as some yellow fleece. Finally, I made it to the Halloween Store and bought a rubber spike neck band (think: Punk Rocker), a Viking helmet, some round Hippie sunglasses, and one of those plastic glasses with the fake nose and eyebrows.
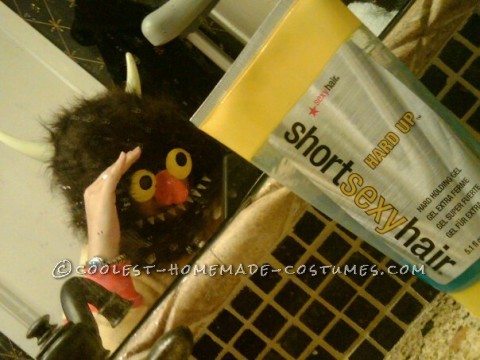
I started by cutting the nose off the plastic glasses, pitching those glasses, and adding the nose to the hippie sunglasses using hot glue. Then I proceeded to put multiple layers of orange puff paint all over the nose, building it up and shaping it how I wanted. Next, I added yellow puff paint to the sunglasses themselves, covering everything but two eye holes, and I put a few layers of glow-in-the-dark puff paint on top of the yellow to finish it off, which dries clear. TIP: I traced a coin on blue painters tape, cut them out, and put those blue circles on the glasses so that the pupils were placed in a natural position, and were perfectly round and rather than painting them by hand.
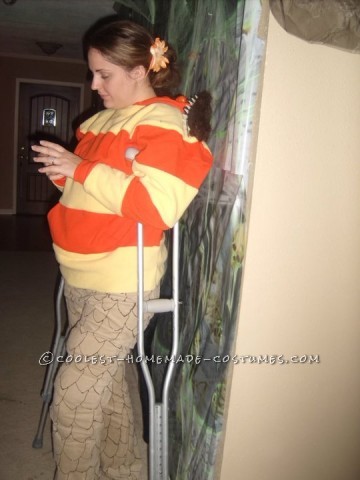
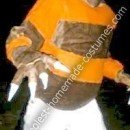
Since I was still waiting for my orange hoodie to come in, I decided the next thing to do was to fix up my pants, which required me to simply added scale-like lines with brown puff paint all over the tan corduroys I ended up with. It took a while, but turned out well. I also started working on Carol’s feet. I took the punk rock necklace thing and cut the rubber spikes off of it so I could begin making his fierce looking claws. I filled them with hot glue, bent them over a bit so they would be curled instead of just straight, and held them until they hardened in that shape. This was fairly tedious and harder than I expected, but again, worth it in the end. :) I painted them with a couple of coats of the glow-in-the-dark puff paint too, and then hand sewed them onto the slippers. Voila! The bottom half was complete!
While I had the glow-in-the-dark puff paint out, I decided to get my horns ready. I cut them off of the Viking Helmet and splayed the base of each horn by cutting 5 slits about 1/2″ apart and bending them at a 90 degree angle outwards so that the horn could almost stand on its own. (This will hopefully make more sense to you later). I painted several coats of the puff paint on them. Now I just needed that orange hoodie to come in so I could add them to it.
When the sweatshirt finally arrived the first thing to do was decide what the height of the yellow stripes should be. Since I wanted to be able to utilize the hand pouch in the front, that was the determining factor and was the height I used for my stripes. I cut them out of the yellow fleece, sewed a hem, and then sewed each of them onto the sweater. It was a little tricky to line up the stripes on my arms, but I know that the devil is in the details, so I had to take the sweatshirt on/off several times before I got it all lined up just right. I also cut thumb holes so the sweatshirt would extend as far down as possible on my hands.
By the way, did I mention that the reason I got the hoodie was so that it would be easy to add fur to the hood rather than having to make some sort of mask? Well. That’s why. I began working on the hood and decided not to pre-cut any of the fur’s head shape. Instead, I found the middle of my fur material, and simply sewed it around the back of the hood at the base/neck. The next step was to decided where I wanted the horns to come out. I cut an X in the fur fabric pushed my horns through. Remember how I cut tabs at the base of the horns and bent them out? It’s so the horns wouldn’t pop through the fur when I pushed them into place. Now all I had to do was hot glue them to the fur, and Carol was really taking shape! My favorite thing about making costumes is watching them come together… I always surprise myself and take joy admiring each little accomplishment. The horns were definitely one of those giddy moments for me.
To finish the hood, I brought the fur up and over my forehead so it would match up perfectly with the top of my sunglasses. Then I added 2 little pieces of Velcro to the inside of my sunglasses (one on each eye) and and a third piece of Velcro to the top of the outside of the nose and sewed their mates to the matching places on the fur (2 on the outside of the fur for each eye, and the one for the nose was reverse and sewn on the inside of the fur). This kept the hood in its proper place all night, but allowed me to remove everything if I got too hot (which, being in Houston was inevitable)! Since I hadn’t sewn the fur to anything except the back of my neck, I went ahead and sewed the top half of the fur to my hood, and then pulled some fur around to the front of my neck. I made sort of “tabs” that flapped open at my neck, and I connected them using Velcro, which kept the fur in place around the front of my neck. Then I just sewed the fur to the sides of the hood and cut off all the extra fur. I didn’t worry about hemming the fur material b/c it’s length covers mistakes so well.
Finally for my teeth! I cut a common hanger to the appropriate size and cut the 5 points off of several of the glow-in-the-dark stars and simply hot-glued them in place. I made a loop on one end of the hanger and sewed it to the inside of my fur hood on the left. For the other side I put a huge glob of hot glue onto the end of the wire hanger and let it cool. Then I pulled it off the end of the wire, which created a perfect male/female sort of snap, which I then safety pinned to the inside of the fur on the right size of the hood and crossed my fingers it wouldn’t break or fall off. Actually – I didn’t just cross my fingers – I made a second little ball of hot glue and kept it in my pocket all night, and was glad I did because I ended up having to use it again! Creating this hot-glue “snap” allowed me to unsnap one side of my teeth so it could just dangle while I snacked and drank my tasty beverages.
Thanks for this awesome site – I love it!!

Related costumes:
 Coolest Homemade Carol Costume from Where the Wild Things Are
 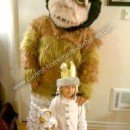 Coolest Homemade Max and Carol Costumes
  Toddlers Getting Wild Halloween Costumes
  Cool Rocket Raccoon Costume From Gaurdians of the Galaxy
  Coolest Homemade Costume Idea: Diary of a Wimpy Kid Costume
  The Wicked Crew: The Dark Side of Oz Family Costume
 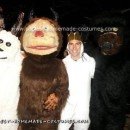 Coolest Where the Wild Things Are Group Costume
  Coolest Max from Where The Wild Things Are Costume
Your comment has been sent successfully.