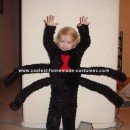
I made a total of 14 costumes this year, all within the insect theme. This is one of them.
Black Widow Spider Costume:
Materials Needed –
* Body
* 1 Can Spray Foam Insulation
* Black Felt or Black Fabric
* Red Felt or Red Fabric
* Spray Adhesive
* Zip Ties
* 2 pieces of Heavy Cardboard or Corrugated Plastic
* Black Spray Paint
* Velcro Strips or Old Backpack Straps
* Old Newspapers
* Legs: 3′ Plastic Hose
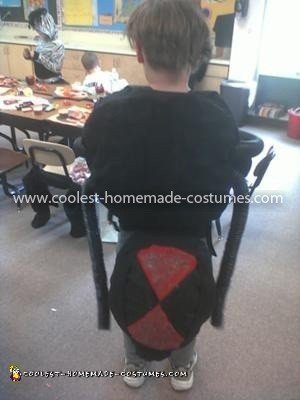
Start with the legs of the costume first. Measure the arm span of the costume wearer. This will be the length of the spider legs.
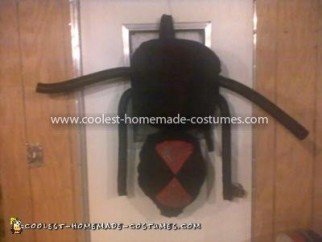
Cut the hose to the appropriate length. At this point, you may choose to cover the hose with black felt. Position the hose about two inches apart, then attach to one piece of the heavy cardboard with zip ties. Be sure to keep the ‘knobs’ of the zip ties on the side with the hose and not on the side that will be rubbing on the wearer’s back.
If you choose to paint the hose, paint it once you have attached it to the cardboard. Don’t worry about the extra cardboard. This will be cut away later. For the body parts, take the cardboard with the legs attached and draw a circle shape about the width of the costume wearer’s back, and from about the shoulders to mid-back.
If you choose to use the back-pack strap method, attach the backpack straps to the side that will be facing the wearer’s back, being careful to place the ‘knobs’ on the side away from the wearer’s back, and within the circle you drew. You may choose to draw the circle on the side facing the wearer’s back to position the straps correctly.
Once you have positioned the straps, crumple up some of the newspapers and place in the area on the cardboard over the legs, and slightly smaller than the circle you drew, bounded up a bit to form a bit of a ‘dome’ shape.
Take the can of spray foam and spray a line along the outside circle, continuing in circular pattern until the newspapers are covered as well. Don’t worry about staying on the lines you drew. This can be fixed later. Set aside.
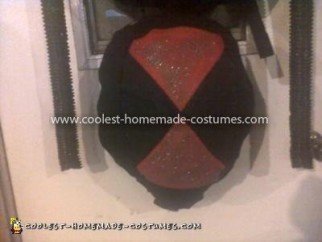
Take the second sheet of cardboard, and draw a longer oval shape. This will be the ‘butt’ of the spider.
Repeat the process with the newspapers and the spray foam, and set aside to dry (cure). The drying process can take anywhere from 12 hours to 2 days, depending how much foam was used for the pieces.
Once the pieces have dried (cured), they can be sanded down and shaped. When you have sanded them to the shape you want them, cut off any excess cardboard away from the pieces, with none sticking out past the foam. Using the spray adhesive, attach either the black felt of black material to each piece.
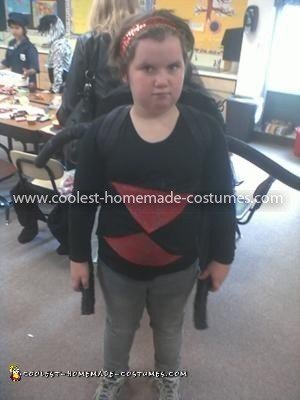
Cut two triangle out of the red felt or red material and attach to the ‘butt’ of the spider.
Black pants and a black shirt will go underneath the completed spider costume.
*****NOTE*****
If this Black Widow Spider Costume is being made for a child, Velcro strips may be attached to the child’s clothing, and the costume become easily removed without removing all their clothes.
The Velcro strips should be placed on the back of the child’s shirt along the top and bottom part of the leg piece. Another strip of Velcro may be placed along the waistband of the child’s pants, along the top of the ‘butt’ piece. This will keep the costume from getting ripped apart when the child sits down. Instead, the ‘butt’ will just pop off.
If this Black Widow Spider Costume is being made for an adult, the pieces may be zip-tied together before the foam is added to the cardboard, and may be cut to curve the ‘backside’ of the adult, OR the ‘butt’ piece may be attached with Velcro, dependent on the weight of the piece.

Related costumes:
 Coolest DIY Spider Costumes and Many Adult and Kid Halloween Costumes
  Coolest Spider Girl Costume for Girls
  Coolest Homemade Black Widow Spider Costume
  Beautiful Spider Queen’s Coronation Day Costume
  Coolest Man Spider Costume
  Coolest Homemade Spider Costume
  50+ Coolest Homemade Scarecrow Costume Ideas
  Coolest Homemade Treehouse Costume
Your comment has been sent successfully.