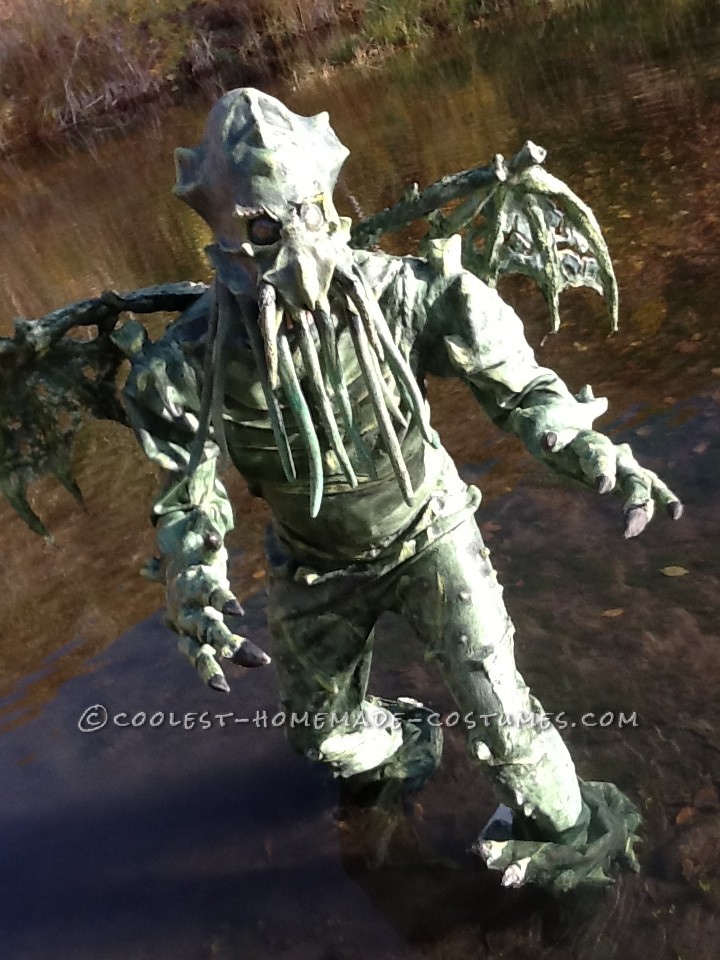
In searching for an idea for a costume to make this year, my brainstorming led me to H.P. Lovecraft, and naturally my mind immediately thought of Cthulhu. Now there was great potential for a unique and challenging costume. In H.P. Lovecraft’s stories, Cthulhu is described as vaguely humanoid, with wings and scales, and writhing tentacles on his face. Having such a vague description to work off of meant I could make my own design. I did a lot of researching to figure out what would be the best way to make the costume. I eventually decided that sculpting the body in clay, and making plaster molds for casting latex pieces would be the best way to go.
I began by making body forms for sculpting. Considering the size and weight of the body that would have to be made, I created separate pieces for the torso, head, legs, feet, and arms. I molded my body shapes on my own body with plaster strips. This was a quick way to build structures that would be strong, and also be hollow on the inside. I slathered Vaseline on my torso and put plaster strips on the front half to mold it. I couldn’t really reach the back half of my torso, so I put the front half onto a duct-tape mannequin, then covered the back with plaster strips. After it was dry, I cut the sides to remove the mold, and then sealed the cuts to make it one whole piece. Then finishing by reinforcing with more plaster strips, and also joint compound. I repeated this process for my arms, legs, and also my feet. I would have stilts on my feet, so I molded my feet while wearing the stilts to preserve that shape.
For sculpting, I used air-dry clay, so that I could have a large amount for a conservative cost. I bought some WED clay from a local supplier, but also used pottery clay for later pieces. Among other things, Cthulhu is often portrayed as having something of a gut. Indeed, the original text describes him (or at least a statue of him) as “somewhat corpulent”. I started there, making a good prominent belly. Then moved onto the upper part of the chest, where I randomly decided to add gill structures. Then added some ridges onto the neck and shoulders. This was how I would sculpt most of this designs; nothing specifically set in mind. I did look at some drawings of Cthulhu for inspiration, but did want to go more my own way, so I just made it up as I went along. Especially with my relatively short schedule to stay on, I had to work fast. I added texture onto the sculpt with a rag, making wrinkles and bumpy skin. And then a final spray of Crystal Clear to seal the sculpt, ready for molding.
I wanted to make the molding process as easy as possible for these pieces, so I wanted to think more out-of-the-box to save some time and money. For something this shape, I was able to make a one-piece mold. I brushed on the initial beauty coat, then built up more thickness, and also added pieces of a cut-up cloth canvas to give it more strength. A few hours later, ready for de-molding. The plaster body form came out easily, but the clay, not so much. It took me several hours to empty all the clay out of the mold. I used my fingers, a toothbrush, a rag, a scratch pad, a knife, wooden spoons, a paintbrush, a garden hose, sculpting tools, a towel, and a toilet brush. A lot of work, but would give me good ideas for future molds. Every piece I molded would present its own unique challenges.
I built the head up as a large bulk with tentacles at the front. The tentacles would be sculpted and molded separately. To ensure that I could see out of the costume, I positioned the eyes similar to my own. The sculpt was so large that face covered all of my own head, meaning I didn’t have to sculpt anything beneath the chin, leaving a large hole on the underside, good for air circulation and breathing. I was glad when I saw the face design coming together. It kind of looks like a mix of Davy Jones, Predator, and the Creature from the Black Lagoon. To save time on molding, I experimented by making a plaster bandage shell of the back half of the sculpt. My idea was to then fill that shell with plaster, and lay the sculpt into it, to fill up the back half with a smooth dividing line for one half of a 2-part mold. But it didn’t really work, just made a big mess. So I made the whole thing a one-piece mold while I was at it. Being a one-piece mold, this meant I would have to go through an intense process for emptying the mold, chipping away the Styrofoam head with scissors. I eventually got it all cleaned out.
More sculpting on the legs, more random designing. I kind of got bored with the legs after a while, and just got to a point where I said “eh, that’s good enough” and for the sake of saving time, decided I was done. For the legs, I took the time to make a dividing wall, ready for a 2-piece mold. And for easier release of the clay, I added some Vaseline and baby powder onto the sculpt. I covered the first half in plaster. Flipped it over and sculpted the back side. Lubed up the edges of the plaster walls with Vaseline for a release, and I was ready to go. Molded the back side. Then prying the two halves apart. Or not. The plaster I put on the back side dripped over the front side, drying hard and “locking” the two halves together. So I was stuck with a one piece mold. But de-molding wasn’t too bad; with the Vaseline and baby powder, the clay came out fairly easily this time.
Then the feet. More clay layered on, and more random designing. The molding was fairly simple for the feet; they didn’t need to be 2-part molds as there were big open holes on either end. The shins were covered with cloth canvas pieces for thin but strong walls. Cleaning the clay from inside was also easier. For stilts, I used a piece of wood for the main foot piece, and the rest was built up with foam boards and PVC pipe. I nailed some old shoes onto the wood, and lots of hot glue for reinforcement. I also added some foam pads onto the bottom. They look very cheap, but they do support my weight.
Onto the arms. More clay, more sculpting. To simplify, I decided that I would sculpt and mold the fingers separately. Since the arm only had one open hole on the shoulder end, a 2-part mold was required. I was finally going to make a successful 2-piece mold. I built the dividing wall, and laid the plaster. Added some cloth pieces to reinforce and thicken the edges of the mold. So far so good. Onto the other side. I added a clay retaining wall to keep the plaster inside the edges. Then came the separation; prying the mold halves apart by wedging in screwdrivers. The molds came apart, but not without problems; one of the halves had cracked pieces that fell out. I had to glue some pieces back together, and add extra plaster to reinforce. The molds didn’t fit together too well either, as they were slightly bent from the prying. I added some clay around the edges of the seam to help them seal together.
For the tentacles, I sculpted 3 difference designs and made 2-part molds. It was much easier to make dividing walls and 2-part molds for the smaller objects. The fingers were also made with the same process; sculpted 3 designs, and made 2-part molds. For the wings, I decided to sculpt only one wing (to simplify and use less plaster), and do it in halves; I sculpted half of the design on a foam board, and molded it. Then flipped it over, removing the foam board, and sculpting up to the plaster edge line to build up the other half. Then I molded that side to finish with a 2-part mold.
The latex casting was a fairly simple process. Brushing latex inside the larger molds, building up multiple layers to a good thickness. I colored the latex green for a good base color. Smaller molds, such as the tentacles and fingers, were filled with latex and then drained, leaving a build-up of latex on the walls. The wings were a bit different; I built up about 6 or 7 layers on each side, then put some fresh latex in, and joined the halves together. After it dried, I was able pull out a whole wing. After pulling the latex pieces out, I’d wash them and scrub them clean. For pieces cast from 2-part molds, there was extra flashing around the edge that I’d buff off with a rotary tool with a soft polishing bit.
To connect the body pieces together, I used hot glue for the initial bond, and then sealed the edges with latex. For the most part, the seams look pretty smooth. To keep the wings stiff, I added a wire from a coat hanger down the length of it, and had a piece of PVC pipe at the end with elbow pieces on the ends leaving two open sockets. This made the wings easy to add and remove; just slip them into holes in the suit, attach the sockets together, and zip up the back. For the fingers, I made a mechanism out of foam board and duct tape to connect the tips of the costume fingers to my fingers, so that when I bent my fingers, the costume fingers would also bend. Also added for subtle details were pieces of crayfish body parts. They were added on prominent places, like the eye ridges, the bases of a few tentacles, wing tips, and fingers.
Most of the suit was painted with dark green washes. I’d paint on a thick layer, then get it wet, and wipe most of the paint off with a paper towel, leaving paint in all the small details. I also built up highlights and shadows with lighter and darker shades of green. I made eyes using clear plastic pieces from the packaging of a cheap dollar-store yo-yo. I kept the pupils clear (so I could see out of them), and then super-glued them on. After the painting was done, I sealed the costume with clear Plasti Dip spray.
Putting on the suit was simple; stepping into the legs, and pull the waist up, slip the arms into the sleeves, have another person zip up the zipper and put on the wings and head. I went to a few local events. It was a scary costume apparently; several small children ran away from me. Ultimately I had an end product that was, honestly, not quite as high quality as I had hoped, but I did learn a lot and it may encourage me to do better work in the future. As a full body latex suit made in 4 weeks, for a little over $300, Cthulhu was awakened.
Video:

Related costumes:
 Homemade Jesus Riding a Raptor Illusion Costume
  Creative Tim Burton’s 9 the Movie Costume
  Coolest Homemade Captain Rex Costume for 10-Year-Old
  Coolest Homemade Gremlin Couple Costume
  Amazing Hollywood Quality Sci-Fi Armor – All Homemade!
  Homemade Teen Wolf Costume
  Coolest Homemade Amy the Vampire from Fright Night Costume
  Crazy Baby Octopus Costume With Moving Tentacles
What a costume! Your work is gorgeous, and my gosh, what a process! I’d love to see it up close and/or see pictures of the work in progress. Do you have this costume posted elsewhere, like on DeviantART or Instructables?
What a costume! Your work is gorgeous, and my gosh, what a process! I’d love to see it up close and/or see pictures of the work in progress. Do you have this costume posted elsewhere, like on DeviantART or Instructables?